What's new
Pinball info

Register a free account today to become a member! Once signed in, you'll be able to participate on this site by adding your own topics and posts, as well as connect with other members through your own private inbox!

Sanctum repair for dummies (i.e. me)

Carl Spiby

Registered
10 Years
Joined
Feb 24, 2013
Messages
2,707
Location
Kendal, Cumbria
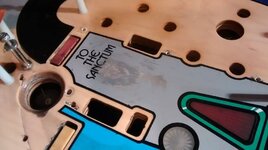
So whilst I'm in the process of stripping the machine down, I thought I might as well see how difficult repairing the sanctum might be, it was done by the previous owner but it looks a bit smudgy and isn't quite flat. It has a piece of mylar over the top to protect the touch up.

What I would like to know is which grey paint people used in order to get a close match and the method employed?

I guess the mylar that is currently on the touchup would just be removed with the usual freeze spray method?

Thanks
IMG_20141228_142711642.jpg
 
I have never undertaken a repair like this before. But I did find this an uncompromising but comprehensive "how to" on the subject.

Essentially.

Mask area
Air brush
Mix your own colour, let it dry on a clear bit of plastic to test the colour
Use a female helper as (tony Blair and the PC brigade close your eyes), they have better colour recognition
Use good quality paints that only harden when you heat them

I am looking to buy an inexpensive game in the near future in need of a bit of work and was going to have a go at this on a day when I was feeling reckless
 
The problem with mixing your own is then having the kit to spray it, costs soon mount up to the point that its easier to pay someone to do it.

I think @RudeDogg1 did a pretty good job on his with a rattle can?
 
No i airbrushed using createx paint, put on a clear water slide transfer of the text and border, clear coated and then put Mylar on
 
You could prob get the same result using a brush but I'd need to go over the paint with fine wet and dry to make it glass smooth
 
I thought I might as well see how difficult repairing the sanctum might be, it was done by the previous owner but it looks a bit smudgy and isn't quite flat. It has a piece of mylar over the top to protect the touch up.

Be aware that if the touch up paint has fused with the glue in the mylar, then you might lift up a lot more than you bargained for...! :eek: It depends how extensive the touch up is I guess.... :rolleyes:

I guess the mylar that is currently on the touch up would just be removed with the usual freeze spray method?

These days I prefer the heat method for mylar removal, others swear by freeze spray but I haven't had good results.
 
I have loads of hand drawn pics,of the sactum,all slightly different shades,so just print em out on adhesive A4,and redecal the area using one that matches the best,then mylar on top
lmk if ya want it via text or email
 
  • Like
Reactions: JT.
I'd still need to remove the old mylar, is there a chance it could remove original undamaged art?

Always a chance but less risky on a diamond plate pf than on others. I've had good results with both the heat and freeze methods on DP playfields.
 
You use to be able to get a sticker.

Sand clean and apply. Noting that any height change can thrown the magnet into a wobbly.
 
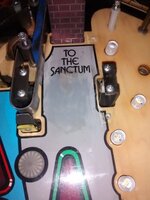
Just an update, mylar came off easy with a bit of heat, this is what im left with. Next step is to mask it, then sand it, I only have 2000 grit paper, do I need something more like 400 initially? I'm going to go to The Works to pick up some acrylic paints as I believe you can get a very close match to the grey with cerulean blue, burnt sienna and white.

10487482_10153084915449047_3490836372649584596_n.jpg

Rudi has uploaded the Sanctum file which is appreciated, do I need to find laser waterslide decal paper for that?
 
I need to fill a slight divot on the sanctum, I'm not buying a tub of body filler that will never get used again so would rather go down the epoxy route, jb weld seems popular, does it matter which type you purchase? Does it have to specifically be for wood?

Is the sticker from the little shop of games the one with the crappy colour match?
 
Pretty much,

You need to work fairly quickly though as it sets in about 5 minutes (few hours to fully cure) of course you can sand it down if you dont get it shaped right first go.
 
Thanks both, I have next to no experience with DIY so I just need to get it clear in my head what's required :)

Still waiting for the laser decal paper to turn up...
 
Back
Top Bottom