What's new
Pinball info

Register a free account today to become a member! Once signed in, you'll be able to participate on this site by adding your own topics and posts, as well as connect with other members through your own private inbox!

Roadshow right ramp microswitches

davejuk

Registered
Joined
Nov 19, 2015
Messages
125
Location
Bristol, UK
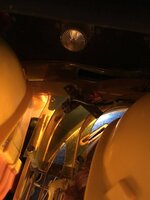
So I finally decided to investigate the power on test on my Roadshow:

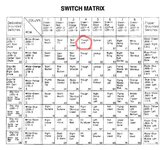
Check switch 46 right loop enter
Check switch 48 hit Ted
Check switch 53 lockup 2
Check switch 55 R. Ramp exit left
Check switch 71 right ramp enter

During gameplay, it is quickly apparent that neither right ramp switches work. I tried pressing it manually without relying on the ball or arm but it is definitely a dead switch.

Interestingly, I tried shorting the switch terminals to trigger it but he game seems to malfunction, ends the current game and loses the credit. Hmmm.

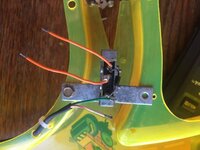
Also, the second right ramp switch looks like it is mounted in the wrong position. Picture below.

Are all of he micro switches in these game the same? Any product codes or reorder numbers that will help me get the right part?
 

Attachments

  • image.jpeg
    image.jpeg
    55.2 KB · Views: 20
That's an awful lot of switch faults. I'd start by testing the actual switches with a test meter.
Has the MPU board had leaky batteries in the past ?
 
That's an awful lot of switch faults. I'd start by testing the actual switches with a test meter.
Has the MPU board had leaky batteries in the past ?

I didn't notice any corrosion or gunk from leaky batteries but will double check.

Are they all on the same row/column in the switch matrix?

They're not but that's something I hadn't thought of. Switch matrix attached below.
 

Attachments

  • switch_matrix.jpg
    switch_matrix.jpg
    75 KB · Views: 14
Check your wiring loom backwards from the switches. Do they share a common connector somewhere ?
 
That is an awful lot of non working switches but I would start by ruling out that it's not as simple as that they are all just broken.

Can you unsolder a known working one from somewhere on your machine, as you don't have a spare one, and use it to replace one of the non working ones? If it doesnt work in the new location you know it is a wiring fault that may be easy to fix once you spot it, and if it does work you know you need to go shopping for a hatful of new switches at the very least.

(Maybe this thread should be in the tech help section?)
 
Have they ever worked correctly?

I don't think so since I have owned it. I have had it since December but I was away until a few weeks ago so I have only just got around to looking at it. I bought it from forum member Safe cracker boy! so perhaps he can comment?

That is an awful lot of non working switches but I would start by ruling out that it's not as simple as that they are all just broken.

Can you unsolder a known working one from somewhere on your machine, as you don't have a spare one, and use it to replace one of the non working ones? If it doesnt work in the new location you know it is a wiring fault that may be easy to fix once you spot it, and if it does work you know you need to go shopping for a hatful of new switches at the very least.

(Maybe this thread should be in the tech help section?)

Unsoldering a working switch doesn't sound like a good idea to me... I have other momentary contact switches I can test with if necessary, just not the type of micro switch that could be fitted to the game.

Regardless, why would I start soldering when I can test with a multimeter?

And I agree that this should be in the tech help section. Can a moderator move it or should I create a new thread?
 
You are right about the switch in your photo being in the wrong location. The left hand side is screwed in to the wrong hole in your photo. It should be in the lower hole like this:

RT switch.JPG

Are all of he micro switches in these game the same? Any product codes or reorder numbers that will help me get the right part?

You can find the product codes for each switch on page 2-47 of the manual.

Regardless, why would I start soldering when I can test with a multimeter?
Cos it's an easy way to check if its a switch that's at fault or if the fault lies downstream, you can unsolder a switch and resolder it somewhere else in about 45 seconds, and you can resolder it back in its original position in the same amount of time and no harm done.

Anyway, that's what I'd do, but there's more than one way to skin a cat!

Whatever you decide, hope you get it working without too much trouble. It's a top top game.
And if you get bored of the music and quotes and you can afford it then get a pinsound board and add some of the hillbilly music from Whoa! Nellie, and some of the call outs from Mellony Melon to the ones from Red. The match the Red and Ted theme and really give the sounds of the game a whole new lease of life....

Cheers,

Paul
 
The plot thickens...

I tested the micro switch photographed above and it works fine.

The incorrect position was causing it not to activate, although that doesn't rule out another fault until I reassemble.

However the other screw hole is too far away (see picture below). Should I force it?

As a side note, this switch shares a common green/black wire with the right ramp enter switch (which is also not working.)
 

Attachments

  • image.jpeg
    image.jpeg
    84.9 KB · Views: 20
There's all sorts of reasons why it might not fit. The most obvious two are:
1: It's a replacement ramp (not original) and it's quite common for them to not have the holes in exactly the right place
2: Someone who owned the game before you bought it removed the metal thing and the similar one in the top left of the game at some point, and when it came to putting them all back they got them mixed up - so the one you have photographed is not wide enough for that position, and the other one is a little too narrow. That could be why they installed it how using the other hole. (Maybe they are actually indentical - I don't know.)

So I would check to see if swapping them helps. If not then you could either gently try to force it to fit, but a better idea might just be to screw the metal thing on to the ramp in what you judge to be the correct position, and the screw will tap itself into the plastic ramp and fasten it nice and tightly. Or poke a small hole in the ramp in the right place with a bradawl or drill and then use a small nut and bolt to fasten it. Or just use a cable tie if you haven't got anything better.
 
Last edited:
Could someone else with a RS take a picture of that switch and it's location on their game and see if that helps figure it out?
 
This isn't my Roadshow (it's from IPDB) but it shows that the OPs switch is correct.

image.jpeg
 
Mmmm. Well that's odd. Mine is in the other position and it definitely works, and the actuator arm is in the middle where you would want it, not poked out to the side.
 
Thanks for the help.

I removed the ramp and had a good look at the micro switches. it looks like it was just dry solder joints. The switch 71 error is now cleared.
 
Back
Top Bottom