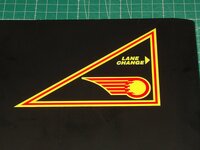
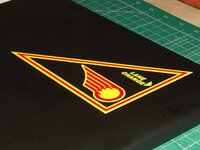
Portable Silkcreen Printing, a New Horizon for More Accurate Prints to Replace Original Decorations in Arcade and Pinball Restorations
- Introduction:
Thanks to new technical advances, decoration formulas and methods are evolving, perfecting, and, above all, becoming more affordable for our consumers. This is the case with portable silkscreen printing, where it's no longer necessary to use vinyl as a printing medium. Instead, the design is translated into ink that can be transported and applied wherever we want, regardless of the surface shape and texture.
One of the most disconcerting and overwhelming advantages of this printing system for me is that you no longer need a cutting plotter to die-cut those large, intricately shaped stickers and vinyls. With traditional vinyl, you had to draw a vector to inform the machine where the blade should pass. All that work of creating bleeds and plotting the cut vector, coding the cut type and control marks is gone; it's no longer necessary. It's a huge time saver.
In our hobbies related to the arcade and pinball world, many of the decorations we replace are silkscreens that have become worn, soiled, damaged, or whose colors have faded. Well, with "portable silkscreen printing," we can make perfect reproductions to replace the originals almost 1 to 1; and I say "almost" because all of this is no longer done by hand; rather, a machine digitally does it for us without errors, without applying excess or insufficient color to one part of the mesh, without desynchronization with respect to the color position—in other words, perfectly.
- What is portable silkscreen printing like?
In "portable screen printing," the ink is suspended between two silicone-coated papers, one on top of which is always transparent. The colored ink layer is underlaid by an opaque white layer and a very strong adhesive that fixes the paint to the surface, regardless of whether it contains curves or straight edges. A satin varnish is applied to the visible side of the painting to protect it.
Since it's machine-made screen printing, the colors are pure and very intense, reaching almost fluorescent tones. Of course, there's no grain or banding, and no vinyl is used as a base. It's the ink and only the ink.
IMPORTANT: Use my links for a full quality photos and screenshots!!!
In this photograph, you can see one of my first "portable screen printing" works. It's "The Addams Family Pinball Aprons" (BALLY), which I restored for the Zona Arcade space a few years ago.
https://www.zonaarcade.com/fotos/artes/The-Addams-Family-Pinball-Aprons-Silkscreen-print1.JPG
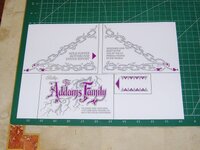
Details in "The Addams Family Pinball Middle Apron" (BALLY) printed in "portable silkscreen printing".
https://www.zonaarcade.com/fotos/artes/Portable-silkscreen-Document-The AddamsFamily-Middle-Apron1.jpg
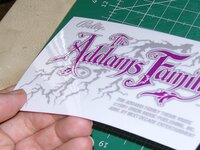
This photo is higher quality and better shows the dense amount of ink my print provider has configured in his machine, which he uses to do my portable silkscreen printing.
The truth is, I warned him it had to be perfect because I wanted to make a big impact on the pinball hobby. I guess he wanted to be sure!
If you look closely at the light reflections, the transfer paper on top perfectly outlines the outline of the painting. There's no background in the images, because this portable screen print will be glued to a black painted surface, namely the black metallic apron.
Regarding the adhesive power of this type of print, it's so strong that it can't be removed traditionally; it can only be removed by chemical or physical stripping (sanding).
The screen print contains a very dense, malleable layer of color that can be cleaned with soap and water using a scouring pad. That's how durable it is!
- How is it applied?
"Portable silkscreen printing" comes on a white or transparent plastic paper, which acts like the silicone paper used on classic vinyl to protect the adhesive layer underneath, and a transparent paper on top, which acts as a carrier. This way, we can place the silkscreen print with total precision on any surface.
The gluing process is exactly like that of plotter-cut vinyl, which has a carrier paper: you remove the paper protecting the adhesive, stick the portable silkscreen print on, and pull off the transparent carrier paper on top. The ink will adhere strongly to any surface, be it plastic, metal, wood, etc. It's that easy!
The dry gluing technique, which is the one I've described, is ideal, easy, and clean for this new form of printing. The cohesion of the paint is very, very good, and it's impossible for air bubbles to form, as with traditional vinyl. However, you can use various traditional dry vinyl installation and bonding techniques. Below, I'll describe the most popular one.
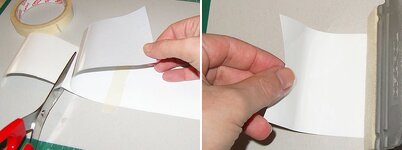
You'll need carpenter's or other types of tape, scissors, and a vinyl-pasting trowel or plastic card (the latter is optional). Place the decoration in the exact spot it will occupy on the surface. Place a strip of tape that runs along half of the decoration, with a generous amount of excess on both sides. Select one half and peel off the paper backing that protects the adhesive halfway down the surface. Cut it with scissors. Apply the vinyl with a trowel, a plastic card, or your fingers, gradually applying it until the entire half is adhered. Remove the carpenter's tape, remove the silicone paper from the other half, and apply the rest of the sticker.
IMPORTANT: Use my links for a full quality photos and screenshots!!!
The images show a visual description of the classic vinyl application process using the "dry-pasting" technique (photographs by Mikonos).
https://www.zonaarcade.com/fotos/artes/dry-gluing-process1a.jpg
- When the elements for "portable silkscreen printing" are very small
When we refer to very small design elements, we immediately think of the technical difficulty of printing elements, such as numbers and letters, which are very small and are not attached to the main design; that is, they are not on a background, or superimposed or connected to other elements, but completely isolated and disconnected from each other. In traditional screen printing, they are, or at least they used to be, a terrible headache because the definition of the printed result was determined by the number of threads in the screen printing mesh, i.e., its porosity. The lower the porosity, the more threads are needed, the greater the definition, and the more expensive and complex the mesh. But there is a limit to definition, because beyond that limit, other elements outside the mesh intervene, such as the porosity of the surface, which causes the ink to remain more or less contained within certain limits.
When I print very small letters, numbers, and certain symbols (©, ®, ¥, 円, etc.) on vinyl using a plotter, I'm always afraid that they might be hard to read in colors other than black. That's even though my regular printer codes the pieces to be printed in "quality mode" and not "production mode," that is, between 120-150 ink pressure and 12-16 printhead passes, which injects a fair amount of ink. Printing is more expensive, but it's worth it! On the other hand, when I print offset at the highest quality on any support, I have no fears at all. I design some very nice custom pinball cards and add a lot of very small text, and even the smallest letters are legible. Returning to portable silkscreen printing, that fear has also been dispelled.
In this regard, if you think the small letters on pinball aprons are rarely visible elements, you're wrong. Just like with arcade decor, the numbering of pinball decorative art pieces is very present, and may be more or less close to a specific decorative piece. I've always tried to be a rigorous restorer with what I've restored, and I've always wanted to include the numbering of the decorations when it was close to a piece and, other times, when it was far away.
I'll show you a couple of very common examples of pinball decorative designs, where we can see the code of letters and numbers that identifies the "part" and its corresponding portable sikscreen printing.
IMPORTANT: Use my links for a full quality photos and screenshots!!!
"Williams Pinball System 11 Middle Apron - Set 2" (WILLIAMS) artwork files scanned and restored in Zona Arcade by Mikonos.
https://www.zonaarcade.com/fotos/ca...-System-11-Middle-Apron-Restored-Mikonos1.jpg
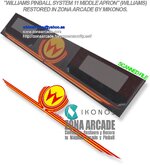
*This "Williams Pinball - System 11 Aprons - Set 2" works for the following pinballs: Bad Cats, Banzai Run, Cyclone, F-14, Jokerz, Police Force and Taxi.
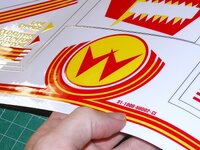
Details in "Williams Pinball System 11 Middle Apron" print reproduced in portable screen printing.
https://www.zonaarcade.com/fotos/ar...cument-Williams-Aprons-Part-Number-print1.JPG
"Atlantis Pinball Shooter Apron" (BALLY) artwork file restored in Zona Arcade by Mikonos.
https://www.zonaarcade.com/fotos/capturas/Atlantis-Pinball-Shooter-Apron-Restored-Mikonos1.jpg
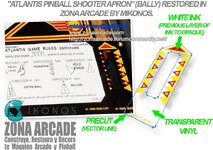
Details in "Atlantis Pinball Shooter Apron" (BALLY) print reproduced in portable silkscreen".
https://www.zonaarcade.com/fotos/ar...-Document-Bally-Aprons-Part-Number-print1.JPG
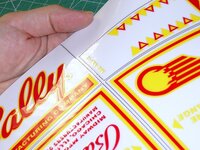
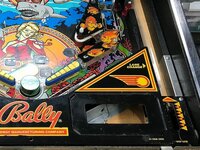
Small screen-printed letters, which are relatively far removed from the decoration of a pinball apron, are also common and were a problem before this printing technique. For example, on "Atlantis Pinball" (BALLY), we can see that the same metal part of the apron is numbered with another screen print.
IMPORTANT: Use my links for a full quality photos and screenshots!!!
Photograph of "Atlantis Pinball" (BALLY) where the yellow screen print can be seen with the part number corresponding to the main metal apron.
https://www.zonaarcade.com/fotos/ar...-Document-Bally-Aprons-Part-Number-photo2.jpg
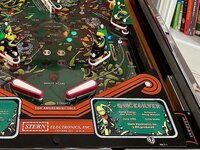
And here's another example: a photograph of "Quicksilver Pinball" (STERN) with the part number silkscreened in white on the main metal apron.
https://www.zonaarcade.com/fotos/ar...-Document-STERN-Aprons-Part-Number-photo1.jpg
I'm harping on this topic because until now, all of this has been relatively complex to resolve elegantly, especially with metal aprons painted in colors other than white and black. You either have to add a background to a relatively small sticker and perform a "color match" process with the color of the metal apron, or you have to make a sticker with a transparent background and use white ink to hide the numbers beneath the main color layer.
*All of this may not matter to many people because they don't have training in design and printing, but, as I've already mentioned, I'm a very meticulous restorer.
In this example, I show one of the few times I opted to reproduce this type of screen printing. I didn't do it with a simple example, but with the aprons from "Star Trek: The Next Generation Pinball" (WILLIAMS).
https://www.zonaarcade.com/fotos/ar...cument-WILLIAMS-Aprons-Part-Number-photo1.jpg
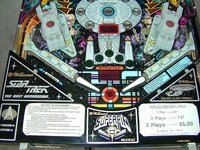
"Star Trek: The Next Generations Aprons" (WILLIAMS) artwork restored by Mikonos and printed over metal vinyl, gloss protective lamination, and precut (photo 3).
http://www.zonaarcade.com/Fotos/Artes/Star Trek Aprons print3.jpg
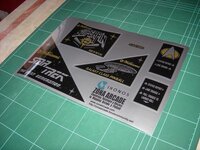
I did this restoration almost 10 years ago. You can see the entire restoration and printing process with several screenshots and photographs here:
https://zonaarcade.forumcommunity.net/?t=58352805#entry411963375
- More interesting facts
The color availability in "portable silkscreen printing" is much greater in this system and, above all, "practical" than in traditional CMYK printing, since the more ink injected, the colors are deeper and more powerful, allowing us to better approximate fluorescent tones, which very few machines can achieve.
Why do I say that the color availability is more "practical"? Because if you've been immersed in the world of printing for a long time, there are certain colors that are avoided as much as possible to offer powerful printing results that impress the user. There are many colors to avoid. These include the "pastel or intermediate colors," which appear more inconsistent and ugly, as this mix of inks makes them less attractive in person than when viewed in an RGB image on your computer screen, television, or other device.
IMPORTANT: Use my links for a full quality photos and screenshots!!!
This photograph shows my first "color chart" in "Portable Silkscreen Printing" format, which contains 571 colors and which I designed myself.
https://www.zonaarcade.com/fotos/artes/Silkscreen-Card-print-Mikonos1a.JPG
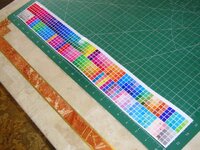
*Color charts are important for correctly performing "Color Match" processes, which allow printed reproductions to closely resemble the originals in color.
.
*****Document under construction, to be continued*****
- Introduction:
Thanks to new technical advances, decoration formulas and methods are evolving, perfecting, and, above all, becoming more affordable for our consumers. This is the case with portable silkscreen printing, where it's no longer necessary to use vinyl as a printing medium. Instead, the design is translated into ink that can be transported and applied wherever we want, regardless of the surface shape and texture.
One of the most disconcerting and overwhelming advantages of this printing system for me is that you no longer need a cutting plotter to die-cut those large, intricately shaped stickers and vinyls. With traditional vinyl, you had to draw a vector to inform the machine where the blade should pass. All that work of creating bleeds and plotting the cut vector, coding the cut type and control marks is gone; it's no longer necessary. It's a huge time saver.
In our hobbies related to the arcade and pinball world, many of the decorations we replace are silkscreens that have become worn, soiled, damaged, or whose colors have faded. Well, with "portable silkscreen printing," we can make perfect reproductions to replace the originals almost 1 to 1; and I say "almost" because all of this is no longer done by hand; rather, a machine digitally does it for us without errors, without applying excess or insufficient color to one part of the mesh, without desynchronization with respect to the color position—in other words, perfectly.
- What is portable silkscreen printing like?
In "portable screen printing," the ink is suspended between two silicone-coated papers, one on top of which is always transparent. The colored ink layer is underlaid by an opaque white layer and a very strong adhesive that fixes the paint to the surface, regardless of whether it contains curves or straight edges. A satin varnish is applied to the visible side of the painting to protect it.
Since it's machine-made screen printing, the colors are pure and very intense, reaching almost fluorescent tones. Of course, there's no grain or banding, and no vinyl is used as a base. It's the ink and only the ink.
IMPORTANT: Use my links for a full quality photos and screenshots!!!
In this photograph, you can see one of my first "portable screen printing" works. It's "The Addams Family Pinball Aprons" (BALLY), which I restored for the Zona Arcade space a few years ago.
https://www.zonaarcade.com/fotos/artes/The-Addams-Family-Pinball-Aprons-Silkscreen-print1.JPG

Details in "The Addams Family Pinball Middle Apron" (BALLY) printed in "portable silkscreen printing".
https://www.zonaarcade.com/fotos/artes/Portable-silkscreen-Document-The AddamsFamily-Middle-Apron1.jpg

This photo is higher quality and better shows the dense amount of ink my print provider has configured in his machine, which he uses to do my portable silkscreen printing.
The truth is, I warned him it had to be perfect because I wanted to make a big impact on the pinball hobby. I guess he wanted to be sure!
If you look closely at the light reflections, the transfer paper on top perfectly outlines the outline of the painting. There's no background in the images, because this portable screen print will be glued to a black painted surface, namely the black metallic apron.
Regarding the adhesive power of this type of print, it's so strong that it can't be removed traditionally; it can only be removed by chemical or physical stripping (sanding).
The screen print contains a very dense, malleable layer of color that can be cleaned with soap and water using a scouring pad. That's how durable it is!
- How is it applied?
"Portable silkscreen printing" comes on a white or transparent plastic paper, which acts like the silicone paper used on classic vinyl to protect the adhesive layer underneath, and a transparent paper on top, which acts as a carrier. This way, we can place the silkscreen print with total precision on any surface.
The gluing process is exactly like that of plotter-cut vinyl, which has a carrier paper: you remove the paper protecting the adhesive, stick the portable silkscreen print on, and pull off the transparent carrier paper on top. The ink will adhere strongly to any surface, be it plastic, metal, wood, etc. It's that easy!
The dry gluing technique, which is the one I've described, is ideal, easy, and clean for this new form of printing. The cohesion of the paint is very, very good, and it's impossible for air bubbles to form, as with traditional vinyl. However, you can use various traditional dry vinyl installation and bonding techniques. Below, I'll describe the most popular one.
You'll need carpenter's or other types of tape, scissors, and a vinyl-pasting trowel or plastic card (the latter is optional). Place the decoration in the exact spot it will occupy on the surface. Place a strip of tape that runs along half of the decoration, with a generous amount of excess on both sides. Select one half and peel off the paper backing that protects the adhesive halfway down the surface. Cut it with scissors. Apply the vinyl with a trowel, a plastic card, or your fingers, gradually applying it until the entire half is adhered. Remove the carpenter's tape, remove the silicone paper from the other half, and apply the rest of the sticker.
IMPORTANT: Use my links for a full quality photos and screenshots!!!
The images show a visual description of the classic vinyl application process using the "dry-pasting" technique (photographs by Mikonos).
https://www.zonaarcade.com/fotos/artes/dry-gluing-process1a.jpg

- When the elements for "portable silkscreen printing" are very small
When we refer to very small design elements, we immediately think of the technical difficulty of printing elements, such as numbers and letters, which are very small and are not attached to the main design; that is, they are not on a background, or superimposed or connected to other elements, but completely isolated and disconnected from each other. In traditional screen printing, they are, or at least they used to be, a terrible headache because the definition of the printed result was determined by the number of threads in the screen printing mesh, i.e., its porosity. The lower the porosity, the more threads are needed, the greater the definition, and the more expensive and complex the mesh. But there is a limit to definition, because beyond that limit, other elements outside the mesh intervene, such as the porosity of the surface, which causes the ink to remain more or less contained within certain limits.
When I print very small letters, numbers, and certain symbols (©, ®, ¥, 円, etc.) on vinyl using a plotter, I'm always afraid that they might be hard to read in colors other than black. That's even though my regular printer codes the pieces to be printed in "quality mode" and not "production mode," that is, between 120-150 ink pressure and 12-16 printhead passes, which injects a fair amount of ink. Printing is more expensive, but it's worth it! On the other hand, when I print offset at the highest quality on any support, I have no fears at all. I design some very nice custom pinball cards and add a lot of very small text, and even the smallest letters are legible. Returning to portable silkscreen printing, that fear has also been dispelled.
In this regard, if you think the small letters on pinball aprons are rarely visible elements, you're wrong. Just like with arcade decor, the numbering of pinball decorative art pieces is very present, and may be more or less close to a specific decorative piece. I've always tried to be a rigorous restorer with what I've restored, and I've always wanted to include the numbering of the decorations when it was close to a piece and, other times, when it was far away.
I'll show you a couple of very common examples of pinball decorative designs, where we can see the code of letters and numbers that identifies the "part" and its corresponding portable sikscreen printing.
IMPORTANT: Use my links for a full quality photos and screenshots!!!
"Williams Pinball System 11 Middle Apron - Set 2" (WILLIAMS) artwork files scanned and restored in Zona Arcade by Mikonos.
https://www.zonaarcade.com/fotos/ca...-System-11-Middle-Apron-Restored-Mikonos1.jpg

*This "Williams Pinball - System 11 Aprons - Set 2" works for the following pinballs: Bad Cats, Banzai Run, Cyclone, F-14, Jokerz, Police Force and Taxi.
Details in "Williams Pinball System 11 Middle Apron" print reproduced in portable screen printing.
https://www.zonaarcade.com/fotos/ar...cument-Williams-Aprons-Part-Number-print1.JPG

"Atlantis Pinball Shooter Apron" (BALLY) artwork file restored in Zona Arcade by Mikonos.
https://www.zonaarcade.com/fotos/capturas/Atlantis-Pinball-Shooter-Apron-Restored-Mikonos1.jpg

Details in "Atlantis Pinball Shooter Apron" (BALLY) print reproduced in portable silkscreen".
https://www.zonaarcade.com/fotos/ar...-Document-Bally-Aprons-Part-Number-print1.JPG

Small screen-printed letters, which are relatively far removed from the decoration of a pinball apron, are also common and were a problem before this printing technique. For example, on "Atlantis Pinball" (BALLY), we can see that the same metal part of the apron is numbered with another screen print.
IMPORTANT: Use my links for a full quality photos and screenshots!!!
Photograph of "Atlantis Pinball" (BALLY) where the yellow screen print can be seen with the part number corresponding to the main metal apron.
https://www.zonaarcade.com/fotos/ar...-Document-Bally-Aprons-Part-Number-photo2.jpg

And here's another example: a photograph of "Quicksilver Pinball" (STERN) with the part number silkscreened in white on the main metal apron.
https://www.zonaarcade.com/fotos/ar...-Document-STERN-Aprons-Part-Number-photo1.jpg

I'm harping on this topic because until now, all of this has been relatively complex to resolve elegantly, especially with metal aprons painted in colors other than white and black. You either have to add a background to a relatively small sticker and perform a "color match" process with the color of the metal apron, or you have to make a sticker with a transparent background and use white ink to hide the numbers beneath the main color layer.
*All of this may not matter to many people because they don't have training in design and printing, but, as I've already mentioned, I'm a very meticulous restorer.
In this example, I show one of the few times I opted to reproduce this type of screen printing. I didn't do it with a simple example, but with the aprons from "Star Trek: The Next Generation Pinball" (WILLIAMS).
https://www.zonaarcade.com/fotos/ar...cument-WILLIAMS-Aprons-Part-Number-photo1.jpg

"Star Trek: The Next Generations Aprons" (WILLIAMS) artwork restored by Mikonos and printed over metal vinyl, gloss protective lamination, and precut (photo 3).
http://www.zonaarcade.com/Fotos/Artes/Star Trek Aprons print3.jpg

I did this restoration almost 10 years ago. You can see the entire restoration and printing process with several screenshots and photographs here:
https://zonaarcade.forumcommunity.net/?t=58352805#entry411963375
- More interesting facts
The color availability in "portable silkscreen printing" is much greater in this system and, above all, "practical" than in traditional CMYK printing, since the more ink injected, the colors are deeper and more powerful, allowing us to better approximate fluorescent tones, which very few machines can achieve.
Why do I say that the color availability is more "practical"? Because if you've been immersed in the world of printing for a long time, there are certain colors that are avoided as much as possible to offer powerful printing results that impress the user. There are many colors to avoid. These include the "pastel or intermediate colors," which appear more inconsistent and ugly, as this mix of inks makes them less attractive in person than when viewed in an RGB image on your computer screen, television, or other device.
IMPORTANT: Use my links for a full quality photos and screenshots!!!
This photograph shows my first "color chart" in "Portable Silkscreen Printing" format, which contains 571 colors and which I designed myself.
https://www.zonaarcade.com/fotos/artes/Silkscreen-Card-print-Mikonos1a.JPG

*Color charts are important for correctly performing "Color Match" processes, which allow printed reproductions to closely resemble the originals in color.
.
*****Document under construction, to be continued*****

