What's new
Pinball info

Register a free account today to become a member! Once signed in, you'll be able to participate on this site by adding your own topics and posts, as well as connect with other members through your own private inbox!

Playfield repair question - FT

VeeMonroe

Site Supporter
Joined
Aug 4, 2021
Messages
2,844
Location
London
I’ve got a Fish Tales with damage on the playfield (pictured). Any ideas how I’d repair that? I figure I might be able to touch up the blue paint and then put a protective layer back on.
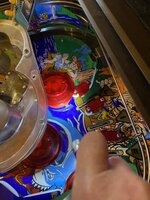
A9CA9284-E677-4589-ADF5-1A0FA1691512.jpeg

Also, how do I clean off the black smears (pictured below) on the playfield? I’ve already used a Pinhead Spray & Wipe with microfibre cloth to remove the (extensive) dirt from the playfield when it arrived in our house (NEVER buy from Williams Amusements), but it hasn’t removed the smears. I don’t want to damage/erode the Diamond Plate playfield surface. There’s still some dirt on the playfield in this picture - I still have a few black rubbers on the posts that I can’t get off and which keep leaving crap.
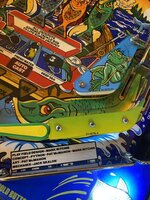
59D32767-9930-4D84-9396-AB62CADC5284.jpeg
 
I'd be inclined to mylar over that damage and not do anything else. On the black marks:


you can get it from dyas b+q etc. but any spray foam cleaner. I use microfibres and one of these to get under the ramps etc although on same games (met and IMDN) I'll take the ramps and rails out:

then you want to put some wax on the playfield:

or any caruba based wax.

Just don't use _anything_ with silicon on it. Also check the trough and balls for dirt.

Neil.
 
My FT’s playfield would not shine no matter what polishing I did like the clear coat was dead/gone so I decided to put a playfield protector on and did any touch ups etc that needed doing and it now looks like a new playfield compared to before.
 
I agree with Neil re: the wear around the pop bumper. You can't see it from the players position so stick some mylar down to stop it getting worse and call it done. If you did want to touch it up then use acrylics and a hair dryer to quickly dry the paint so you can see the actual colour. If not quite right then wipe off with ipa and try again until you're happy and then mylar over to seal it in. I generally only get the paints out on a fully stripped playfield as it can be a bit awkward to work around stuff.

For the black ball trails, I suspect foam cleaner won't be enough as it'll be ground in a bit but worth trying first. If no joy then try some novus 2 with a micro fibre, if still no joy then t-cut with a microfiber and if none of that works then magic eraser and ipa but be gentle. Also bear in mind that the more aggressive you go in a small area then the more likely it won't shine like the untouched areas around it. You can use wax to help but generally I use magic eraser only when doing a full playfield strip down.
 
Thanks, everyone 😀

The playfield cleans to a nice shine - so I’ll try the mylar approach on the dodgy bit. There’s a question about whether I want to replace the whole playfield at some point, but I don’t think it’s especially bad and we don’t currently have anywhere to leave the pin dismantled while we work on it.

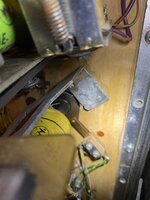
As a separate issue, anyone any ideas how we open up the assembly under the Caster’s Club? We’re trying to remove the yellow solenoid to fix the ball popper assembly, which has an intermittent fault, but are having problems actually physically turning a mini-wrench in the space between the side bars and the solenoid. We’ve both tried removing the hex-headed screw with no success and I have small hands.

B33099AB-DCBF-4CF2-A3C8-B111EF1CEE24.jpeg
 
As said above Novus 2 or treasure cove , it’s the same as novus . Sometimes you have to take other things off to get to the item you want to take off . I think I did a shop log on here a few years ago !!
 
Do you definitely need to remove the entire assembly from the playfield? It's probably just as awkward, but if (as it looks to be) the ball popper is what I term the 'original' type, removing the switch gives better access to push out the dowel pin holding the cap or seat for the ball onto the solenoid plunger. The pin limits the movement of the cap to the slots on opposite sides, but thankfully the cap isn't sprung. Then the coil support can be detached from the frame and the coil, sleeve, spring and plunger (less the cap) removed together. Though it'll be even trickier to re-fit, with the cap having to be aligned with the hole through the tip of the plunger to allow the pin to be re-inserted. In fact, the pin can become loose, and end up protruding through one of the slots. This end can then catch on the switch, causing false contacts.

Looking closer at the picture, what's that silver thread visible against the seat? Has some fool used a split pin to fasten the seat?

Yeah, we're wondering if we need to remove the entire assembly or I can fix it without removing anything. Initially, we thought the problem was the solenoid spring (and I ordered a new one), but it became apparent over the weekend that - as you point out - some idiot has stuck a twisted piece of wire through the seat/cap to attach it to rest of the ball popper assembly and there's no dowel pin!

We've ordered a pack of dowel pins from Amazon and I'm going to see if I can remove the twisted bit of wire and insert a dowel pin without removing the assembly. I *think* the problem we're having is that the seat is wobbling about loosely because of the wire, and that's causing false contacts. We've been experiencing an intermittent fault since we bought the machine where it thinks there's a ball on the popper cap when there isn't, and the solenoid keeps firing and the game keeps registering a ball lock that isn't there. Subsequently, the caster's reel spins madly looking for a ball that was never there in the first place. This never gives us a multi-ball, presumably because a ball never reaches the reel, but it does sometimes give us Fast Cast bonuses that we didn't earn.

The machine had a bunch of bodged maintenance done at some point before we bought it - these included a persistent ball jam in the left inlane due to some idiot having stuck 3" black rubbers onto the slingshots. Given slingshot rubbers are frequently 2 1/2", I have to assume there's been work done on this pin by someone who didn't read the instruction manual and knew nothing about pinball machines...
 
Last edited:
With this type of ball popper, there used to be occasional service calls for 'a bit of rubber loose on the playfield', which turned out to be the ball seat having flown off when the dowel pin fell out completely. The F-14 which I ended up buying from work liked to do this, to the extent that a new plunger with unworn drilled hole was needed. Though maybe a slightly larger dowel would have sufficed. Earthshaker used to suffer from it, too, giving false 'Match Up' awards.
 
Back
Top Bottom