Howdy folks!!
As some of you may know i've had an R&B for a while now and when I got it the cabinet rear end was in pretty bad state. Well now i've ordered some new decals so I've finally decided to take the plunge and get it sorted.
I don't really want to start doing anything too extreme until the decals arrive but in the meantime i've noticed some other work on the cab that also needs doing.
This is the section below the head. As you can see it's missing a piece entirely and the top part of the ply is really badly separating.

There's a big bit missing in the middle. The power cable used to drop through there because there was no cord cup in the back (in fact there was no hole for the cable at all).

There's some really nasty splitting and lifting going on too.

Now given the amount of damage the only option I can see is to remove the whole section and make up a new one before refitting it in readiness for the sanding and respraying. But - the million dollar question is - how the hell do I remove the section without totally knackering the cabinet?
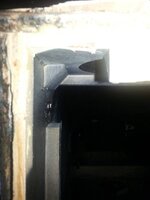
Underneath I can see two blocks which have a brad nail into them. There's also some residue around them which makes me think they're glued in place too.


This is a side shot of the top of the cabinet - the bit running vertically in the picture is actually the bit which sits below the head (if you rotated the picture 90 degrees clockwise then it would actually be the right way up). It looks like the piece I want to remove is actually routed to fit down into the cabinet and then this top section has the extra width so it sits neatly on top of the cabinet.

So, if anyone has any good recommendations as how to get this part removed then i'd appreciate it. I had thought about smashing the heck out of it with a rubber mallet but I thought a bit more finesse might be a good idea. Perhaps start by getting something and trying to pry the wooden blocks from the corner maybe?
Suggestions and ideas would really be welcomed.
As some of you may know i've had an R&B for a while now and when I got it the cabinet rear end was in pretty bad state. Well now i've ordered some new decals so I've finally decided to take the plunge and get it sorted.
I don't really want to start doing anything too extreme until the decals arrive but in the meantime i've noticed some other work on the cab that also needs doing.
This is the section below the head. As you can see it's missing a piece entirely and the top part of the ply is really badly separating.
There's a big bit missing in the middle. The power cable used to drop through there because there was no cord cup in the back (in fact there was no hole for the cable at all).
There's some really nasty splitting and lifting going on too.
Now given the amount of damage the only option I can see is to remove the whole section and make up a new one before refitting it in readiness for the sanding and respraying. But - the million dollar question is - how the hell do I remove the section without totally knackering the cabinet?
Underneath I can see two blocks which have a brad nail into them. There's also some residue around them which makes me think they're glued in place too.
This is a side shot of the top of the cabinet - the bit running vertically in the picture is actually the bit which sits below the head (if you rotated the picture 90 degrees clockwise then it would actually be the right way up). It looks like the piece I want to remove is actually routed to fit down into the cabinet and then this top section has the extra width so it sits neatly on top of the cabinet.
So, if anyone has any good recommendations as how to get this part removed then i'd appreciate it. I had thought about smashing the heck out of it with a rubber mallet but I thought a bit more finesse might be a good idea. Perhaps start by getting something and trying to pry the wooden blocks from the corner maybe?
Suggestions and ideas would really be welcomed.
")

