Pinball info
You are using an out of date browser. It may not display this or other websites correctly.
You should upgrade or use an alternative browser.
You should upgrade or use an alternative browser.
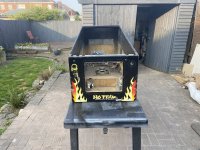
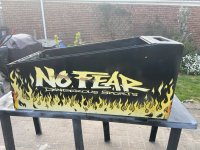
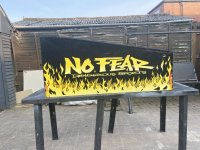
Complete No Fear
- Thread starter Andy B
- Start date

OP
OP
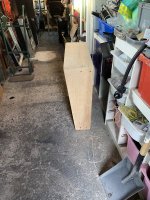
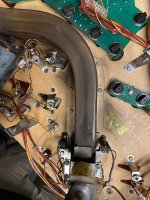
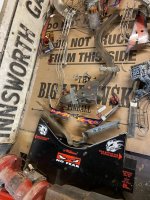
Couple of hours to spare today so got the Dymo Letratag out and labelled all the connectors. Then removed boards and head and finally, with the help of my lad (they only start being useful to you when they can go to the shops for you and get you beer or help you lift out a pinball playfield).
I really need to get or make a playfield rotisserie and I definitely need to buy some GI connectors, the previous owner has done a proper hack job on the old melted ones with wires soldered directly to board. Have a full set of LEDs to install so we won’t have that problem anymore.
This one will be up for sale when the restoration is done (though my mate with an arcade has first dibs on it).
Last edited:
OP
OP

OP
OP

OP
OP

OP
OP

OP
OP

OP
OP

OP
OP

OP
OP
Nice bit of sun this afternoon so out with the orbital sander and the 60, 80, 120 and 240 grit.
Attachments
-
 15711DF7-BCA9-403B-B1D2-062C1EA4F4B5.jpeg193.1 KB · Views: 30
 -
 5365EC29-5BE6-4E3B-A7FE-350C8EAAD47A.jpeg198.3 KB · Views: 27
 -
 470F81C3-38EA-4E56-813C-3BFD65FAE3E1.jpeg221.5 KB · Views: 26
 -
 8A0D8BF1-9DC4-4EDC-B437-07E1F53C8C77.jpeg169.5 KB · Views: 30
 -
 83FDA377-26F2-4CFA-8464-B57206DBCD43.jpeg168.9 KB · Views: 28
 -
 C64E2750-995A-4C51-863C-30EE4A63D5B5.jpeg141.3 KB · Views: 31
OP
OP
Started on the main cab tonight. An hour and 5 pads of 60 grit later and still not finished a full side yet. This one’s gonna be a tough one.
OP
OP
A few, before shots. Look at the difference between the original colours and the faded on the front of the cab.
Attachments
OP
OP
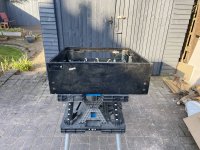
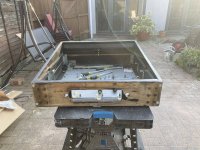
Managed to get the main cab sanded back to bare wood tonight. 2 hours on it plus the 1 hour the other night. Don’t remember the other two cabs I sanded down being this bad but they were painted cabs and this No Fear was decalled.
Found that a heat gun snd scraper was marginally quicker taking the top of the decal off than using a sander- but then had to hit the sander again for the underneath sticky layer.
Filled in the really bad gouge down the right hand side with Ronseal wood filler. Use that all the time and it’s the best - dries rock hard and doesn’t fall apart/crumble when you sand it down. Only trouble is it’s quite expensive so I used some Wilko own brand wood filler for the other minor imperfections there were down that side.
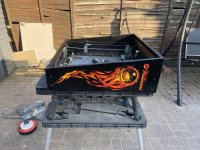
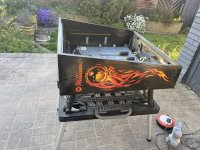
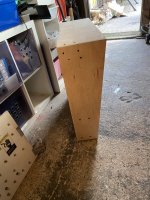
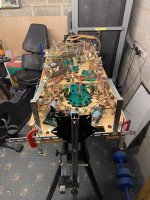
Knocked myself up a home made playfield rotisserie too for when I eventually get round to starting on the playfield. About £80 in bits and a half hour on the chop saw and cordless drill. Well chuffed with that (Got the idea/plans from The Canadian Arcade YouTube and my mitre saw stand I already had was similar type to the one they used in the video so that saved me a bob or two ).
).
Found that a heat gun snd scraper was marginally quicker taking the top of the decal off than using a sander- but then had to hit the sander again for the underneath sticky layer.
Filled in the really bad gouge down the right hand side with Ronseal wood filler. Use that all the time and it’s the best - dries rock hard and doesn’t fall apart/crumble when you sand it down. Only trouble is it’s quite expensive so I used some Wilko own brand wood filler for the other minor imperfections there were down that side.
Knocked myself up a home made playfield rotisserie too for when I eventually get round to starting on the playfield. About £80 in bits and a half hour on the chop saw and cordless drill. Well chuffed with that (Got the idea/plans from The Canadian Arcade YouTube and my mitre saw stand I already had was similar type to the one they used in the video so that saved me a bob or two
).
Last edited:
OP
OP

OP
OP

OP
OP

l like that Rotisserie idea and might use and/or adapt it as I need to make something up for the playfield swaps I've got to get around to doing. That stand looks like the Evolution one from Screwfix that I've got for a chop saw. Plus are they lazy Suzy bearing plates?
OP
OP
Yep, it’s the Evolution stand.
The plates are heavy duty barstool swivel plates:
https://www.amazon.co.uk/dp/B076CD9...imm_5ND4V2R8Y2JA9CF9N073?_encoding=UTF8&psc=1
The uprights are 30mm square rolled steel from B&Q and fit snug in the saw stand. I bought a 2.5m length and chopped it in half:
https://www.diy.com/departments/var...be-l-2-5m-w-30mm-t-1-5mm/3232637200004_BQ.prd
M6 coach bolts, washers and nuts. 45mm length for attaching plates to uprights. 16mm length for attaching angle iron (also from B&Q) to plates.
The Canadian Arcade YouTube video shows you how to set it up if you need instructions.
Great; many thanks for the details and good luck with the No Fear refurb.
OP
OP
Cheers.
Anyone making these rotisseries? - Marcos have a cheap crappy chinese thing, but £340+ to get one imported is a bit steep.
OP
OP
My DIY job cost me around £80 in bits but I already had the mitre saw stand on which it’s mounted.
Having said that, the stand itself is only £59.99 from Screwfix:
https://www.screwfix.com/p/evolution-800b-mitre-saw-stand-with-extension-arms/48911
Having said that, the stand itself is only £59.99 from Screwfix:
https://www.screwfix.com/p/evolution-800b-mitre-saw-stand-with-extension-arms/48911
@Andy B - looks goods - one suggestion - your angle iron - could you fix it diagonally across the middle of the bar stool swivel plate? Then you will have perfect rotation around the centre, instead of it being offset.Yep, it’s the Evolution stand.
The plates are heavy duty barstool swivel plates:
https://www.amazon.co.uk/dp/B076CD9...imm_5ND4V2R8Y2JA9CF9N073?_encoding=UTF8&psc=1
The uprights are 30mm square rolled steel from B&Q and fit snug in the saw stand. I bought a 2.5m length and chopped it in half:
https://www.diy.com/departments/var...be-l-2-5m-w-30mm-t-1-5mm/3232637200004_BQ.prd
M6 coach bolts, washers and nuts. 45mm length for attaching plates to uprights. 16mm length for attaching angle iron (also from B&Q) to plates.
The Canadian Arcade YouTube video shows you how to set it up if you need instructions.
OP
OP
Tried it on the diagonal but the plates are a little too loose so when you put playfield on it, the weight of the playfield makes them rotate. I guess I could stick them/wedge them with something to stop them rotating but just as easy to mount brackets on bottom of plates (though I will have to stick them in place when flipping playfield over I guess).
Also found out two things when I just tried to mount playfield on it just now:
1. You need 2 people to lift a playfield safely on to it (get my lad round later to help with that!).
2. If you have a playfield that has stuff sticking out beyond the backboard (ramp etc. or in case of No Fear some magnets) you’re going to have to find a way of extending the angle iron (or buy angle iron with a wider bottom edge of course!). Or else just rotate the plates so the angle iron is at the top (effectively upside down) and mount playfield to the top - doh!
Last edited:
Aha. I see. I’m going to have a go at making one later in the year. (Well actually i’m going to wait for my cousin to visit from overseas, and feed him beer, curry and wine and a load of bits of metal and hopefully he’ll produce a rotisserie for me. He’s coming over in sept for my 60th birthday.
OP
OP
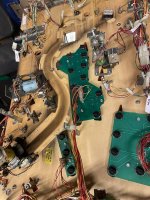
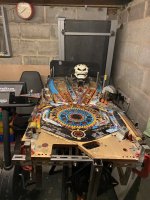
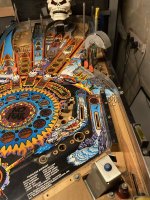
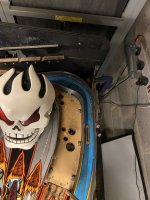
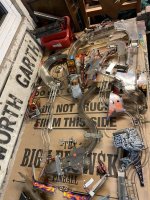
Playfield strip down started tonight.
Rotisserie works a treat. Perfect height so I don’t get a bad back or be constantly lifting playfield up and down removing connectors. Best £80 I’ve ever spent on pinball stuff.
Only one thread snapped on base of hex spacer. Of course it has to be one of the most difficult to find hex spacers around. Pinball Heaven - nada. Pinball Mania - niente. Pinball Center NL has it (part number 02-5173-1) for 16.90 euros but 35 euros shipping. Nigh on £50 for one hex spacer!
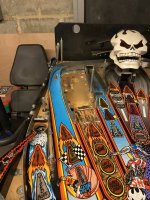
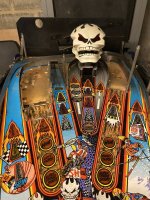
Playfield filthy. Subway ramp black. Plenty of elbow grease needed but should make for some cracking before and after photos. Speaking of which...
Rotisserie works a treat. Perfect height so I don’t get a bad back or be constantly lifting playfield up and down removing connectors. Best £80 I’ve ever spent on pinball stuff
.Only one thread snapped on base of hex spacer. Of course it has to be one of the most difficult to find hex spacers around. Pinball Heaven - nada. Pinball Mania - niente. Pinball Center NL has it (part number 02-5173-1) for 16.90 euros but 35 euros shipping. Nigh on £50 for one hex spacer!
Playfield filthy. Subway ramp black. Plenty of elbow grease needed but should make for some cracking before and after photos. Speaking of which...
OP
OP
OP
OP
T’other side
Attachments
-
 FB3241F1-7BC0-4585-8234-621288CD6E3B.jpeg130.5 KB · Views: 33
 -
 2FAC8C47-DD14-466A-A4F3-2EA9A1C52A1C.jpeg151.8 KB · Views: 29
 -
 ABF4CCB1-D04D-432B-83A9-F6972F2130BD.jpeg155.7 KB · Views: 27
 -
 26D53E08-BAD8-4F33-BF85-4DBCAC5BB815.jpeg158.6 KB · Views: 22
 -
 AF394789-CBBC-43AF-903B-FEB85706D61E.jpeg100.1 KB · Views: 23
 -
 A8957A7A-C1EA-4CA2-BFA9-CD496ABEA37F.jpeg142 KB · Views: 22
 -
 CCE97316-637B-412F-893B-2B3EE48CE80A.jpeg79.1 KB · Views: 30
OP
OP
OP
OP
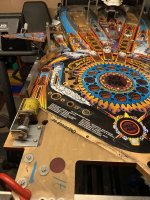
Foam cleanser + T-Cut + Autosol + Magic eraser = playfield ready for waxing and then rebuilding once I’ve cleaned all the bits!
