saladman
Registered
Hello all, I'm reasonably new here and very happy to receive input / feedback / criticism on this my first major restoration.
I have to say a big thanks (I think!) to @Ronsplooter (not sure if I added the link to user properly there) for the inspiration to make this into a full blown resot instead of just 'getting it running'. Saw his Night Moves restoration youtube videos and gave me a shove in the right direction to go for it.
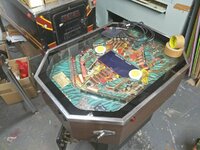
I received this NM a couple of years ago - after a quick check over, it powered up, display illuminated, but super weak flippers, no sound or music, and some signs of water ingress / moisture towards the bottom of the cabinet. Playfield in probalby 6/10 condition - but certainly not a disaster. Given the relative rarity of these, the fact that I should be able to convince the better half that I can fit this into our small house, and the great music, I knew that I wanted to get it working. But... time and other commitments (and machines)... meant that it has taken until now before I am getting stuck in.
Fast forward to now(ish), and a decision that a more thorough than originally intended restoration is happening, the strip down has commenced.
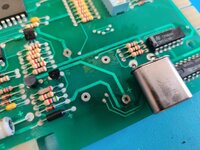
First, I took a lot of photos of the inside of the cab, and stripped out all the boards and parts in the lower cabinet. Boards seem to be in fairly good condition, I removed the battery from the MPU board, vinegar-d / IPA-d and soldered on some fly wires for a remote AA battery pack
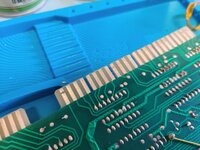
I cleaned up all PCB edge connect 'pads' with a fibreglass 'pen' and contact cleaner spray as there was some general grot there.
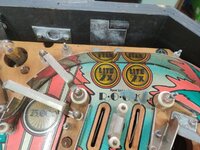
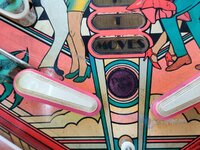
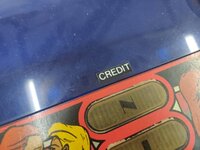
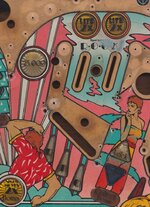
Some more photos of playfield wear. Also interesting to see the where I think was originally a painted 'CREDIT' has been replaced by a sticker. I think that this machine got a fair amount of use (more than Ron's!)
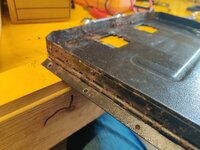
The coin door is showing a fair amount of rust - plan is to wire brush / strip all the paint off, use rust convertor to reduce chance of anything coming back, then use some crackle effect black spray paint to finish it. Hinge is stiff but hoping a bit of elbow and literal greasing will free it up a bit.
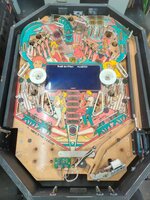
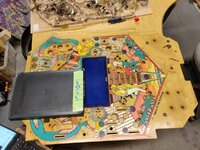
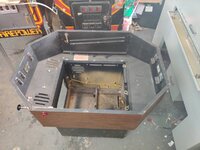
After clearing the base box / unit, I removed all of the plastics / rubbers and other parts from the top of playfield (photo is an 'in progress' shot).
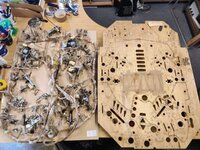
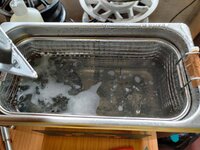
With this done, the playfield was removed and I unscrewed all of the components underneath. I found a set of nut drivers very handy to do this - but still it took a while! A lot of the self tapping screws / hardware seem lightly corroded / have a dull surface - I am planning on cleaning these up in an ultrasonic cleaner, am still unsure of the best way to prevent future corrosion. Some screws that had been soldered to / very close to solder showed worse signs of corrosion. I ummed and ahhd about best way to deal with the lamp holders common ground wire that is stapled to the underside of the playfield - between lifting all of the staples and de-soldering all of the lamp holders. Seemed like desoldering would be easier and only took about 15 minutes or so to complete this.
With everything disconnected from the playfield, I slid a board of MDF between the playfield and all components, and used a few pieces of papertape to secure the lot to the board before lifting off. The hope is that all the parts will stay in a similar position to where they need to go back onto the playfield - and that along with plenty of photos should help when reassembling. Fingers crossed!
Next the remaining posts were removed, and staples / guide rails removed. I was not looking forward to removing the staples at all, as I have seen nightmares of the crimped ends lifting the top surface of the playfield. I first use a drift tool and hammer, with the playfield resting on some blocks of wood with a protective felt covering. This wasn't too bad - but I got a bit of playfield lifting.
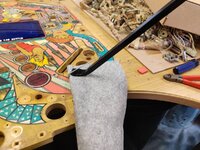
Next I tried gently prising the staples out with a crowbar - note the photo shows the crowbar used, but I also used a another flatter bar with my other hand in order to spread the load on the staples and reduce chance of damage. Found it too hard to take a photo without any hands.. so you'll have to take my word for it! Overall the process of removing the staples was in fact a lot less stressful, and went a lot better than I expected with only seemingly minimal damage to the playfield. Given that NM seems to have a lot more of these staples than other machines I've come across, it was a huge relief.
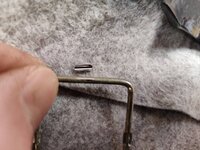
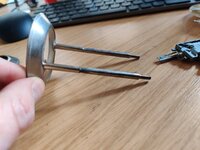
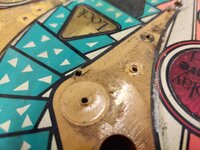
Not the best photo but shows what happened to several of the staples - to me looks like the chrome plating cracking and coming away from the staple, but I am not sure about this. The metal was shiny underneath - I'm not sure of the best solution for this right now.
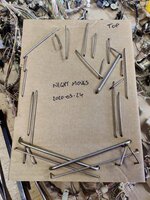
In an attempt to keep some semblance of organisation, I used a cardboard box (granted a lot smaller than the playfield) and poked the staples into a rough layout onto the box. Check out the big chunky staples toward the bottom! I was super nervous about getting those out but they came out as easily as the thinner gauge ones.
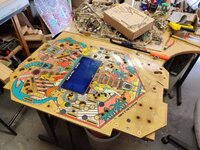
Now the playfield is fully stripped. Current thinking is that I will take this to get professionally restored and most likely clearcoated too. In my opinion worth it as the machine will be a keeper. I'm apprehensive about how the clearcoating will work with the large plastic screen in the centre of the playfield, but will have to see what Chris thinks. Before going for restoration, the plan is to scan the playfield in for sake of prosperity. To do this, I have a standard A4 flatbed scanner that I have removed the bezel / casing from, which can be placed face down flat onto the playfield, and a series of images saved and later stitched together. I also need to get another machine stripped down that will be receiving a similar treatment - but that's for another thread.
Hopefully posting this log on here will help keep momentum on the project and prevent me from leaving it all in bits for too long!
Summary of next imminent steps:
I have to say a big thanks (I think!) to @Ronsplooter (not sure if I added the link to user properly there) for the inspiration to make this into a full blown resot instead of just 'getting it running'. Saw his Night Moves restoration youtube videos and gave me a shove in the right direction to go for it.

I received this NM a couple of years ago - after a quick check over, it powered up, display illuminated, but super weak flippers, no sound or music, and some signs of water ingress / moisture towards the bottom of the cabinet. Playfield in probalby 6/10 condition - but certainly not a disaster. Given the relative rarity of these, the fact that I should be able to convince the better half that I can fit this into our small house, and the great music, I knew that I wanted to get it working. But... time and other commitments (and machines)... meant that it has taken until now before I am getting stuck in.
Fast forward to now(ish), and a decision that a more thorough than originally intended restoration is happening, the strip down has commenced.

First, I took a lot of photos of the inside of the cab, and stripped out all the boards and parts in the lower cabinet. Boards seem to be in fairly good condition, I removed the battery from the MPU board, vinegar-d / IPA-d and soldered on some fly wires for a remote AA battery pack

I cleaned up all PCB edge connect 'pads' with a fibreglass 'pen' and contact cleaner spray as there was some general grot there.


Some more photos of playfield wear. Also interesting to see the where I think was originally a painted 'CREDIT' has been replaced by a sticker. I think that this machine got a fair amount of use (more than Ron's!)

The coin door is showing a fair amount of rust - plan is to wire brush / strip all the paint off, use rust convertor to reduce chance of anything coming back, then use some crackle effect black spray paint to finish it. Hinge is stiff but hoping a bit of elbow and literal greasing will free it up a bit.

After clearing the base box / unit, I removed all of the plastics / rubbers and other parts from the top of playfield (photo is an 'in progress' shot).


With this done, the playfield was removed and I unscrewed all of the components underneath. I found a set of nut drivers very handy to do this - but still it took a while! A lot of the self tapping screws / hardware seem lightly corroded / have a dull surface - I am planning on cleaning these up in an ultrasonic cleaner, am still unsure of the best way to prevent future corrosion. Some screws that had been soldered to / very close to solder showed worse signs of corrosion. I ummed and ahhd about best way to deal with the lamp holders common ground wire that is stapled to the underside of the playfield - between lifting all of the staples and de-soldering all of the lamp holders. Seemed like desoldering would be easier and only took about 15 minutes or so to complete this.
With everything disconnected from the playfield, I slid a board of MDF between the playfield and all components, and used a few pieces of papertape to secure the lot to the board before lifting off. The hope is that all the parts will stay in a similar position to where they need to go back onto the playfield - and that along with plenty of photos should help when reassembling. Fingers crossed!

Next the remaining posts were removed, and staples / guide rails removed. I was not looking forward to removing the staples at all, as I have seen nightmares of the crimped ends lifting the top surface of the playfield. I first use a drift tool and hammer, with the playfield resting on some blocks of wood with a protective felt covering. This wasn't too bad - but I got a bit of playfield lifting.

Next I tried gently prising the staples out with a crowbar - note the photo shows the crowbar used, but I also used a another flatter bar with my other hand in order to spread the load on the staples and reduce chance of damage. Found it too hard to take a photo without any hands.. so you'll have to take my word for it! Overall the process of removing the staples was in fact a lot less stressful, and went a lot better than I expected with only seemingly minimal damage to the playfield. Given that NM seems to have a lot more of these staples than other machines I've come across, it was a huge relief.

Not the best photo but shows what happened to several of the staples - to me looks like the chrome plating cracking and coming away from the staple, but I am not sure about this. The metal was shiny underneath - I'm not sure of the best solution for this right now.

In an attempt to keep some semblance of organisation, I used a cardboard box (granted a lot smaller than the playfield) and poked the staples into a rough layout onto the box. Check out the big chunky staples toward the bottom! I was super nervous about getting those out but they came out as easily as the thinner gauge ones.

Now the playfield is fully stripped. Current thinking is that I will take this to get professionally restored and most likely clearcoated too. In my opinion worth it as the machine will be a keeper. I'm apprehensive about how the clearcoating will work with the large plastic screen in the centre of the playfield, but will have to see what Chris thinks. Before going for restoration, the plan is to scan the playfield in for sake of prosperity. To do this, I have a standard A4 flatbed scanner that I have removed the bezel / casing from, which can be placed face down flat onto the playfield, and a series of images saved and later stitched together. I also need to get another machine stripped down that will be receiving a similar treatment - but that's for another thread.
Hopefully posting this log on here will help keep momentum on the project and prevent me from leaving it all in bits for too long!
Summary of next imminent steps:
- Strip other machine playfield so the two PFs are ready to go to Chris (whenever the covid19 situation allows... :/ )
- Scan PF
- Sort out ground mods recommended for this machine (despite the common GND PCBs looking OK)
- Clean up all screws / other hardware
- Probably get rebuild kits for flipper, bumper and other solenoids
- New rubber kit
- Order other various bits that need replacing
- Tempted to order LED bulbs - I've not used LED bulbs before, but think that they may suit this machine
- Clean up the coin door and paint
- remove top part of cabinet, then restore / paint the lower part
- Clean all plastics
- Work out what to do about the staple de-chroming (if that's what it is)
- Probably other things that I have forgotten


