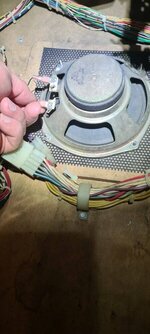
What's new
Pinball info

Register a free account today to become a member! Once signed in, you'll be able to participate on this site by adding your own topics and posts, as well as connect with other members through your own private inbox!

My Options?

Marcel

Registered
5Years
Joined
Feb 26, 2017
Messages
657
Location
Huddersfield
Hi all,
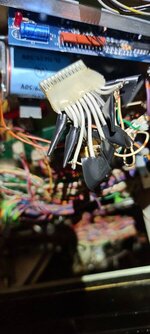
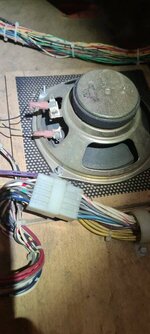
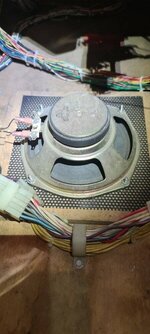
Just doing a little maintenance today and I noticed my STTNG speaker connector is broken.
Still works perfectly buy I am concerned that should this lead hop over to the metal Parton the speaker, it may short something.

Either way, I need to sort this to keep it in good order.
Would you guys gave an idea as to my sensible options please?
 

Attachments

  • 20220501_162447.jpg
    20220501_162447.jpg
    69.2 KB · Views: 33
  • 20220501_162439.jpg
    20220501_162439.jpg
    68.5 KB · Views: 33
  • 20220501_162433.jpg
    20220501_162433.jpg
    68.3 KB · Views: 33
Same same - no real stress there, so glue should do it..
If possible - maybe a small support, e.g. if you can glue a thin piece of card beneath the remaining side /rivet to strengthen the broken piece, that will add all the extra strength you need IMO.
 
Yeah, that's epoxy, that will be fine. JB Weld is another more expensive epoxy aimed a bit more at metals. That's a great product. For the speakers though Araldite should be fine.
 
Or just replace it with the same size sub off amazon. Be cheap and probably improve the sound alot.
The old STTNG will take 4 ohm subs.
Well I don't know much about correct practice for keeping authenticity v improving quality, but I had suspected this may be an option that may improve sound.
 
Having said that, I've never been 7pset with sound quality either.
Edit: I think glue is so easy there's no benefit in speaker swaps
 
Last edited:
Plenty of folk upgrade cab speakers. If you put out a wanted ad you might get a replacement for modest money
 
I've just glued it for now, had to sort it whilst tea was brewing. I can upgrade speaker anytime now.

Worryingly though, I saw a loose easth wire coming from the ball tray board. I've seen and dismissed it before as everything works fine.

But then close by, there has been a wiring loom repair, no doubt related to the loose earth.
I suppose its old age creeping in, but I don't want to leave this amateur loom repair as it is.
It looks and feels like the replacement multi pin plug is made using jelly and not an original plastic plug.

It also looks like there is just about enough loom spare to remove the jelly plug and re-attach a hard plastic plug which I'd imagine is simple task.

Second Look:
I've just realised the jelly is attached to an original plug. I just cannot understand why anyone would do this, proper back street job.

As far as I can see, I just need to make careful notes of wiring and re-attach the "original" wires without the silly jelly plug (or the single wire the single wire that comes out of jelly and which is soldered to the original pairs of wires), to an original plug, perhaps this very plug if it cleans up well.

Does that sound correct and can I source a replacement 12 pin (female) plug if it is knackered under the jelly?

Plus has anyone got a clue where the spare earth goes please?
 

Attachments

  • 20220501_233036.jpg
    20220501_233036.jpg
    63.9 KB · Views: 29
  • 20220501_231511.jpg
    20220501_231511.jpg
    80.3 KB · Views: 29
  • 20220501_231422.jpg
    20220501_231422.jpg
    91.3 KB · Views: 29
Morning,
Bloody hell well done for finding that, looks terrible have they twisted wires together and taped over ?
You can definitely get these parts there not expensive, I think you have to crimp them on though.
I’m new to pinball and electronics myself and it’s something I’d like to learn to do as these are the parts that burn out and fail commonly.
There may be a tutorial on YouTube or even on here no doubt ?
Here’s a link to parts but it’s all I can help with in afraid. Hope you get this sorted 👍🏻

Thanks dotty, they've twisted wires and then soldered but then just folded Electrical tape as insulation, it's primed for a bang.

I can only think someone was short of parts on his van and made doo as a temporary fix as the owner used to have it serviced by someone. Apparently he owned it for 15yrs before me.

Don't know how I didn't spot it when I bought it 4 years ago. But it worked fully so I was happy.
Although I had noticed it had had some wiring work much after purchase, I never realised how poor this was until the electrical tape started falling off just now and they were so close to each other.

I suppose I'll inspect the full loom now in detail. Still looks easy to do.

As for the tool, I already have one. It's a punch tool for the connector I need. Mine is like the one linked below ish. Athough I'm not sure how reliable these connector sockets are with two wires punch in.

If anyone know more of the earth wire it'd help please, I'm thinking it may just earth to another part of metal somewhere close (still may need a longer replacement) but to what?

 
Back
Top Bottom