Introduction:
When Stern and Pat Lawlor Designs were constructing the Monopoly pinball, they did not make ramp flaps part of the design except on the RailRoad Ramp.
The Problem:
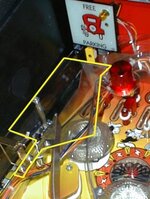
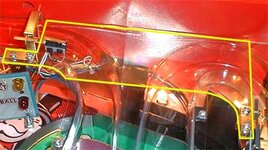
The Monopoly ramps tend to be so fast, airballs and other problems abound. There are also a few places that can cause severe ball jams. Especially on the middle ramp, where an airball can smack the back-side of the switch assembly, and send the ball rocketing down the ramp and eventually straight-down-the-middle (potential instant-drain). You can see enhanced pictures of the flaps we'll be building below. The flap edges have been highlighted yellow so you can see the general idea of what you will be building. Also note, no additional holes will need to be drilled in the ramps. A goal of this project was to NOT irreversibly modify the game hardware in any way. Another goal of the project was to make sure the new flaps did not create potential ball jams (painstaking detail to spacing was imperitive).
These parts are now IN PRODUCTION.
Buy them now from The King of Payne (Click Here!), or continue down this page for do-it-yourself instructions!
Flap 1 (Free Parking Ramp)
Flap 2 (Bank Ramp/Right Ramp)
What You Will Need:
The Thinest Lexan You Can Get (Mine was 1/16" thick.)
Scroll Saw (or Dremel and lots of patience...)
Dremel w/finishing bits
Drill w/bits
Philips-Head Screwdriver
Nut Drivers/Socket Set
Needle-Nose Pliers
Patience (The Most Important Ingredient)
The Procedure:
Coming Soon...
Pictures:
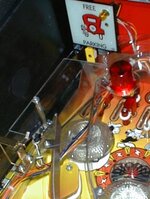
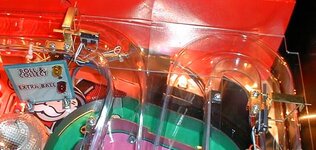

You can see templates for cutting the Lexan below. Clicking on these images will let you download an Adobe Acrobat PDF File that should closely approximate the actual size of the final product when printed. All measurements are given in inches.
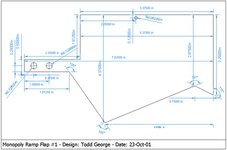
With Dimensions | Without Dimensions
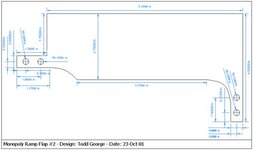
With Dimensions | Without Dimensions
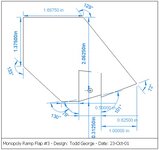
With Dimensions | Without Dimensions
More Procedure:
Once you are done cutting the Lexan on your scroll saw, or with your Dremel, drill the holes where indicated. The size of the holes is not incredibly important. To allow for some margin of error in my measurements, I used a slightly larger than needed drill bit. Drill the four holes in the Lexan where indicated by the cross-hairs on the template. At this point, take a Dremel polishing stone and polish all of the edges of the Lexan piece(s) you've created. I rounded the edges a bit, to be kinder to my hands if I'm working around this piece in the future. Be sure to clean the finished Lexan piece VERY WELL before installation. You don't want to have any excess dust enter your game. Reassemble the game in the reverse order of how you disassembled it, and you're all done!
When Stern and Pat Lawlor Designs were constructing the Monopoly pinball, they did not make ramp flaps part of the design except on the RailRoad Ramp.
The Problem:
The Monopoly ramps tend to be so fast, airballs and other problems abound. There are also a few places that can cause severe ball jams. Especially on the middle ramp, where an airball can smack the back-side of the switch assembly, and send the ball rocketing down the ramp and eventually straight-down-the-middle (potential instant-drain). You can see enhanced pictures of the flaps we'll be building below. The flap edges have been highlighted yellow so you can see the general idea of what you will be building. Also note, no additional holes will need to be drilled in the ramps. A goal of this project was to NOT irreversibly modify the game hardware in any way. Another goal of the project was to make sure the new flaps did not create potential ball jams (painstaking detail to spacing was imperitive).
These parts are now IN PRODUCTION.
Buy them now from The King of Payne (Click Here!), or continue down this page for do-it-yourself instructions!
Flap 1 (Free Parking Ramp)

Flap 2 (Bank Ramp/Right Ramp)

What You Will Need:
The Thinest Lexan You Can Get (Mine was 1/16" thick.)
Scroll Saw (or Dremel and lots of patience...)
Dremel w/finishing bits
Drill w/bits
Philips-Head Screwdriver
Nut Drivers/Socket Set
Needle-Nose Pliers
Patience (The Most Important Ingredient)
The Procedure:
Coming Soon...
Pictures:


You can see templates for cutting the Lexan below. Clicking on these images will let you download an Adobe Acrobat PDF File that should closely approximate the actual size of the final product when printed. All measurements are given in inches.

With Dimensions | Without Dimensions

With Dimensions | Without Dimensions

With Dimensions | Without Dimensions
More Procedure:
Once you are done cutting the Lexan on your scroll saw, or with your Dremel, drill the holes where indicated. The size of the holes is not incredibly important. To allow for some margin of error in my measurements, I used a slightly larger than needed drill bit. Drill the four holes in the Lexan where indicated by the cross-hairs on the template. At this point, take a Dremel polishing stone and polish all of the edges of the Lexan piece(s) you've created. I rounded the edges a bit, to be kinder to my hands if I'm working around this piece in the future. Be sure to clean the finished Lexan piece VERY WELL before installation. You don't want to have any excess dust enter your game. Reassemble the game in the reverse order of how you disassembled it, and you're all done!
