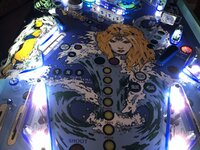
What's new
Pinball info

Register a free account today to become a member! Once signed in, you'll be able to participate on this site by adding your own topics and posts, as well as connect with other members through your own private inbox!

Complete Minty Stern Seawitch...now on site at SWL Salisbury 🤓

Keith, looking fantastic, but about those clear flipper bats, whenever we have a game come into the club with them on they usually snap within a day (our IJ just had that happen) - any reason you are using them and not stock?

also did the game have bally flippers and you've converted it back to stern?

Neil.
 
@Neil McRae currently we have no stock of the original stern flippers but yes that’s what will be fitted when we have finished. I cannot find stock in the U.K. (Andy has two @pinballmania ) but obviously we need four!
Thing is Stern used the one piece bat for only a few of there games, all earlier sterns used the separate flipper bat and shaft set up. This Seawitch came to us with Gottlieb flippers and mechs. So yes we have changed it back to Stern original set up which is B-634-1 and B-634-2 (left and right). The older mechs are B-195-l-1 and B-195-R-1. See below.........
Hopefully that answers your questions Neil.
One the subject of the clear flippers breaking we have never had that issue strangely, but our stock is some years old now so maybe quality (like so many pinball spare parts currently on the market) has been compromised. To prove the point as many of you know Rich’s Fathom @RuyLopez has been on site At swl (one of the most popular with visitors) that had a set of clear flippers and they never broke in over 3 years in fact one of the plunger/link assembly’s gave up first.
Cheers Keef.... and thanks for following this thread all comments, observations and opinions always welcome.......👊🏼image.jpgimage.jpg

Games that use B-634 include big game Seawitch cheetah quicksilver stargazer flight2000 9ball freefall lighting split second catacomb iron maiden viper cue dragonfist according to my old stern parts manual which is one of my most useful references......
 
Keith, re. the resistors for the upper flippers, some Stern manuals* do mention them. Not in the relevant games' own details, but a schematic showing the flipper wiring - a sidebar says 'on some games, a 1 Ohm, 5 Watt resistor is used to reduce power (of upper flippers)'

I'm not sure if the later '634' type flipper assembly only ever used a 1-piece flipper, though. My own Seawitch had flipper units with the separate 'shoe and shaft', in the correct length for the 634 unit. The two that weren't 'suzo' copies of Medusa translucent Red, anyway. Could there be a less suitable game for Red flippers, with only a few spots of Red anywhere? They chipped very easily, too.

The two 'Ali' machines that I owned both had the 634 type, so I'd take it all the games with 7-digit scoring used it.


apologies but I find eos switches fascinating and they are so crucial to strong reliable flipper power..... maybe it’s just me?

No, it's not just you. Though people used to solid-state flipper control often don't realise how important good End of Stroke switch condition and adjustment are with the older set-up.

* the manual for Cheetah does, page 21, sharing with Mpu jumper information, just as you'd expect..
 
Last edited:
No, it's not just you. Though people used to solid-state flipper control often don't realise how important good End of Stroke switch condition and adjustment are with the older set-up.

I'm curious to learn the subtleties, since rebuilding the flippers on Flash Gordon the right flipper power seems to vary quite a lot. Making small tweaks to the EOS switch positioning helps initially then it'll revert back to being a bit erratic and inconsistent.
 
LIGHTING AND POWER PART 2.

First @Jay Walker yes know what you are saying about the flippers, probably down to Stern stock!. The shaft length is not the issue if you compare the flipper bats they are different sizes and it does effect gameplay. My statement was purely based on the stern parts manual...... and we know how reliable manuals are. But how would we get by without them......

Progress was made on the g.i. Part of the illumination with all starposts Leds soldered in place ready for testing.we powered up the g.i. With 6.3v and the total g.i. Draw with the extra illumination (minus the apron leds, as that needs painting and redecalling) was 1.3amps intotal so well pleased with that....... here it is lit up.
AA594665-E1B8-4958-BF7C-6C9C8D3166E1.jpeg

We decided on clear posts and blue rubbers, happy with the results. New drop targets installed....
Also Col @Colywobbles did us a set of blue protectors that look gorgeous! Here’s the drops, clear/ blue combo and Colin’s fabulous protectors....325684B9-2024-4DF0-9AA0-B4D7B3457748.jpegEBDDF16F-6CD4-4500-9A24-F8C252447DBA.jpegF0B9C195-8610-45FE-8D38-1FED5F1C1987.jpeg
All three pop bumpers installed with caps, and 18 led comets......92F5AA3F-71DB-4300-A972-D76B838ED1B9.jpeg428FDE9D-4B7E-4617-A71E-3496E8764AE4.jpeg
Plastics having a dummy fit and play around....

4071BA64-F0B0-48A2-B88E-34493FB71C46.jpeg404E3372-4C58-4E45-8C76-59BDAD753EEA.jpeg

Next job is to fit some new flipper buttons, flipper switches and rgb LEDs......watch this space doodes......cheers Keef 😎
2B68652F-2374-463C-B2CD-0FFE6DB7DDED.jpeg
 

Attachments

  • 569A56DC-4035-4DBC-8D68-92DA6C1CA9DC.jpeg
    569A56DC-4035-4DBC-8D68-92DA6C1CA9DC.jpeg
    205.8 KB · Views: 1
POWER 💥.
The power supply connectors on this Seawitch were in a very sorry state of affairs. Most were soldered to the old power supply pcb or were badly burnt and/or on terminal blocks here’s what they looked like....
15EBD48B-E675-4CEA-BFB3-A2FC015A7294.jpeg
Rosie was about , she’s our re-pin expert. Well that’s what I tell her and she finds it rather therapeutic (?) (Probably in my mind also😝) any case she’s good at it whatever.... here’s the new pins and connectors.....
3ED50D6E-E2E1-4064-A9C1-FE3C97525C8C.jpeg

And... Taaa daaa.... all cables re-pinned.......BD0F591A-DB5A-4EF2-A3A4-F4F3BD715012.jpeg
Now you have to be careful how you put these back as some colours are duplicated but the gauge of the wire is different so always double check them before inserting into the connectors.....
Here’s the results.... much neater and reliable........
0AC0BA39-AFE1-485A-9878-20E9F0F7DDE8.jpeg

From earlier here’s the flipper buttons fitted. (Set to turquoise) and the new flipper switches, again essential for maintaining a powerful flipper. No point getting new eos switches without new flipper button switches in our opinion 😎
6AB556C8-AC0E-4DFA-9488-47833F5E6E95.jpeg5A483088-2F38-49BD-AC81-955E0F5EB5C7.jpeg
 
SIDERAILS.
A nice sunny day has allowed us to complete The siderails. Leaving only the apron and shooter guide left to paint.
Pleased with the colour choice. As wasn’t sure if to choose the slightly darker blue. Here they are repaired, repainted and installed.
F3AF22A3-8B85-4967-A8CA-8A19D39E8C86.jpegCC58830F-5E11-4602-8A8A-F2A2732122CD.jpegFE960128-54E2-405F-BF82-4195FC71E449.jpeg
In the following picture, if you have played a Seawitch before you know there is a ball guide to the right of the spinner that is flexible, allowing you to launch the Ball around the orbit from plunge, but also doubles up as a orbit guide from the spinner shot. I lost the one originally on the machine (this was a home made one from a coke can) purchased one from cliffy a few months ago(well about 15 actually) and now we have lost that as well! With cliffy running at 4 months on orders currently this is distressing news indeed!😔 long shot I know but if you have one or a lead on one please let me know....
Here’s where it goes...right of the 2x....


3D907C5D-27B5-421D-AAC8-B1602DACE247.jpeg
And this is what it looks like.........
015D7F19-5442-40AB-86D8-574027D32A27.jpeg
Next up time to plug in all the connectors and reconnect the lightboard for the backbox and install the scores loom....
 
While we're discussing this area;

Do all examples of this game have an occasional 'skill shot/cheat' where the ball passes up the tight channel below the upper right flipper, and drops back onto the plunger, without operating the star rollover? Normally, a player would send it back into play as intended, but if the rollover happened to be lit for a Special, I'd nudge the machine to have the ball re-enter down the 'Runway' channel, as I think it's called.
 
SHE BOOTS.
To fit the new orbit flap from Cliffy you need to raise it slightly to avoid this happening on your new Playfield......
Here’s what happened to the original....

AD58AD27-C9A8-4799-989C-40685CD1B1F3.jpeg
So best to mount it on a couple of mini washers, like this.....BC87BBE5-C1B7-491E-9D7D-0126147209C7.jpeg5A89C88F-42F5-4EAB-B10C-A3E0CE2AB87B.jpeg
And here it is in place. Time will tell if we need to adjust any of the loop guides yet, as from what I have heard the ball can rattle and stop just above the spinner!FAE856C7-19F1-4578-91FA-693C850CB8FB.jpeg
Next job was to install the score displays loom, which was removed when we resprayed the backglass illumination board. Left the wire in a bit of a pickle so we had to tidy those up as well.......
BEFORE...
F513A5C4-190D-4157-B143-E17B36DB2264.jpeg
AFTER...
2BFB38C3-3D05-4EF9-8AB4-F6CBCA9327EF.jpeg
Just need to clip underneath the mpu before we’re finished.....
Plugged all the cables in to see what we get, it booted with the following results.....
THE GOOD.
All displays working.
All inserts correct.
Backbox illumination operates.
All switches good.
Starts a game.
THE BAD.
No sound. (Refuses to boot with sound pcb connected)
No right flippers
Playfield fuse blowing. (So no coils except the knocker)
Not bad for a fresh rebuild, will look into remaining faults and report in this log..... here’s a few boot pictures....
62040FE4-5576-4535-BF2B-75A121E7BD7F.jpegDA07B938-8A89-40F0-95B9-819A9881E853.jpeg
 

Attachments

  • 58EA09F6-F8B1-4CC5-9292-3745C76DB260.jpeg
    58EA09F6-F8B1-4CC5-9292-3745C76DB260.jpeg
    233.1 KB · Views: 2
THE SOUND OF THE SEA.
Yes we have sound. It was the interconnection cable between the soundboard and the cpu. We put in a new one and it worked! Hooray! For information about connecting this cable pin one is the right side of both boards. Start there with the first cable (they are both sixteen pins) then insert the next cable right up against it at pin seventeen this will leave two pins not connected on the cpu pin 33 and 34. (See below)
F191D9D4-F99E-404E-909C-A62EE9C8FDAA.jpeg

Here’s our new cable connected......
6C33A02B-5D72-45EE-B647-D06F961C1535.jpeg
The background sound was still absent, this required a reset of the alltek cpu and a couple of clicks of dip switch 14 (needs to be on for background sound).
The background sound on Seawitch is awesome it sounds like being on a beach, calming sounds of waves breaking, really cool 😎. So that’s the sound sorted. More on the solenoids tomorrow.......
 
Stern's no expense incurred ribbon cables, again. The earlier games, like my Wild Fyre, used two bundles of alternating Red and Yellow wires for connecting the sound board.

One of my favourite sounds on this game is the cheeky effect made by the star rollover in the upper loop, particularly if the ball pops upwards from the 'lagoon' bumper area.
 
Last edited:
NEW CPR BACKGLASS.
ok. Time to unwrap , inspect and install the new backglass. The old one is above average I would say for a 43 year old machine. But definitely deserves a new one. The new one is a cpr not a Greatwitch.
Here’s the two side by side for comparison. Initial observations are that the colours are very good, but obviously the definition of the cpr is inferior if you look closely. Here they are....
This is the original….
D73B6E5F-E1D1-487B-8E19-D074ABB77436.jpeg
This is cpr’s……
321AB1A1-6230-4369-9CE3-9866A26080DB.jpeg
Side by side…..what do you think?……
7CA45FCC-0E68-4C41-AB5F-AF48579FF27B.jpeg

Here’s the new backglass installed with new trims and illuminated. Looks gorgeous……
7BC964D6-FFF9-4C99-9B2E-0672E7356E70.jpeg
 
DEAD ! 🤯
Planning on finishing this today , turned it on this morning and completely dead!
On/off cabinet switch felt a bit stiff so we had a look........ one of the terminals had broken off. Phew nothing tricky for a change......2DEB1F51-FACB-47C2-AFD8-90926A23550F.jpeg

So whilst the playfield was up we replaced that very unique cluster of resistors.......
56A9E47A-28F4-480A-8B5E-2AF579F00C39.jpeg

And replaced with a nice cement resistor of the 10 watts 1 ohm variety.....
2F6FD092-3613-4604-AE27-8E331EFD118D.jpeg
Gameplay second test and adjustments coming up next......
 
APRON LEFT AND A BIT O FETTLING.
So after replacing the on/off switch calm was restored. Time to press start we thought. No point just staring at it and admiring its beauty. (Bit like being married to Kylie Minogue, and just.....well you get the point).
Mind you the art and colours used on this machine are gorgeous. Had a few games and it plays very well, we had to adjust the posts behind the centre drop targets, as they were not resetting correctly. The orbit needs adjustments at the spinner side. The spinner on a clean hit will give 50 spins its a real buzz that orbit shot particularly on loop lit x2💥
Absolutely love this game, never played one with full power on the flippers before, it’s fast and furious. Real fun.
Sounds are very basic but pleasant not annoying.....
So left to sort out...
1) Apron and shooter guide resprayed and re-decal.
2) drop target adjustments, as having occasional ghost drop on reset.
Otherwise wow love it... good ole Stern..... here’s a few pictures of it.......39A589C1-251D-4311-8DB6-70EF5517E6A2.jpegBB45EDB3-AEAE-4BA4-BD9A-87A814FF4490.jpeg3A6D2B67-BCF7-4241-8D0A-7DFFDEC16800.jpeg66F40AB5-97E5-40AB-871C-AC2BBDC73245.jpegAFC12DF3-B3D7-47E1-88FB-9E533BC1E6A3.jpeg6F1C8613-EDB3-4967-BA37-E0703F530702.jpeg99F8B1FC-032D-4547-B26F-07C2D179F828.jpeg4A2550F2-B76F-49E1-940C-9661BE7A64A4.jpeg13FBA7ED-F731-40B0-B621-CF69BB3315BC.jpegF6F6D7D0-9E43-44DC-B398-12B0F7969E62.jpegC0BB47CB-89EC-4B6D-B395-AED2774D86E1.jpegA998B5CA-291A-4525-8887-85887BE27CFC.jpegEE4F8AB6-80F8-4EB0-B977-00572FF3B860.jpeg7F28292D-0974-48B0-9C42-781074E21EF3.jpeg6B6F1A22-79D3-42B3-818E-DE2049F1A45D.jpegB406ED5A-4513-4436-91BD-1E2D79396F3B.jpegA898895B-DFF5-4524-B643-87319540BAFA.jpegA7A10CB6-1D6C-4AF3-B826-D971DE7C8DD8.jpegA406119E-2C7C-442F-B212-F05026614690.jpeg6D94D995-3B7C-4C2E-8976-B31C2C3296F7.jpegD1E0DB50-5756-4946-B744-684C7C11EE95.jpeg6E6EC3FC-E289-4FF6-B8DE-313DE1967143.jpegC5BECF96-F068-4B52-9A9A-B131B5FDE5AB.jpeg
 
Those white LEDs are perfect with the artwork. I bet some people would have got to that point and ruined a minty game with coloured GI.

Fettling is my favourite thing 😄 
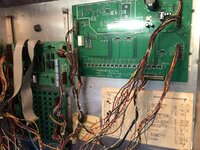
getting ball feeds right and making sure a game not only looks nice but plays nice!

I want to play it.😄
 
ONE FOR THE PURISTS. (Aka lightening flippers).

Ok so Generally we do like to keep things original, but as you know on occasion sneaking in the odd acceptable mod, pimp, or accessory. After a lot of investigation (See early discussion on Stern classic original flippers.). It was decided that we would go to the trouble of fitting the original flipper type the designer intended. The Stern part: B-634. Now it turns out that the B-634 flipper bat is 72.5mm long whilst the B-195 type bat (Currently fitted) is 76mm long and 2mm wider?!.....
Bit like installing lightening flippers to a GOTG! Absolutely ridiculous! (Let the reader use discernment...... @Neil McRae ).

So here’s the thing. The original flippers make it easier to shoot the spinner and hit the loop from the upper left. That’s a very good and pleasant thing. But the sdtm drains are crazy 😝.... anyway here’s a few pictures for you my fellow purist pinheads!
Enjoy..... nearly finished now....
18B2C77A-EFCF-4AB1-BF8F-99BF0A2C25AC.jpegFCB89939-CA28-4FD1-B9A5-67796A1FAC2C.jpegC1F9B528-8207-4150-93BF-7DAE565845A7.jpeg66586218-5335-477A-8AEB-2EF1AFFA03ED.jpeg0587ED5C-5694-4DE8-83FD-4740C3A55E23.jpeg

I think I need a decent camera, these pictures are ****
 
Back
Top Bottom