What's new
Pinball info

Register a free account today to become a member! Once signed in, you'll be able to participate on this site by adding your own topics and posts, as well as connect with other members through your own private inbox!

Complete It's another Hook!

ChriX

Site Supporter
Joined
Aug 29, 2011
Messages
140
Location
Cornwall
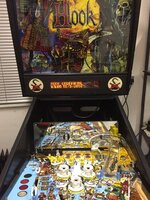
Whilst this almost certainly won't end up as nice as @PeteB Hook in the thread on here, mine needs a clean so thought I would start a log. I purchased this one after a wanted thread on here a few weeks ago, it's sat in the workshop folded up until last night as I stumbled across this video on YouTube and it made me want a go :D

@JWG9999 you might be interested in this one?

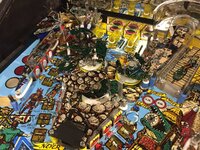
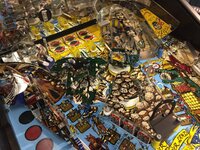
Will be going full LED playfield on this (except flashers) as have not done one before. The machine already has a PinLED display but needs the segments aligning and I'll put in some red gel. Also have planned to rebuild the ropelights with LEDs. Other than that just a good cleanup, mylar removal, some playfield touchups and new bits where necessary. Let's get started with some before shots...

IMG_0798.JPGIMG_0799.JPG IMG_0801.JPG

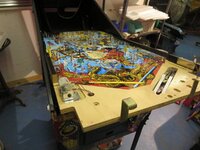
Starting to get somewhere...
IMG_0863.JPG IMG_0865.JPG IMG_0861.JPG IMG_0879.JPG


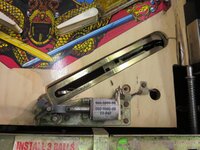
Posts for the tumbler (this may take a day or two!)

IMG_0869.JPG

If you look on my Instagram @chrixbuilds I'll probably post more photos there.
 
Looks like you're off to a flying start man! I'm sure it'll turn out great.

I shudder at the thought of ever shopping out another Hook, however. o_O
 
Great time to own a HOOK what with the new game code imminent and yours looks a nice one. New forest pinball is selling the LED flashers here http://www.pinballinfo.com/community/threads/super-bright-89-9-led-flashers.34952/

Interesting that you have yellow pop brackets (like mine) most I've seen have blue. Check them underneath that they're not cracked where they bolt onto the playfield.

I look forward to following your progress :thumbs:
 
Getting there with disassembly now...

Found that one of the flipper coils is wrong, missing the stronger right one for the windcoaster.
IMG_0888.JPG

There was a Cliffy on here but unfortunately the wood wasn't filled first so it was wrecked. Got filler in progress and new Cliffy on the way.
IMG_0880.JPG

Almost there with the top level cleaning! The mylar came off really easily with freeze spray, and all the goo has been cleared up.
IMG_0892.JPG

Tools and parts everywhere!
IMG_0886.JPG
 
Interesting that you have yellow pop brackets (like mine) most I've seen have blue. Check them underneath that they're not cracked where they bolt onto the playfield

Surprisingly I have them all off and can't see any cracks or anything broken. Will rebuild the pops anyway but no need for new brackets this time!
 
Posts coming out nice considering how bad the corrosion was on some. This is tumbler, buffing wheel then ultrasonic cleaner. Started to put some back in just to minimise the number of parts floating round, top side is clean but now have bottom side to do.

IMG_0895.JPG IMG_0898.JPG
 
Been slowly progressing.

Firstly cleaning all the inserts and installing LED kit from the bottom...
IMG_0899.JPG

Then started refitting ball guides and more posts. The ball guides polished on the buffing wheel on the bench grinder; brilliant tool, I seem to use it for almost everything.
IMG_0902.JPG
IMG_0901.JPG
IMG_0903.JPG

Then spending an inordinate amount of time on stuff you can't see under the apron:
Before:
IMG_0797.JPG

After:
IMG_0906.JPG
You can see the trough rails were a bit bent so sorted that as well as the mechs.

The link was a bit worn, in the interests of pressing on I quickly made a new one out of a bit of stainless... I think the hole spacing is right but was hard to tell from the oval shaped holes in the old one!

Before and after:
IMG_0905.JPG

Also got the red shooter rod and correct spring
IMG_0907.JPG

That's it for the moment, probably will do flipper mechs next but will need some parts ordering.
 

Attachments

  • IMG_0904.JPG
    IMG_0904.JPG
    117.5 KB · Views: 18
  • IMG_0900.JPG
    IMG_0900.JPG
    139.6 KB · Views: 19
  • IMG_0837.JPG
    IMG_0837.JPG
    149.3 KB · Views: 20
Just a few more bits done. This bracket that holes the rails into the back of the skull was looking a bit rough so refinished it:
IMG_0910.JPG

And after:
IMG_0912.JPG

Got a silicone ring kit from Titan, but missed a couple as the manual is wrong (of course) :(
Just working through cleaning everything and refitting as I go now.
IMG_0914.JPG

IMG_0913.JPG
 
Good choice with the blue post sleeves on the slings (and everything else). Really helps them blend with the playfield.
 
Have you thought about getting some new slingshot plastics? Yours look a bid faded, seems to happen on all Hooks. I got some new ones for mine and it made a world of difference:

c1.staticflickr.com_8_7549_28078230136_8a19061b59_b.jpgIMG_5759
 
Yeah they are a bit faded Pete, I had thought about it but haven't given any time to looking for a pair yet.
 
Bit of progress on the right ramp...
IMG_0921.JPG IMG_0920.JPG

Cleaned up and back in the game...
IMG_0935.JPG

Gradually getting through all the plastics
IMG_0936.JPG
 
Does anyone know where I can get replacement hanging gates for the ramp entries in the above pic? One of mine was a thin bit of very flexible wire, and the other one snapped when I took it out :<
 
Does anyone know where I can get replacement hanging gates for the ramp entries in the above pic? One of mine was a thin bit of very flexible wire, and the other one snapped when I took it out :<

I have a parts playfield which is being stripped down. I will see if the ramp entry gates are there and if so you can have them. ;)
 
That Rufio ramp has come up great - how did you clean it?

Re. the gates my machine has straight but I see a lot have a square/wavey form:hmm: Also have you got the no-return gate on the lane under the shooter skill shot?
 
Thanks @astyy Agree the ramp did come up nicer than expected! This was just washed in warm/soapy water then flame polished. Also took the metal parts off, cleaned and polished and riveted back on with fresh rivets.

I do have that gate as well.
 
Back to it after the holidays... getting very tired of drilling out and replacing rivets but I think they are all done now!

Firstly, perhaps a bit premature, I burnt the new code and installed.
Photo 20-12-2016, 21 14 38.jpg

Sorting out plastic assemblies. All the little L brackets had corrosion that I wanted to clean, so that meant drilling out all the rivets, polishing them up and putting back together. Very tedious.
Photo 07-01-2017, 15 53 25.jpg Photo 10-01-2017, 20 59 36.jpg Photo 15-01-2017, 13 45 28.jpg

Looking good with them all done and back in though. Also refreshed all the targets.
Photo 15-01-2017, 17 04 20.jpg Photo 15-01-2017, 17 04 39.jpg

Now working on the launch/skill shot ramp. Current state of reassembly below.
Photo 15-01-2017, 17 12 28.jpg
 

Attachments

  • Photo 20-12-2016, 21 14 38.jpg
    Photo 20-12-2016, 21 14 38.jpg
    131.2 KB · Views: 16
  • Photo 07-01-2017, 15 53 25.jpg
    Photo 07-01-2017, 15 53 25.jpg
    113.1 KB · Views: 17
  • Photo 10-01-2017, 20 59 36.jpg
    Photo 10-01-2017, 20 59 36.jpg
    134.8 KB · Views: 15
  • Photo 15-01-2017, 13 45 28.jpg
    Photo 15-01-2017, 13 45 28.jpg
    137.9 KB · Views: 17
  • Photo 15-01-2017, 17 04 20.jpg
    Photo 15-01-2017, 17 04 20.jpg
    272.9 KB · Views: 17
  • Photo 15-01-2017, 17 04 39.jpg
    Photo 15-01-2017, 17 04 39.jpg
    256.7 KB · Views: 18
@PeteB did you manage to find those ramp entry gates?

Yes! I've got both the LEFT and RIGHT ramp gate wires. They could do with a polish, and should come up looking fine.

I've took them off ready to send to you, just inbox me your address. :)
 
Pics to follow but went for it this weekend and got it all running.

This machine has a Rottendog PSU which I had some difficulty getting to behave. If I ran everything on 12V reg. then the sound would crackle when the chaser lights came on but if I ran it all on 12V unreg then the entire sound board would keep rebooting. I ended up with a fully working solution running the chaser lights on the 12V reg line and everything else on unreg... very strange, it's like the PSU isn't up to it at all. I'll need to modify the board if I want to make it permanent, it's just rigged up at the moment, but is working well!
 
Yep, it's caused by the chaser lights pulling on the PSU when activated. For my XPin board there was a fix, basically involved desoldering a component and putting a jumper in. I took that option instead of getting a new version replacement board from XPin.

I don't know what the fix would be for the Rottendog board but it would be worth emailing them to discuss the problem. They are likely aware of it and will be able to suggest a fix.
 
the best solution for most Rottendog board problems seems to be throwing it in the bin and using something else less sh1t

gif smug thick donald.gif
 
Thanks chaps, I am happy I can mod the board into a working state for the machine but have emailed them for ideas. Wish I had the original to repair and put back in!
 
Cool!

Also I remember now as well the big capacitor on my board was wayyyy underated, something like 10,000uf when it should have been 18,000uf like the original boards. Obviously I replaced that too, but having never seen a Rottendog PSU board I don't know what they're using. It's probably all the same circuitry though right, and should be easy to modify?
 
Back
Top Bottom