What's new
Pinball info

Register a free account today to become a member! Once signed in, you'll be able to participate on this site by adding your own topics and posts, as well as connect with other members through your own private inbox!

Flipper mechanism sticking on EOS switch

Durzel

Registered
Joined
Oct 1, 2017
Messages
2,041
Location
Bath, UK
Slowly trying to learn how to do routine maintenance myself...

On my TAF recently I've been seeing the left flipper stick up. Usually it has become freed either by pressing the flipper button again, or vibration, etc. On a couple of occasions it has stuck up and the game has reported "L Flipper E.O.S is stuck closed".

Turning off the machine when the flipper is stuck will leave it in the upward position, from research this suggests the problem is mechanical, not electrical.

The flipper itself is strong, and there isn't obvious sticking in the sleeve or anything like that.

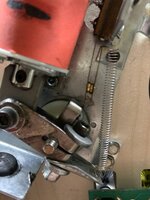
Lifted the playfield and noted that at the full travel of the flipper bat the mechanism appears to get wedged against the longer EOS leaf. It looks to be like the leaf isn't long enough? Though I couldn't explain why a leaf would lose material...
79997

Could it be the case that my flipper is traveling too far instead? Is that a thing?

I've been told by someone else (who hasn't seen it in person) that they think it needs a full flipper rebuild? Surely I can just replace the EOS switch can't I?

Thanks in advance.
 
Yes. The eos looks too short, it also looks the wrong type. The spring is also not standard, and the flipper link has been shaped where it contacts the coil. This all points to worn parts and id agree that it’s due a rebuild. But yes you could just change the eos.

Best thing to do is remove the end stop and move the coil aside, and look at the plunger. If it has an original bevelled end then it may have more life in it. If it is flat, mushroomed, or has been rebevelled then it need replacing.

You could just replace the eos plunger and end stop as a minimum but for the sake of a few extra £££ you may as well fit new pawl as well.

Andy
 
That's what I did (actually, bought a few - you'll need them at some point or other, particularly with 4 flippers on the TAF...
 
Best off rebuilding the lot as Andy says. It's a shame the flipper rebuild kits don't come with the bushings that screw to underside of playfield though.
 
Andy's single flipper rebuild kit above gives the option to purchase a bushing. Glad you've said what that is now because I chose to add it to my order lol
 
As Andy said, your flippers are worn out, the link is touching the coil. How people can move on a top end top condition machine as this was, when it clearly needs a little TLC seems madness to me, £50 to rebuild all four flippers really isn’t going to break the bank. In the home use environment with a number of machines available for play at any one time, they’re going to last a long time between rebuilds.

Coincidentally pretty much all the machines I’ve bought have also needed flipper rebuilds, although I would rarely buy a shopped/restored machine. My recently acquired RS (bought as a project) was no different, but I had flipper kits in my parts box, so man maths states they’re at no cost! Haha

Get them rebuilt and enjoy the improvement.
 
Yeah it's an oddity for sure. It doesn't help that I (still) don't really know what I'm looking for in terms of wear in areas like this. The flipper itself didn't feel odd, there was plenty of power and snap (?) to it, but it took one photo for the experts on here to spot obvious issues. I wouldn't have suspected anything wrong were it not for the fact it was very obviously sticking up on about 3 out of 10 flips.

Have bought a rebuild kit and will have a crack at it (my first attempt) and see how I get on.
 
As Andy said, your flippers are worn out, the link is touching the coil. How people can move on a top end top condition machine as this was, when it clearly needs a little TLC seems madness to me, £50 to rebuild all four flippers really isn’t going to break the bank. In the home use environment with a number of machines available for play at any one time, they’re going to last a long time between rebuilds.

I don't know who sold this, and not commenting on it specifically....BUT lots of modding/LED experts around these days, fewer owners who actually know some of the basics/essentials of pin maintenance.

Hobby has changed. More high end machines circulating these days, but fewer projects keeping hands dirty in the garage [emoji3]


Sent from my D5833 using Tapatalk
 
I try to pick up bits here and there, but my time is very limited unfortunately. I get home late enough these days that the weekends are the only time I really get to do anything meaningful. I also personally err on the side of caution (and OCD) when it comes to maintenance so I would prefer to pay a professional to do soldering related stuff rather than attempt it and stand an above average chance of ballsing it up. The goal is ultimately to learn as much as I can from reading stuff on here and where possible supervising pros doing repairs.

I'd like to think that I've got to a point now where I can do a little more than simply wiring up mods, I've removed ramps and re-rubbered machines. I even rebuilt a friend's slingshot! :p But yeah, there are still lots of things to learn.
 
Have bought a rebuild kit and will have a crack at it (my first attempt) and see how I get on.

It’s just nuts and bolts, far from rocket science. Just take your time, any questions you have I’m sure will be swiftly answered here.

The chewed Philips/Pozi screws holding the coil bracket, shown on your picture are incorrect, they should be socket screws and will be included in your rebuild kit. Do it right, do it once and it will last you a long long time.

You will need some imperial Allen keys and spanners, and don’t forget to leave some endfloat on the flipper shaft. There is a proper tool, in fact the original brown envelope came with my TAF, had various general spares/plastics and the little setting tool for endfloat, think it’s about .020” (0.5mm) from memory.

Chris
 
A few points to bear in mind;

There should be lock-nuts for the flipper bushing on the hidden side of the baseplate, so it's usually best to remove the flipper paddle/shaft and take the whole unit off the playfield. Depending on your soldering skills, leave the coil and switch in place while doing so, i.e. unsolder them (though the switch is to be changed anyway). Having the whole assembly built-up away from the machine (with the paddle* temporarily refitted) allows a better overall view of the task - you can hold the unit in the 'playfield down' attitude and see how much vertical play to give the pawl/link/plunger for smoothest operation. The ideal is to set the pawl on the shaft so that the plunger has minimal resistance sliding into the coil sleeve, regardless of the 'chip fork' setting tool, which I never bothered with, even asking Williams what they meant by "Keep that great flipper play on your game", when so many were poorly set on the production line

If there are 5/16" lock nuts present, watch out for 'loctite' or similar product on the threads. A tip I heard from a Williams service lecturer is to use isopropyl alcohol (tape head cleaner drops) to loosen these

The screws for the existing EoS switch don't look right; the lower one has a counter-sunk head, and the other looks too long and thick

Take care with the 3/8" nut closing the flipper pawl onto the shaft. It's quite soft metal, if over-tightened it can strip the internal thread, leaving a ghost of itself on the bolt

The screws holding the coil bracket, while chewed up, are the type I recall Addams being originally fitted with. Another thing I now remember is using the leeway allowable with these screws & the bracket to give the coil a little horizontal (and rotational) play

Red flipper coil, is it an 11630? Besides which, best practice is to have the solder terminals at the end away from the stop. Check for the sleeve being damaged by the link hammering into it, and that it isn't fused into the plastic bobbin of the coil

The kit shown doesn't seem to have any fasteners, but they'll be an imperial type thread, listed in the assembly drawing of Addams or any other Wms game. Incidentally, Addams were built with the older type plunger link, which I preferred to the new type, with its external spring (the coil bracket still has four lugs for locating the older conical spring)

For the future, a guide to wear is to hold the coil plunger against the stop with a fingernail on its rear edge, and see how much the pawl and plunger can be moved horizontally, i.e. how much movement is being lost to wear between the plunger/link and link/pawl. Usually the former goes first. Compare the coil stop against a new one, placing their actual stops against each others' uprights; two new ones will make full contact, a worn one will be short of the new ones' upright

Be prepared for renovation of one flipper to cause its previously satisfactory partner to seem less so afterwards


* and a spare coil/sleeve, if you'd prefer to leave the existing one attached to the machine
 
Last edited:
Thanks

Looks like I'll need 2 of these: https://pinparts.co.uk/products/screw-5-8-x4-for-eos-switch-mounting for the EOS switch. Any ideas where I might source them besides Pinball Mania? Literally only need two screws so seems overkill to place another order when my kit has already been dispatched.

The screws holding the coil bracket, while chewed up, are the type I recall Addams being originally fitted with. Another thing I now remember is using the leeway allowable with these screws & the bracket to give the coil a little horizontal (and rotational) play
I also did confirm that the chewed up screws are in fact the ones listed in the Addams manual (sorry taz).

Red flipper coil, is it an 11630? Besides which, best practice is to have the solder terminals at the end away from the stop. Check for the sleeve being damaged by the link hammering into it, and that it isn't fused into the plastic bobbin of the coil
Yup, 11630. Interestingly TAFG manual says they should be orange - 11541. A cursory search on Google suggests this isn't particularly unusual (if wrong) and I have no trouble making any shots so I'm not going to lose any sleep over it right now. Right now I just want to fix the sticky problem.

Be prepared for renovation of one flipper to cause its previously satisfactory partner to seem less so afterwards
Yeah that's what I'm worried about now. I'm even looking at full ready made kits lol :)

Thanks again for your help.
 
They're holding in the speed-nut rather than the bracket or the switch, maybe take that off and try a diy or hardware store for some that will catch in it. The crucial thing is being long enough to reach through the plate, but not contact the coil
 
I also did confirm that the chewed up screws are in fact the ones listed in the Addams manual (sorry taz).

Apologies for the mis information, the socket screws I mentioned should be on the stop bracket, and as already said, the screws you pictured are indeed the correct type.

Chris.
 
Super dumb question time..

I checked the other flippers in the game and with the exception of the coils wires/diodes being at the "wrong" end of the mechanism they all look correct in terms of parts & cleanliness. Am I ok to rotate the coils on all of them so that the wires/diodes are not on the coil stop side? That won't reverse the behaviour of the coil will it?

:oops:

Also - anyone know a source for "#6 Lockwasher, split" (I think they are called split lock washers too), B/W part code 4701-00002-00? They are needed for the EOS screws and it's the only part I can't find.
Also called spring washers


Sent from my D5833 using Tapatalk
 
Reversing the placement of the coil won't affect the magnetic forces it produces. I wondered if the "Right Hand Grip Rule" would mean that having the current flow in the opposite direction (CW or CCW w/regard to the metal plunger) would make a solenoid operate backwards, but AIUI this doesn't occur due to the solenoid power being 'pulsating' DC

Williams flipper coils have a peg on the terminal end of the plastic bobbin, which fits into a cut-out in the locating point, whether end stop (on the earlier type) or supporting bracket. This didn't prevent many from cutting the peg off to fit a coil whichever way was necessary/convenient


* When making a 'thumbs up' with the right hand, if the fingers are imagined as turns of a coil winding, then with direct current flowing towards the finger-tips, the resulting magnetic force acts in the direction of the raised thumb
 
I guess the million dollar question is - would you switch them all around if that's all you were doing? I mean I could give the sleeves and plunger a clean but they look in great condition anyway. All I would be doing is rotating the coils because it's not the best practice way of doing it. Are the diodes at risk from being at the wrong end?
 
Well my philosophy is if it ain't broken don't fix it , Don't forget it's been like that on site since 1992 working hard and no harm has come to the diodes ?
 
Not quite.. :) I bought mine fully restored with a new playfield, redecalled cab, etc. It was sourced from abroad, not from one of the usual suspects on here (nothing was available to the standard I wanted for a non-bonkers price, was typical that like three Addams came up as soon as I received it), when the Pound was a little stronger.

I guess there is some idiosyncrasies to be found - e.g. flipper coil wiring being against the coil stop, but nothing that stops it playing pretty much flawlessly.

I'll see how much stress I end up feeling rebuilding this flipper before I consider rotating the coils on the other 3.
 
Couple of quick questions before I start tackling this.

I'm going to try and do it in situ because it's unsoldering two wires (switch) instead of 5. Presumably once I remove the existing pawl the flipper bat and shaft is free to move around in every direction.

How do I ensure that it remains aligned with the lane guide, with the clearance above the playfield it needs?

I've done a bit of reading and the suggestion seems to be to wedge a credit card under the bat above the playfield so it's not sat on it, to give the proper gap above, tighten the pawl enough so the flipper shaft doesn't freely move, then align the bat rubber with the lane guide using a straight edge, then tighten fully (not too hard).

What I've described intuitively sounds too simplistic though, and I'm worried about getting to a point of no return and ending up with a badly aligned or performing flipper.
 
How do I ensure that it remains aligned with the lane guide, with the clearance above the playfield it needs?

I've done a bit of reading and the suggestion seems to be to wedge a credit card under the bat above the playfield so it's not sat on it, to give the proper gap above, tighten the pawl enough so the flipper shaft doesn't freely move, then align the bat rubber with the lane guide using a straight edge, then tighten fully (not too hard).

You can attach a straight edge the lane guide and then push the bat (with rubber on) back against it. Or you can put a toothpick in the little playfield flipper alignment hole and hold the bat against that.

Regarding the gap sizing - I have used a spacer in the past but I usually get it tightened enough for alignment and then give it a gentle tap with a hammer just to nudge it up a bit. You should be able then to wiggle it up and down a bit. I wouldn't get too hung up on it being millimetre perfect.

When you come to tighten the pawl..........REALLY tighten it , even if you think its enough, give it a bit more. Obviously don't go uber Popeye on it :D or you'll risk cracking it ...... but seriously it has to be TIGHT. If you don't then that bad boy is gonna start slipping within a very short time and you'll be back to square one.
 
Thanks for fast reply, didn't get notification of reply due to my email being lame.

@Jay Walker said the opposite about being careful not to overtighten it because it's soft metal.. I'm even more uncertain than I already was lol.

My playfield doesn't have alignment holes, so will try the straight edge trick. What stops it dropping bat below it though? (pointing towards the trough). I guess you mount the pawl with the plunger fully extended?
 
Last edited:
Back
Top Bottom