Pinball info
You are using an out of date browser. It may not display this or other websites correctly.
You should upgrade or use an alternative browser.
You should upgrade or use an alternative browser.
Flipper issue
- Thread starter Drew Taylor
- Start date

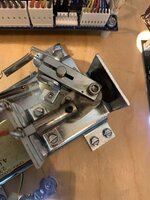
flippers are adjustable. the flipper bat shaft is held in place undernesth by two screws or grub screws. loosen off , align then retighten
Your need an Allen key, there a bolt attached to the flipper shaft.
Make sure you leave a credit card size gap between the table and the bat when you adjust and tighten.
When tightening you will have to tighten it hard
Make sure you leave a credit card size gap between the table and the bat when you adjust and tighten.
When tightening you will have to tighten it hard
for your vuk problem (vertical up kicker) first check your playfield is level, at the front and near the back. on the playfield not the glass
OP
OP
Drew Taylor
Site Supporter
The little plastic bit has loads of play in it. The other side is fine.Your need an Allen key, there a bolt attached to the flipper shaft.
Make sure you leave a credit card size gap between the table and the bat when you adjust and tighten.
When tightening you will have to tighten it hard
Attachments
if its worn out, buy a new one, all readily available. A full flipper rebuild kit is a good idea - do both flippers.
Sorry - just one screw (not 2) on that type of mech.
Sorry - just one screw (not 2) on that type of mech.
OP
OP
Drew Taylor
Site Supporter
It’s cock on.for your vuk problem (vertical up kicker) first check your playfield is level, at the front and near the back. on the playfield not the glass
Align them like in the pic @cmrl9 shows. If they're still out when held up you've got worn coil stops or plungers .
If the plastic bit has a lot of play the hole has been enlarged over time and you may as well replace the plunger on both flippers.
Do coil stops too while you're at it.
Although you're not far from a full rebuild at that point
If the plastic bit has a lot of play the hole has been enlarged over time and you may as well replace the plunger on both flippers.
Do coil stops too while you're at it.
Although you're not far from a full rebuild at that point

Personally I would do a full rebuild I doubt they have ever been done, 1700 plays it's worth doing. It's pretty easy just be careful with the banding on the diode. Getting this the wrong way round will damage the board. As Captain dumb dumb (me) did twice on both STTNG and LOTR! With a coil , springs etc around £50 each flipper, without the coils a lot less.
OP
OP
Drew Taylor
Site Supporter
Don't forget, this GB. That's not a lot of game time. LOLPersonally I would do a full rebuild I doubt they have ever been done, 1700 plays it's worth doing. It's pretty easy just be careful with the banding on the diode. Getting this the wrong way round will damage the board. As Captain dumb dumb (me) did twice on both STTNG and LOTR! With a coil , springs etc around £50 each flipper, without the coils a lot less.
Asiapinball
Site Supporter
Surely coils shouldn't need replacing after just 1700 plays. If coil sleeves move freely and no other signs of overheating or damage and right level of ohms then no need to replace.
That's true, although with this kit, you should get a little longerDon't forget, this GB. That's not a lot of game time. LOL

Probably not, but if your taking the whole thing apart, for all the other bits, personally why not it's £20 ish, although to be honest I'm probably in the minority on that way of thinkingSurely coils shouldn't need replacing after just 1700 plays. If coil sleeves move freely and no other signs of overheating or damage and right level of ohms then no need to replace.

 .
.Re. leaving 'a credit card (thickness) gap between the flipper and the table..', that refers to the clearance between the upper surface of the flipper crank (the metal linkage clamped around the flipper shaft) and the underside of the flipper bush (the plastic bearing poking up through the playfield).
If the flipper coil isn't being replaced, there's no need to unsolder it. Simply remove the coil stop at the end, which may be worn anyway, and detach the coil. After loosening the clamping bolt, pull the flipper out of the crank. Without the coil or flipper in place, there's enough leeway to angle the plunger, plastic link and metal crank out, and detach the spring. If you wish to replace the flipper bush, there may be lock nuts on the hidden side of the flipper baseplate. If so, that will have to be removed from the playfield.
If the flipper coil isn't being replaced, there's no need to unsolder it. Simply remove the coil stop at the end, which may be worn anyway, and detach the coil. After loosening the clamping bolt, pull the flipper out of the crank. Without the coil or flipper in place, there's enough leeway to angle the plunger, plastic link and metal crank out, and detach the spring. If you wish to replace the flipper bush, there may be lock nuts on the hidden side of the flipper baseplate. If so, that will have to be removed from the playfield.
On these Stern mechs it's usually the screw between the plunger and pawl which wears out first (at the bend on Dave's red line).
Sleeves also worth replacing. Other parts only need changing if they are visibly worn (stops, plungers, springs, grommets, bushings, etc.). Replacing coils is a waste of money and just creates unnecessary environmental waste.
Sleeves also worth replacing. Other parts only need changing if they are visibly worn (stops, plungers, springs, grommets, bushings, etc.). Replacing coils is a waste of money and just creates unnecessary environmental waste.
Re. leaving 'a credit card (thickness) gap between the flipper and the table..', that refers to the clearance between the upper surface of the flipper crank (the metal linkage clamped around the flipper shaft) and the underside of the flipper bush (the plastic bearing poking up through the playfield
What. Have I been misunderstanding this for months? I thought the gap was between the flipper and the bushing on the top of the playfield side.
So you use the credit card trick on the underside?
It's the same thing if you think about it Dave. If you do it on top of the playfield as soon as you pull your gapping tool of choice out the flipper will drop and the gap will then be underneath.What. Have I been misunderstanding this for months? I thought the gap was between the flipper and the bushing on the top of the playfield side.
So you use the credit card trick on the underside?
- Joined
- Jul 21, 2011
- Messages
- 2,508
It looks to me that your flipper linkage is simply missing the flipper bushing inside the plastic link that the pivot bolt goes through. Its not unusual for this linkage to fall apart over time. When reassembled the link is sometimes not refitted. Its probably in the cabinet somewhere.
As you dont show the flippers at rest, I'm guessing they are aligned in this state, so no point moving the flipper bat within the pawl, as you'll lose the at rest alignment.
As you dont show the flippers at rest, I'm guessing they are aligned in this state, so no point moving the flipper bat within the pawl, as you'll lose the at rest alignment.
Hold on, 'the screw between the plunger and the pawl (another name for the crank)'?. There isn't such a thing - the link is fitted between them. The link is pinned into the back end of the plunger, and bolted into the crank. With, as Andy points out, a metal spacer ring to make up the difference between the through-bolt and the hole in the link. To check on this without disturbing the alignment of the flipper, undo the through bolt, using a hex key and a spanner on the nut hidden above the crank (if there is one on this type). Then slip the plunger and link out of the crank, the spacer if present should come with them.
Re. the clearance adjustment, that's how Williams described it, in the 1/2 page note with each new machine, showing how to use the 'chip fork' gapping tool supplied.
Re. the clearance adjustment, that's how Williams described it, in the 1/2 page note with each new machine, showing how to use the 'chip fork' gapping tool supplied.
Sorry if I messed up the jargonHold on, 'the screw between the plunger and the pawl (another name for the crank)'?. There isn't such a thing - the link is fitted between them. The link is pinned into the back end of the plunger, and bolted into the crank. With, as Andy points out, a metal spacer ring to make up the difference between the through-bolt and the hole in the link.
 Yes I do mean that bolt... Wears out faster than most other parts.
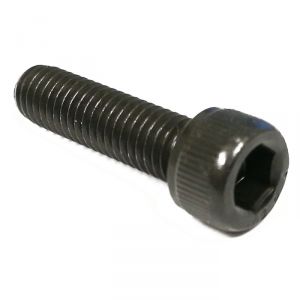
237-6144-00 Stern flipper crank bolt - Pinball Heaven
237-6144-00 Stern flipper crank bolt. This wears terribly on Stern pinball flipper cranks and must be replaced as part of a routine flipper service.
 www.pinball.co.uk
The left upkicker is straight draining too. Can this be adjusted?
Cheers
Adjust the kicker power in settings (game adjustments menu from memory) reduce by 10 each time until you get the outcome you want
OP
OP
Drew Taylor
Site Supporter
- Joined
- Jul 21, 2011
- Messages
- 2,508
Have a good look around inside the cabinet including the area right at the back where everything collects when the pin is tombstoned.
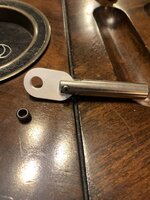
Done the flippers and found out the reason it was slack. The little bit that fits in the hole in the joint, pictured, was actually missing on the left flipper.
Where can I get one?
I found one yesterday in my old bits drawer when chucking stuff into the tumbler. If I can find it again I'll happily send it assuming it's the same part, I think it's from a Bally Williams flipper mech so might differ?
OP
OP
Drew Taylor
Site Supporter
I wonder. If it's the same, I would be eternally grateful.I found one yesterday in my old bits drawer when chucking stuff into the tumbler. If I can find it again I'll happily send it assuming it's the same part, I think it's from a Bally Williams flipper mech so might differ?
I wonder. If it's the same, I would be eternally grateful.

I want to assume these are standardised. If I can find some stamps I'll happily send you them

You could just drop Andy at pinball mania a message and ask him - he'll know immediately, and point you to the exact part on his website for sale if not. https://pinparts.co.uk/contact
Edit: Scrap that, I see he already replied in the post above, so you can just ask him here")
Edit: Scrap that, I see he already replied in the post above, so you can just ask him here