What's new
Pinball info

Register a free account today to become a member! Once signed in, you'll be able to participate on this site by adding your own topics and posts, as well as connect with other members through your own private inbox!

In Progress Elvira and the Party Monsters

Dex-Jay

Site Supporter
Joined
Nov 20, 2016
Messages
1,618
Location
Midlands
Alias
Richard
I 'spose I better start a thread on mine as I've done some jobs on it lately...

I picked it up off eBay 2019 and it wasn't something I'd budgeted for really but I thought, hell with it, I was after one and you can't help when they pop up for sale, can you?

It was dropped off all without damage by Martin Worldwide Shipping Ltd., (OK he's not Worldwide but he and his brother in law are great!)

Screen Shot 2019-10-01 at 23.10.25.png

The seller had the sense to wrap it well, good man!

It fired up no problems, no issues just some wear tear and bulbs out and incorrect, the usual 12V instead of a 6V type deal.
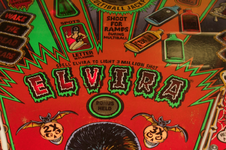
The cabinet art isn't bad it just needed some paint here and there to help tidy it.

Screen Shot 2019-10-01 at 23.13.56.png

The head needed some black and yellow for the most part. Nothing really bad but not really worth re-decalling in my opinion...

E.JPG


A de-furing and vacuum too! (Yak)

Screen Shot 2019-10-01 at 23.15.56.png

The coin door was a bit tired so that got stripped and repainted.

Screen Shot 2019-10-01 at 23.17.30.png

Screen Shot 2019-10-01 at 23.18.27.png

Screen Shot 2019-10-01 at 23.19.33.png

Gubbins stripped, de-gunked, polished where need be and reassembled. That looks as damn sight better!

Screen Shot 2019-10-01 at 23.23.25.png

The red had faded to orange on the side art but I decided to keep the original decals on it than replace.

Screen Shot 2019-10-01 at 23.30.34.png

I removed some usual mouldy marks from the back of the head and dabbed in a bit of paint where needed.

More soon!
 
Good job so far mate! I've never actually seen one of these in person, dying to play one some day 😂
 
With the most of the exterior jobs done for now I got started on some of the playfield dirt. It all could have been worse but it was still ickky.

Screen Shot 2019-10-02 at 13.17.01.png
I pulled the shooter lane rail and gave it a quick polish...

Screen Shot 2019-10-02 at 13.17.17.png
Cleaned 30 years of dirt, polished and waxed..

Screen Shot 2019-10-02 at 13.17.38.png

Better! Replaced the 2 springs on the shooter and cleaned the rod.

Screen Shot 2019-10-02 at 13.21.23.png

Cleaned the usual dirt under the apron. Meh, seen worse but polished and waxed anyway (this is after of course!)

Screen Shot 2019-10-02 at 13.31.12.png

Then it's on to the Skull Cave, yeah he'd seen better days. Clearly been picking fights with a pinball and lost 5 of his teeth, cracked, discoloured and a mounting tab missing...

(You've probably seen my post with me repair & replace this section so skip to the end if you have!)

Screen Shot 2019-10-02 at 13.35.40.png

With some modelling putty I rebuilt his teeth and added a tab section. Put him in a shuttered box ready for moulding in Silicone....

Screen Shot 2019-10-02 at 13.37.59.png

Glub,glub,glub ....
Screen Shot 2019-10-02 at 13.39.52.png

Demould 24 hours later and I have a mould ready to make a replacement! Screen Shot 2019-10-02 at 13.41.22.png
Here's a fibreglass replacement with white gel coat (after trimming of course!)
Just needs a paint and test fit to make sure it fits correctly.... yeah seems OK!

Screen Shot 2019-10-02 at 13.43.17.png

Right better paint him up then, playfield looks a bit bare with out it!
Screen Shot 2019-10-02 at 13.45.17.png

Maybe I'll repaint him again in a matte white and go super crazy with detail in future but for now at least it's replaced!

Next up playfield touch-up's! (GULP)
 
Thanks!
I have done some vac forming in the past but some of the details do get lost the medium grade silicone catches most of the fine detail.
I didn't fancy a vacuum formed repro, I wanted one bullet proof and this you can stand on! Overbuilt? Yeah, a bit but airballs won't break this one!

Should anyone fancy trying remoulding damaged plastics I'd say give it a go. There's plenty of great tutorials on Youtube and I can point you in the right place for supplies.
 
Right with the simple stuff done it was time for a bit more of a challenge.... now I do paint portraiture in oils but never touched up a pinball playfield before. I do have OK eyesight but thankfully I'm really good at matching paint. (Good job really!)

So those of you who saw the pin on eBay initially would have seen the playfield wear, or spotted it in my other pictures. Touch-up challenges range from easy to expert!

The first job I set my eyes and brushes to were the E L V I R A letters centre in the playfield. It looked like this...

ELVI-_letters.jpg

Usual insert wear really. I've done the black and the white (yet to match the green) but it now looks like this.

ELV-letters.jpg

The vertical target and roll over lanes also needed some lilac paint...

So that was simple enough. The tough one was always going to be Elvira's head and this was the worst part of the playfield.... she looked like...

EV1.png
Gawd.

ELV_head.jpg
To make matters worse the colours had been touched up and the magic ring was missing off her left hand.

Her hair had also rubbed through some layers so that needed colour and a lot of black....

EV2.png

With some yellow, black and white I matched the skin tone in 2K Automotive paint.

Screen Shot 2019-10-02 at 19.49.18.png

Mixed and activated and time to brush it on...

EV3.png

By this point the lilac shadow was done, most of the black and getting a feel for where some more of the detail was missing...

EV4.png

Here she is with more colours - the red and yellow added and a touch more fine brush work done.

The only thing left was 3 layers of 2K clear coat, just over the figure. At some point I'll strip the playfield do the rest of the touch-ups and lacquer the whole thing but for now at lease I can live with it the way it is.

This evening I've flatted the 2K lacquer and wet & dry'd the area. Polished and used fine polish to finish. For the faint hearted? Nope. Still she's looking a lot better!
 

Attachments

  • Screen Shot 2019-10-02 at 14.56.39.png
    Screen Shot 2019-10-02 at 14.56.39.png
    397.1 KB · Views: 57
  • Screen Shot 2019-10-02 at 14.52.35.png
    Screen Shot 2019-10-02 at 14.52.35.png
    379.3 KB · Views: 58
Last edited:
Other stuff I've done are...

Retired these couple of BoogieMen.

Screen Shot 2019-10-05 at 12.58.46.png

Split and an arm missing, his dancing days are over. : ( To the retirement home for those two....

I found some replacements from Hong Kong, a lot of the eBay monsters listed in the UK were a poor replacement.
Screen Shot 2019-10-05 at 12.58.56.png

Ready to boogie!
Screen Shot 2019-10-05 at 12.59.06.png

Other stuff? Some stealth cabinet leg protectors from Andy @pinballmania https://pinparts.co.uk/products/stealth-cabinet-protectors-535-0599-00

These go behind the legs and aren't visible unlike the plastic leg protectors. I was getting some for my Cyclone so I had another pair for my EATPM so I could touch-up the paint a little. ( I really could do with getting some more of these actually....)

Screen Shot 2019-10-05 at 13.02.47.png

What else? You'd never see it, but I know it was dirty so I cleaned the head light board behind the translite.

DSCF6359_2.jpg

A before on the left and after on the right...

I also got a good match for the fluorescent green on the playfield too. The green around 4 of the E L V I R A letters and the bottle of green potion need touching up so I've gotta dab those in next week and seal with some 2K lacquer....

Rust-oleum Neon Green paint (available to B&Q) is a near bang on match thankfully as you can see by this swatch...

Screen Shot 2019-10-05 at 13.17.45.png

And that's where I am at the moment. Future jobs include a set of plastics and also some tasteful LED's here and there.

Rich
 
Last edited:
Thanks Andy! Like I've mentioned it wasn't cheap (cheep-cheep) but it was fair in fair condition just in need of a little tidying. If only I could pick up a SS for the same money! :p
 
I’ve got one but had someone do my restoration work on it. You’ve done a fantastic job on it. I love playing mine and although l’m missing a part it’s fully functional. Great job.
 
I've done some more touch-up on the inserts, most if not all of them and added some 2K lacquer to help remove the ghosting on the inserts (seal the existing paint from more wear).

Here's one some areas showing the fluorescent green and lacquer, both the E L V I R A letters and the Party Punch bottles (multipliers).

Before

Screen Shot 2019-11-01 at 22.53.05.png

After

DSCF6531_web.jpg

I also added some tasteful frosted LED's, warm white, some red and some green.
Green under the Frankenstein deliveryman....

DSCF6546_web.jpg

With the lights on it looks rather nice! Not everyone will like it but hopefully most will.

DSCF6539_web.jpg

And one with the lights off. The bulbs aren't as harsh as they look, it's a long exposure without a flash you see....

DSCF6538_web.jpg

Next, some more bayonet LED's and I think I'm going all warm white in the back box apart from the multipliers.
I may end up swapping some out though, I think I may replace the red's at the rollovers with purple and see how that looks.
 
Last edited:
Back
Top Bottom