What's new
Pinball info

Register a free account today to become a member! Once signed in, you'll be able to participate on this site by adding your own topics and posts, as well as connect with other members through your own private inbox!

DMD Update...

DrPinball

Site Supporter
10 Years
Joined
Aug 2, 2011
Messages
389
Hi

I've made some progress with the Personal DMD enclosure - I received the first laser cut sample from the fabricator. It's in 1.5mm mild steel, laser cut and press folded. It has a good weight and feel to it.

The next iteration will have magnet mounts to hold onto the apron and some minor changes to hole positions. I will look into having the corners welded and finished, but I want to be careful with cost so this may not happen for the finished article.
If the next version is right I'll get a volume of them created, finished in black gloss powder coat.

Video:
[video=youtube_share;6UT4tQi4ydA]

Pictures:
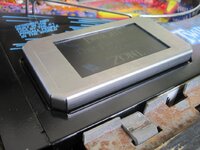
IMG_0382.jpg IMG_0387.jpg

I also purchased a projector from Ebay - £22 delivered! Here are the results...
[video=youtube_share;xQnxszriKd4]

Cheers

David.
 
Dave, had some legs powder coated by flare in warrington
did a great job and I thought good value at £30
i seem to recolect your from wozza too
mooseman just down the rd in runcorn
 
David,

Just a thought - If you can put the hole in the bottom corner, and it was large enough (around 1.5") then you may be able to use on the newer non-recessed aprons, since the feeding cable could be fed down through the card "holding" corner cut OR the larger central hole...... Therefore one fits all...

Paul
 
I dunno, I quite like the brush metal finish, matches the lock down bars. ;)

Like Paul, I would happily buy the case to mount my screen better or buy the whole thing if that is how you need to sell it.
I need to go back to searching for a cheap projector too.
 
I've got a couple of projectors kicking about - must try that ;)

All ready for the MM install later tonight - Will post pics :)

David - whats the dimensions of the "hole" in the middle of the metal mount? that screen looks identical to mine....

http://www.amazon.co.uk/gp/product/B006MPRFJQ/

It's come down a whole Pound since i got mine...

Paul

The cut out for the screen will be identical to your screen - they appear to be all pretty much the same. I got mine from eBay for £16 delivered.
 
Dave, had some legs powder coated by flare in warrington
did a great job and I thought good value at £30
i seem to recolect your from wozza too
mooseman just down the rd in runcorn

Thanks Mooseman - I've driven past Flare and noted them. The company doing the fabrication will powder coat as well so I'm happy to let them do everything. If the cost is getting too high I'll get a quote from Flare. Cheers.
 
David,

Just a thought - If you can put the hole in the bottom corner, and it was large enough (around 1.5") then you may be able to use on the newer non-recessed aprons, since the feeding cable could be fed down through the card "holding" corner cut OR the larger central hole...... Therefore one fits all...

Paul

Cheers Paul - I'm hoping to allow the enclosure to sit up at the back using magnets. This will allow some room underneath, enough to route the cable through card corner hole. Thanks for the pictures of your STTNG - it looks like the holes will be big enough to get a cable through - will you be a guinea pig please :biggrin1:
 
I dunno, I quite like the brush metal finish, matches the lock down bars. ;)

Like Paul, I would happily buy the case to mount my screen better or buy the whole thing if that is how you need to sell it.
I need to go back to searching for a cheap projector too.

For you DIY types the enclosure will be available on its own. Any joy testing the config app?
 
Cheers Paul - I'm hoping to allow the enclosure to sit up at the back using magnets. This will allow some room underneath, enough to route the cable through card corner hole. Thanks for the pictures of your STTNG - it looks like the holes will be big enough to get a cable through - will you be a guinea pig please :biggrin1:

Of course - no problems at all :) I can try on both Recessed and flat :) I'll check out the cable tonight across them all - to make sure that the connector on the cables from the screen will easily fit through the holes on both ( i suspect they will with no real issues - just a double check).
 
How much does this cost by the time you get everything needed?

The DMD Extender costs £55 delivered. You need to supply a Raspberry Pi (<£20) and a video cable (£2). For the mini screen option the screens cost about £20 and the 12V regulator needed costs about £10.

The DMD Extender is available now. I'm working on a bespoke mini screen option - see the beginning of this thread. Cost to be confirmed soon. Cheers.
 
please could you make it even simpler by selling it as a complete kit with the raspberry and the cable all attached and plugged in and working?
i'd probably like to buy one for £77, but am way too lazy to buy three things then when they all arrive try to connect them all and faff about with that. what do i get for the extra £30? i'm being a dick on purpose for once. you could sell loads of these - i mean hundreds - if you wanted to, but loads of folk will just want something they can plug and play.

if there are two options available, can you post a pic of what the normal and the mini both look like?
i think i like the idea of buying the one that goes in the apron, probably on the right though as i'm right-handed and right-eyed and generally dex

The DMD Extender that allows you to connect to a TV / Monitor or Projector is always going to be a niche market (of a niche market). But the addition of the Personal DMD for the apron should spark a lot more interest in the product as a whole. I agree that at the moment things are more complex than a lot of people want to tackle.

When the Personal DMD is completed the kits I sell will contain everything needed. All the wires, all of the circuit boards, and hopefully the Raspberry Pi too. I've always stayed away from selling the Raspberry Pi as it's something else I'd need to support and give warranty for, and it's quite easy to get hold of them all over the world.
 
I agree with Cooldan. If I could buy a complete "Apron DMD kit" that contained literally everything I needed to add this to my FT then I would.

Brilliant work by DrPinball.
 
I agree with Cooldan. If I could buy a complete "Apron DMD kit" that contained literally everything I needed to add this to my FT then I would.

Brilliant work by DrPinball.

I'm working to make the Personal DMD a plug and play solution. It seems to have more appeal as a product and obvious it needs to work for a broad range of people. I'm happy to support the tinkerers as well as those who just want to install and play.

Thanks for the encouragement. I've started a Facebook page with regular updates... https://www.facebook.com/pages/Dr-Pinball/516962141672693

Cheers

David.
 
Oki - got so far and then paused since was my B'day yesterday and had my good lady around :) Will finish the install and pics etc tonight.

Interestingly enough I had what i thought may have been a slight issue, in that i have the Colour DMD installed in my MM, therefore i had concerns on how much power that everything would be drawing from J138. I also noticed an Aux power connector on the rear of the colourdmd, so couldn't resist a quick email to the guys there to find out the score on that, as well as a quick line to David. Here's the reply i got from the colourDMD guys......

Hi Paul,

You can use the AUX connector. The PWR and AUX connectors are parallel connections so there's no danger in damaging the ColorDMD board. The pin connections are identical to the PWR connector. Using our power cable, the gray/yellow wire is 12V, the black wire is ground, and the gray wire is 5V.

The ColorDMD board uses around 0.6A on the unregulated 12V supply. The 5V supply is virtually unused except to power a USB flash drive.

The 12V supply on the power driver board is comprised of a fuse, diode, bridge and capacitor. Since it's unregulated, the more current you try to pull from this supply, the more voltage drop you will experience through the bridge. Also, the bridge will heat up. If you try to pull too much current, the fuse will blow to protect the transformer.

Unfortunately, I don't have a hard number on how much more current you can pull from here but I've heard that trying to power a led light strip (which can also pull 0.5A) is enough to blow the fuse.

Hope this helps.
Randy

Tied in together with Davids info...

I believe ColorDMDs only use the 12V supply. The Extender and Pi are driven from the 5V so should be okay there (about 200mA).

The screen uses the 12V supply at about 250mA.

There are fuses on the power driver board so you shouldn't be able to do too much damage, but as the components are getting old they can always fail even if not being pushed to the maximum. This is why I put the warnings in my documents.

...means that whilst it SHOULD work (but gonna be close!), as David says, It's down to the individual tolerances and actual current draw of the parts themselves (Especially on startup).

Will see tonight if there's any issues...

Paul
 
Paul

I had a thought after I sent that email - you should be able to use the Aux connector on the ColorDMD instead of splicing into J138, I think that is what ColorDMD are confirming in their email.

For info, the power cable I supply has Grey wire 12V, Black wire ground and White wire is 5V.

David.
 
Will you be doing a complete kit for the main dmd to?

When I get the Personal DMD matured a bit I hope to start looking into a full replacement for the main DMD. I'm expecting this will be a standalone piece of kit which will be easy to install and should work alongside the DMD Extender and Personal DMD.

The advantages over a traditional DMD will be flexibility in dot colour choice and use of screen effects like the CRT modes etc
 
I got an email from the Dr the other day asking if I wanted one of the first Personal DMD cases as I already had the DMD Extender Board, the Power Regulator and a self sources LCD screen.
The LCD screen I had did the job but looked out of place, say funny due it case and was too tight a fit under the glass. It looked unfinished so I quickly took the Dr up on his offer and it arrived today.
A quick bit of work over my lunch break and pictures to demonstrate what I had to do.

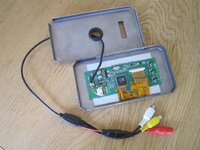
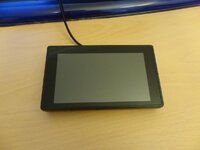
Here is the doner LCD in the original case, it sat to high due to a lump on the back and didn't match the machine.
i263.photobucket.com_albums_ii125_calimori_pinball_DSC03860_zpsbdb0538e.jpg

The electronics stripped from the original case. Very easy job, I just followed the Dr's instructions.
i263.photobucket.com_albums_ii125_calimori_pinball_DSC03869_zpsdb361c90.jpg

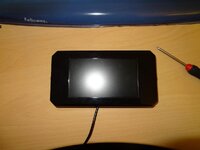
All the fittings I needed to stick it into the new surround were included, it went together very easily.
i263.photobucket.com_albums_ii125_calimori_pinball_DSC03871_zps04909566.jpg

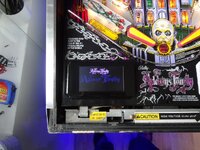
In the machine on the left
i263.photobucket.com_albums_ii125_calimori_pinball_DSC03872_zpsdbe3e6de.jpg

Then the Dr suggested I tried the left, it does seems to feel mentally like the better place. Creech is getting green with envy.
i263.photobucket.com_albums_ii125_calimori_pinball_DSC03875_zpsb523fd8b.jpg

It didn't take long and I can't stress how much more of an original fitment this is. There are magnets holding it in place that can withstand the movement of the play field, the glass slide over cleanly and it just suits the machine much better.
Great work and as I hear the Dr is preparing complete kits for those who don't enjoy the DiY approach, I am sure these will be very popular.
 
Back
Top Bottom