What's new
Pinball info

Register a free account today to become a member! Once signed in, you'll be able to participate on this site by adding your own topics and posts, as well as connect with other members through your own private inbox!

DE Star Wars Solenoid Burning

strongs

Site Supporter
Joined
Oct 18, 2015
Messages
935
Location
United Kingdom
Evening Guys,

Switched on my DE Star Wars this evening for a quick game and there was a noticeable loud buzzing (over the usual DE buzz) switched off the game after about a minute opened the coin door to be greeted with smoke and that electrical smell that smells a lot like TCP.

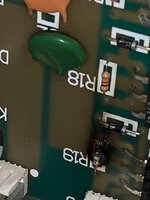
It appears to have been coming from the re-launch / kickback solenoid, it is incredibly hot and smells as mentioned above. I'm just going to leave the game off for now for the solenoid to cool.

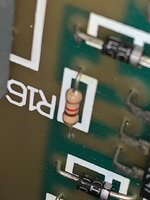
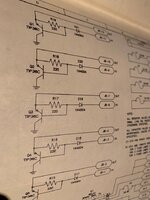
I assume this is either the coil itself or a transistor that has gone bad?

Thanks in advance.
 
You will need to download the manual from ipdb if you don't already have a hard copy.
 
I assume THIS is where my problem is :rolleyes:
 

Attachments

  • 0.jpg
    0.jpg
    45.6 KB · Views: 57
  • Inked01_LI.jpg
    Inked01_LI.jpg
    202.4 KB · Views: 59
It's not looking too clever is it. Had the machine long or has someone sold you a turnip?
 
It's not looking too clever is it. Had the machine long or has someone sold you a turnip?

I've not had it long but it's definitely not a turnip. The reason I spotted the issue so quickly is because how tidy all the boards and wiring are. The boards are extremely clean and tidy. I'm more annoyed about the scorch mark on the board than the game breaking down.

Will the scorch mark remove and what is the best solution to clean it off?
 
I would give isopropyl alcohol a go on a cotton wool bud, giving it 5 mins to dry before firing up...
 
I'd give it more than 5 mns to dry. Yes both solenoid and drive transistor need replacing. Basically the drive transistor locked on, overheated the coil shorting to earth drawing too much power to be drawn through the resistor, destroying it. That's why I suggested checking the MPU (and reseat connectors) as transistors rarely lock on when a game is not being played.
 
Thanks. I had a look at the schematics for the board in my manual (first time for me so go easy on me)

Will the transistor be the one right next to the burnt (R19) resistor? The transistor next to it is at location Q1.

Also the manual suggests that the resistor is 85ohms? I think I might be totally wrong on that.

Why would the solenoid need replacing? Is there a chance it will have survived so to speak?

I'd give it more than 5 mns to dry. Yes both solenoid and drive transistor need replacing. Basically the drive transistor locked on, overheated the coil shorting to earth drawing too much power to be drawn through the resistor, destroying it. That's why I suggested checking the MPU (and reseat connectors) as transistors rarely lock on when a game is not being played.
 
Will the transistor be the one right next to the burnt (R19) resistor? The transistor next to it is at location Q1.
Also the manual suggests that the resistor is 85ohms? I think I might be totally wrong on that.
I had the exact same problem on my Hook with same mech and moonraker helped me fix it too! Defo, replace everything together as everybody above is advising : PPB Q1, PPB R19, PPB D21 (preferably) and the kickback coil itself. If not you'll be chasing your tail with individual bits failing. Unlikely but you may be unlucky with the Q23 pre-driver on the MPU too so give it a looky.

What confused me is the terminology used in the manual, often they refer to this mech as Laserkick (I assume dating back to an early game - Laser War?) Here's the useful parts from the manual confirming what you're looking at.

Pg 29
82887

Pg 48
82888

Pg 65 - PPB Schematic - confirms the parts you need and what is connected to what!
Where are you seeing R19 as 85Ohm - shown here as 220?
82890

I hope the above is of some help, it defo wasn't obvious to me a few years back on my first DE - good luck with the repair :thumbs:
 
The smoke and smell coming out through the open door was partly the insulating lacquer burning off the wire turns of the coil, and burning of the plastic 'bobbin' former of the coil and its sleeve. The kick-back plunger may be fused into the sleeve in any case. That coil winding is now just a short-circuit, connecting it to a new transistor would simply blow the device immediately

Re. the resistor value - if R 18 in the picture is the neighbouring circuits' equivalent component, then the colour bands say 220 Ohms; red (2), red (2), and brown (x10)

I'm amused by the reference to 'tcp', which the acronym highlighter says is 'The Champion Pub'


ALSO I now notice that the kickback is Solenoid 22. In a Williams game (and the hardware is a variation on Williams boards) No. 22 is one of the 'Special' solenoids, with additional (almost) direct control of the drive transistor from a playfield switch. I wouldn't expect a kickback to use this method, though, it's meant for bumpers and slingshots. But the switching capability is still present, so I'd replace all the damaged components and check by powering-up without the connection to the Cpu board, CN 12, pin 9. The solenoid shouldn't work. Turn off, reconnect CN 12 and power up again. The kickback shouldn't operate immediately, or when going into test/starting a game, but only when intended, i.e. when a ball closing the switch (or the test program) pulses the drive transistor, Q 23 of the Cpu board
 
Last edited:
The smoke and smell coming out through the open door was partly the insulating lacquer burning off the wire turns of the coil, and burning of the plastic 'bobbin' former of the coil and its sleeve. The kick-back plunger may be fused into the sleeve in any case. That coil winding is now just a short-circuit, connecting it to a new transistor would simply blow the device immediately

Re. the resistor value - if R 18 in the picture is the neighbouring circuits' equivalent component, then the colour bands say 220 Ohms; red (2), red (2), and brown (x10)

I'm amused by the reference to 'tcp', which the acronym highlighter says is 'The Champion Pub'


ALSO I now notice that the kickback is Solenoid 22. In a Williams game (and the hardware is a variation on Williams boards) No. 22 is one of the 'Special' solenoids, with additional (almost) direct control of the drive transistor from a playfield switch. I wouldn't expect a kickback to use this method, though, it's meant for bumpers and slingshots. But the switching capability is still present, so I'd replace all the damaged components and check by powering-up without the connection to the Cpu board, CN 12, pin 9. The solenoid shouldn't work. Turn off, reconnect CN 12 and power up again. The kickback shouldn't operate immediately, or when going into test/starting a game, but only when intended, i.e. when a ball closing the switch (or the test program) pulses the drive transistor, Q 23 of the Cpu board

You can’t beat a jay walker explanation top man
 
I reckon Jay Walker is also “Wilson” the next door neighbour from Home Improvment. A font of knowledge and wisdom
 
I think the more people have tried to help the more questions I have. Appreciate the replies though guys. Feel a little run down at the moment so will have another look when I’m feeling better and come back to you.
 
Ok I’ve just re-read everything after a good sleep and I think I’m good to go, just one question about the coil. I’ll order the new coil/sleeve but what about the plunger? Do I just remove the plunger from the old sleeve or can you buy new ones? Are they easy to assemble?
 
Just remove the old plunger, no need for a new one. Easy to do, you normally undo two screws to release a coil bracket that holds it in place.
 
Also the resistors... I can now see where @astyy has pointed out that the resistor needing to be replaced and all neighbouring resistors are stated as 220ohms in the manual, but looking at the board in front of me at the resistors the colours look like orange, red, brown which would be 320ohms? or is that my eyes?

Sorry to be a nuisance, this is my first attempt at a repair and I want to get it right. I've attached a photo of R16
 

Attachments

  • 0.jpg
    0.jpg
    45 KB · Views: 16
Bit of a potato phone picture but yeah

I am reading Orange, Red, Brown Gold - 320OHM +5%
 
The manual states that R19, R18, R17, R16 and R15. should all be 220ohms.

Looking at my board however R15 is 220ohms (correct ok good) but R16, R17, R18 look to be 320ohm?

R19 is indistinguishable as it's burnt.
 

Attachments

  • 0.jpg
    0.jpg
    55.8 KB · Views: 10
Last edited:
Use a meter to measure the resistance of the others to be certain. I would expect 220 ohms but manuals have been known to be incorrect.
 
Just measured the resistance and they are 220 ohms. Looks like it has taken out R18 too, although not burnt the meter says it's bad. So does that mean the transistor at Q2 will be knackered too?

I wonder why a fuse didn't blow...
 
Last edited:
I checked R18 a few times it’s reading bad. All other neighbouring resistors are reading 220.

I’ll check it again when I pull the board to repair.

Anyone got a direct link to some 220ohm resistors? I keep finding 220k and large quantity orders.

Thank you all for the advice.
 
Back
Top Bottom