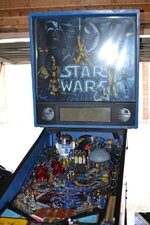
Picked this up a few weeks ago and I've finally got some time to start work on it now. Just the one pic current but I'll post a few more detailed pictures tomorrow.
It's spent a fair while in a Greek arcade by the looks of it (!) but it's in surprisingly good condition considering that. This won't be the most ambitious restoration you'll see here, being my first, but it'll definitely still consume a fair chunk of my time. Here's a list of stuff I'm planning, in rough order of priority. Some of this I might not sort for ages, just getting it playable and protected from further damage is priority.
- Swap in improved v-shaped leg bolt brackets, the current ones are worryingly thin and starting to pull through the wood (!) so definitely want to sort that ASAP.
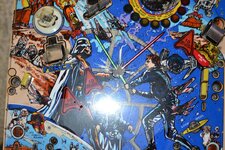
- Strip and clean the playfield with foaming cleaner and Novus 2, Brasso wadding cleaner on the ramps, clean the glass, re-rubbber, fix the left flipper (it sticks sometimes, not worked out why yet despite some reading and investigation, the usual suspect is the flipper link and those look fine to my untrained eye).
- Put in Cliffy's force/sarlac-pit scoop protectors. I'll look into repairing the wear with wood putty and maybe even painting them further down the line, for now I just want to stop further wear. Currently looking for the Cliffy's slot switch protectors too since the slots are starting to wear, but those appear to be rarer than rocking horse **** currently, presumably because every machine can use them so everyone wants them!
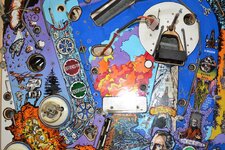
- Replace the backbox lock (the current one is missing a key).
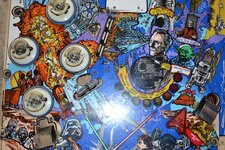
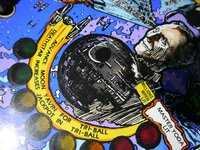
- Minor repair to the Death Star - the plastic is chipped but not completely broken around the top screw, so hopefully some polycement (ah, memories of gluing plastic Warhammer miniatures from my youth!) will "weld" that stronger again and make sure it lasts.
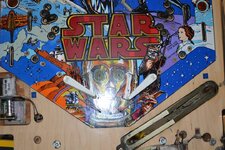
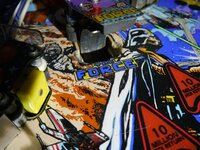
- Replace the ramp flap with an extended one I'll cut/drill myself (cheers to replicas for the blue spring steel!) - there is a sliver of chipped/missing playfield art just before the ramp (you can just about see it in the picture). Maybe I'll have a go at restoring that myself one day but it's probably beyond my painting skills for now so covering it seems the easier option for the time being.
- Pop in Chad's amazing code revamp ROM chip, it's in the post already.
At this point it'll be ready to play again and everything else is really cosmetic improvements.
- Full LED swap of course, although I want to take my time and do this later once I've had enough games with the incandescents first so I can choose my own parts rather than buying a kit (although I'll probably go for Superfluxes which means this kit is tempting if I get lazy instead).
- Replace the yellow Death Star targets (they're cracked and chipped but still work)
- R2D2 looks good, I might whiten some of his plastic with this method though, there's also a scrape on his dome from a crazy air ball at some point, I might sand that smooth and get it rechromed eventually.
- The cab has a fair few chips and scrapes (although the artwork is in pretty good nick compared to many I've seen photos of). Most of the dings are areas where I can repair with wood putty then paint with the colour matched blue from here (I might try and put together a group buy with 5 others though with that shipping cost!).
- There are a few chipped painted plastics, it's easy enough to find replacements for but I don't know if the quality of those is any good. Anyone know?
- New pop bumper caps, they're cracked but work fine so that's another cosmetic indulgence I'm in no rush to sort.
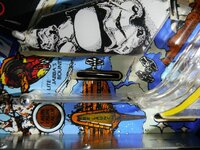
- The translite has a few wear spots (above and below Han Solo's muzzle flash). I might have a go one day at colour matching that after I've clear coated the back first, it's not hugely distracting though and still looks great overall.
- Replace the legs, lockbar and side rails - not a huge priority, but they're dented and rusted in parts. Not urgent though (or cheap!)
Cheers to Ben (and family!) for being no trouble to deal with and helpful with getting it into the van - it was his only pin so I don't believe he'll be selling others here but it's still nice to say thanks when there are so many cowboys out there on eBay etc.!
Anyway, congrats if you read to the end of this monster list, I typed it as much as a personal to-do list reminder as I did to share with the community and get advice! Like I said, I'll take a few more pics of the cab, translite and playfield soon, as well as my progress. Can't wait to get this up to scratch as my first Garage Arcade pin!
It's spent a fair while in a Greek arcade by the looks of it (!) but it's in surprisingly good condition considering that. This won't be the most ambitious restoration you'll see here, being my first, but it'll definitely still consume a fair chunk of my time. Here's a list of stuff I'm planning, in rough order of priority. Some of this I might not sort for ages, just getting it playable and protected from further damage is priority.
- Swap in improved v-shaped leg bolt brackets, the current ones are worryingly thin and starting to pull through the wood (!) so definitely want to sort that ASAP.
- Strip and clean the playfield with foaming cleaner and Novus 2, Brasso wadding cleaner on the ramps, clean the glass, re-rubbber, fix the left flipper (it sticks sometimes, not worked out why yet despite some reading and investigation, the usual suspect is the flipper link and those look fine to my untrained eye).
- Put in Cliffy's force/sarlac-pit scoop protectors. I'll look into repairing the wear with wood putty and maybe even painting them further down the line, for now I just want to stop further wear. Currently looking for the Cliffy's slot switch protectors too since the slots are starting to wear, but those appear to be rarer than rocking horse **** currently, presumably because every machine can use them so everyone wants them!
- Replace the backbox lock (the current one is missing a key).
- Minor repair to the Death Star - the plastic is chipped but not completely broken around the top screw, so hopefully some polycement (ah, memories of gluing plastic Warhammer miniatures from my youth!) will "weld" that stronger again and make sure it lasts.
- Replace the ramp flap with an extended one I'll cut/drill myself (cheers to replicas for the blue spring steel!) - there is a sliver of chipped/missing playfield art just before the ramp (you can just about see it in the picture). Maybe I'll have a go at restoring that myself one day but it's probably beyond my painting skills for now so covering it seems the easier option for the time being.
- Pop in Chad's amazing code revamp ROM chip, it's in the post already.
At this point it'll be ready to play again and everything else is really cosmetic improvements.
- Full LED swap of course, although I want to take my time and do this later once I've had enough games with the incandescents first so I can choose my own parts rather than buying a kit (although I'll probably go for Superfluxes which means this kit is tempting if I get lazy instead).
- Replace the yellow Death Star targets (they're cracked and chipped but still work)
- R2D2 looks good, I might whiten some of his plastic with this method though, there's also a scrape on his dome from a crazy air ball at some point, I might sand that smooth and get it rechromed eventually.
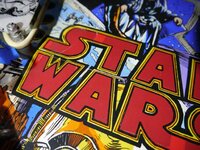
- The cab has a fair few chips and scrapes (although the artwork is in pretty good nick compared to many I've seen photos of). Most of the dings are areas where I can repair with wood putty then paint with the colour matched blue from here (I might try and put together a group buy with 5 others though with that shipping cost!).
- There are a few chipped painted plastics, it's easy enough to find replacements for but I don't know if the quality of those is any good. Anyone know?
- New pop bumper caps, they're cracked but work fine so that's another cosmetic indulgence I'm in no rush to sort.
- The translite has a few wear spots (above and below Han Solo's muzzle flash). I might have a go one day at colour matching that after I've clear coated the back first, it's not hugely distracting though and still looks great overall.
- Replace the legs, lockbar and side rails - not a huge priority, but they're dented and rusted in parts. Not urgent though (or cheap!)
Cheers to Ben (and family!) for being no trouble to deal with and helpful with getting it into the van - it was his only pin so I don't believe he'll be selling others here but it's still nice to say thanks when there are so many cowboys out there on eBay etc.!
Anyway, congrats if you read to the end of this monster list, I typed it as much as a personal to-do list reminder as I did to share with the community and get advice! Like I said, I'll take a few more pics of the cab, translite and playfield soon, as well as my progress. Can't wait to get this up to scratch as my first Garage Arcade pin!
Attachments
Last edited:
") Fine machine DESW - I played for the first time at South Coast Slam last month. Do carry on with your shop log, plenty of folk on here like reading them and they're great for sharing machine-specific information.
Fine machine DESW - I played for the first time at South Coast Slam last month. Do carry on with your shop log, plenty of folk on here like reading them and they're great for sharing machine-specific information.


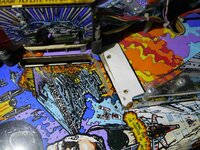


 I gave that and other ball trails a go with foam cleaner then a Magic Eraser but it started lifting paint (just miniscule specs thankfully) so I gave up on that. 20 years in a smokey Greek arcade hasn't been kind to the pf so it's never going to be perfect, but I've seen far worse and once it's done it'll be in a much nicer condition than it was at least!