What's new
Pinball info

Register a free account today to become a member! Once signed in, you'll be able to participate on this site by adding your own topics and posts, as well as connect with other members through your own private inbox!

Complete Data East Monday Night Football (1989)

Sgt GrizZ

Registered
Joined
Jul 21, 2011
Messages
11,336
Location
Ex PinballInfo Admin . MIA Brighton Hove beach
Alias
Ive
Pay attention troops ! Sgt GrizZ has signed up for another mission and this one is a humdinger ! :boxing:

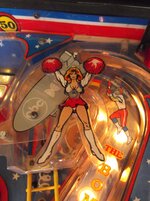
For some weird reason I have had DE's Monday Night Football on my mind for a while now - I guess just because I had never played or even seen one anywhere, or knew anyone who had/has had one, which in 11 years of this madness seemed pretty odd. It gets mixed opinions at best, though those who like it say it is simple but a lot of fun especially as a multiplayer game - you get pinball points and football points in game . I also like the full on Americana razzmatazz football theme, complete with cheerleaders :eyebrows:

So when this one popped up for sale I decided to throw all caution to the wind and grab it - I may regret that decision as you will see :eeek:

So here it is - I have only just reconnected the backbox, powered it up and done an initial assessment of the main issues.

DSCF4036.jpg DSCF4037.jpg DSCF4059.jpg

Backglass ....I love .....mirrored glass, and its in pretty good shape with only a couple of minor scratches.

Playfield - full mylar has protected main area well, and mylar itself is ok. The unprotected playfield areas aren't too bad. Usual ball swirl, dirt etc. Overall the play area is the usual dirty, neglected example - needs full strip and clean, DE flipper bats installing ( has yellow Williams at present), rerubbered, metal parts polishing etc etc etc

DSCF4038.jpg DSCF4039.jpg DSCF4041.jpg

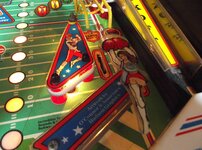
My main concern was/is the raising playfield ramp flap area. This is very worn and battered. Also the 2 round red targets are not original - they should be large white rectanglar with decals on. The decal on the ramp entrance and the yellow raising goalpost are also battered. And its missing a plastic that sits above the targets. Apart from that ....that part of the game is brilliant 💷 At least the ramp and goalposts do move up and down as they should.

DSCF4043.jpg

Now I knew parts were gonna be tough to find for this game, low production run (1492) and not many this side of the pond. The ramp flap in particular ,as I imagine its battered on most machines. However I have found that Parts4Pinball have the ramp flap unit in stock, and that Marco carry a full set of decals for the game including the ramp flap one. So happy days ....at least for the game.... not my bank account.

Plastics - on the whole ok, missing the 'UP' one as I mentioned and also a thin one by the left spinner is missing, someone has used an inlane one from an X Files as a substitute (!)

DSCF4045.jpg
 
Left sling plastic is cracked/chipped and the bottom of the left ramp has been repaired with a metal bracket, decent enough job but needs some cosmetic work - polish/repaint/decal something like that to make it less conspicuous. Again finding a ramp for this game is prob not gonna happen

DSCF4047.JPG

Some pics of cheerleaders ;)


1607-1e547ad129d25374343348165429cb8d.jpg
1608-56ea36f6d6399923554037928c636143.jpg


Now a look under the bonnet and at the brains - there is some good stuff here (!)

When I was reconnecting the head I found this strange piece of homemade cabling - 2 bits of flex (wtf !?) and a connector which didn't seem to have a home

1609-e2d68fa4c021500e7b5b5fd22e3c2224.jpg


Following this flex into the cabinet I found it led to this ...


1610-cae3733a10735c9ab76b2acc6d71dcbd.jpg
1611-cd55d285fcbab31a414911e757d9aaed.jpg
1612-a56ed597811e09b89f2a31fb52253dee.jpg

Whaaaaat ??? Some sort of extra voltage switching unit/transformer ?? It was connected by a kettle lead to the on/off switch unit near the coin door. I disconnected it seeing that it isn't connected to the boards anyway now. The game is running perfectly well with the original transformer. So did someone have it running with this in the mix at some point ?, and then fix it , I have no idea :confused: Answers on a postcard to Grizz HQ please

The connector in the backbox is keyed and doesn't seem to fit on any header pins even if there was space ! I haven't investigated further or looked at schematics. I'm just leaving it all well alone for now.
 

Attachments

  • DSCF4048.JPG
    DSCF4048.JPG
    145.8 KB · Views: 8
  • DSCF4050.JPG
    DSCF4050.JPG
    97 KB · Views: 6
  • DSCF4033.JPG
    DSCF4033.JPG
    109.4 KB · Views: 7
  • DSCF4055.JPG
    DSCF4055.JPG
    116.4 KB · Views: 5
  • DSCF4051.JPG
    DSCF4051.JPG
    133 KB · Views: 5
  • DSCF4054.JPG
    DSCF4054.JPG
    160.6 KB · Views: 5
Very interesting theme. When you are about to order some parts, let me know as I have some parts I need and we can share postage.
 
Looking at the boards revealed a super fried connector on the power board, pretty common on these DE games.
1613-d58ef841ab2559266700d21b9e71d2df.jpg


And a burnt GI connector - explaining half the lights out no doubt

1614-2676456c487776e28308125dbe921150.jpg


Running tests on game revealed ....

Feature lamps - pretty much all working, just odd bulb out.

GI lighting - left half of playfield out, lower half of backbox out.

Flashers - all working

Coils - both flipper coils are disconnected, I had been told there is some issue with them. Will investigate in due course. 2 others have issues ......Left VUK coil was shotgunning gently - disconnected it for now. Skill shot kicker coil not working at present.

Soooooooo .........to be honest its in slightly worse shape than I had been led to believe but .......its game on to bring this bad boy back to its former glory as best I can. I love a new project ! :pop2:
 

Attachments

  • DSCF4061.JPG
    DSCF4061.JPG
    101.5 KB · Views: 6
  • DSCF4062.JPG
    DSCF4062.JPG
    142.7 KB · Views: 5
Nice one sarge,I had a cheeky bid on this game too looks interesting and a challenging project ,be good to see end result :)
 
it is wonderful to see people like yourself put the time and effort and money into bringing these wonderful old machines back to life.

commando with shark - awesome.jpg
 
Nope!!! I noticed the lack of pics in the 2nd and 3rd posts about 5 mins after it was posted. Anyhow, now we are on the new forum, hopefully these problems wont exist any more....

Soz GrizZ bloke!
 
Cooldan, you REALLY need to change your avatar. I'm mesmerised and struggle to keep to the topic of the posts....

Good luck, Grizz. Will be nice to see the progress of this.
 
Right - bit of fixing today.

Replaced the burnt connectors. The GI header pins were fine but a couple had cracked solder joints so reflowed them. All GI now working :)

Next up the locked on VUK coil. When I first powered up the game this was busily humming away . Now look at this picture and you might spot the cause ....

DSCF4113.JPG

Yep - the diode on these coils should always have the banded end nearest the power wire (the thicker purple wire) . So either someone replaced the diode wrongly or mixed up the wires when they were reattaching them for whatever reason. Doh. So the diode was fubar and potentially the drive transistors on the boards could have been taken out. I tested the coil also just to make sure it was all good - fine with approx 4 ohms resistance.

So meter and manual/schematics out. This is one of the two 50v Special Solenoids on this game. Quick look at manual showed that there are 2 trannys for this coil, a big old TIP36c at position Q5 on the PPB board, and a TIP122 at Q23 on the cpu board.

Q23 tested fine.

Q5 ...no surprise, shorted !

For comparison ......this pic shows me testing Q4 (which I know is good) below it on the board and getting the sort of reading you would expect - diode test, red lead to middle leg, black lead to either outside leg should give somewhere between 0.4 and 0.6

DSCF4114.JPG

Now when I tested Q5 .... a reading of zero, showing it is shorted on. It needs replacing.

DSCF4116.JPG

A few minutes later and a new bad boy soldered in....and just to check we get good reading on both legs. Yep. All good.

DSCF4118.JPG

So new diode on coil, wires attached the correct way round. Power up - and the VUK is back in business all working fine :)
 
This is very helpful, it is something I had to do on IJ and you have just walked me through it. I can now confirm that Q5 on the fliptronic board is shorted on IJ which is a TIP102.
Thank you. :)

There is no diode on the suspect coil, it has a hold and lock circuit, should it have one?
 
This is very helpful, it is something I had to do on IJ and you have just walked me through it. I can now confirm that Q5 on the fliptronic board is shorted on IJ which is a TIP102.
Thank you. :)

There is no diode on the suspect coil, it has a hold and lock circuit, should it have one?

Williams coils have the diodes on the driver board, except flipper coils - they still have em on the coil.

You know with TIP102/122 testing its black lead to centre and red lead to legs to get the reading.
 
They look brand new, looks like you'll be spending some money Ive ;) Postage could get expensive!
 
I will not clutter up your thread anymore but you are the man, thanks for helping me learn. :)
 
Good and bad news in this update !

Bad news - on Wed night the displays starting flickering/acting odd. Then died. Found Fuse F3 (displays)on power board had blown. Disconnected displays and tried another fuse - blew immediately. Hmmm. Not good means something in the HV section of the board has gone tits up. Reading up on this the advice seemed to be rebuild the HV section, replacing all components as they are prob old and stressed anyway.

Well ...after a few beers I made an executive decision to just cut to the chase and stick a new Rottendog power board in. I figured by the time I mess about getting all the 20+ diff components, swapping them all in, poss chasing my tail a bit if it still fecks up .....meh , happy to fork out for a new board that i know is 100% and power good across the game.

So quick email to Sean at Pin Palace. It came today. Fitted and all good. Displays perfect. And I'm pretty sure all the lights seem brighter too. I'll maybe have a crack at repairing the old one later, but for now I just wanted to get this bad boy running.

DSCF4123.JPG


Good news though - flippers sorted.

When I got the game the guy said it needed new coils. No more info than that. When I powered game on, 1 flipper had the wires cut from the flippers and the other was wired up but busily humming away, locked on and getting pretty hot, when you pressed flipper button the flipper kind of wiggled a bit.

The coils used on this are pretty unique to just Monday Night Football and Playboy. They should be these ... 22-900, 3 lugs, but only one winding used on the coil - after the initial flip the game then reduces voltage down to 9v to hold the flipper. 2 different diodes installed, a 1N4004 and a 1N5404.

correct mnf coil.jpg

What I have on this MNF is these ....

5013 00 coil.jpg

A 23-700, 2 windings coil - thick and thin wires, thick for the initial power, then the thin is the holding. With 2 1N4004 diodes.

And this is what mine looked like ......

DSCF4120.JPG

....someone ( with club hands judging by the soldering job :eek: ) has soldered on a 1N5404 in an attempt to make this work. Problem is this coil has 2nd winding, the thin one for the 'hold' also. Now I'm not sure how that would all play out but I'm pretty sure its gonna cause issues. So ....seeing that I can't get the proper coils quickly, only place that has them is Parts4 Pinball in Norway, I decided to experiment to get these to work. I figured if I just take the 'hold' winding out of the equation, this will basically be a similar setup to the correct coils.

So I snipped the little hold wire, temp clipped the drive and power wires back on and tried it out. Success - seems to work fine :)

DSCF4121.JPG DSCF4122.JPG

I'll prob replace with the proper ones at some point, but for now I know I have working flippers.

Sooooo - as of now everything is basically working. And it already looks better with all the GI on . Can start gathering parts ready to strip it down.


DSCF4125.JPG


DSCF4132.JPG
 
They look brand new, looks like you'll be spending some money Ive ;) Postage could get expensive!

Ended at approx £130. I didn't bid - with the shipping and hassle getting them (he wouldn't ship to Europe so would have had to send it to someone else in the US for them to post on etc) on top just couldn't justify it. TBH 2 out of the 3 ramps on this one are fine, and the 3rd I can live with. Can't afford to have this be a money pit :rolleyes:
 
Looks good Ive, nice work :) You bringing a game to Swavesey and if so could it be this?

Cheers Chris - it looks ok from a distance :D I haven't started cleaning it up yet. I had planned to take something to Swaves yeah, I think Mark really wanted Seawitch but not sure that will make it. Could maybe be this if I pull my finger out.
 
Back
Top Bottom