I had an issue a while back my TOTAN decals, and wanted waterslide decals to use on a playfield restoration. The complexity with them is that they have a white shadow around the black text - I'm not sure if that is unique to TOTAN or not.
I haven't actually got around to applying the decals, I ended up buying a new playfeild whilst I played around with restoring the old one (not because they were inadequate), but that decal application process is covered elsewhere on the net and is quite straight forward.
Anyway, I thought it might be helpful to share how and where to get waterslides decals done with white ink. For anyone not aware, printing white is a very specialist application - there used to be printers capable of doing it off the shelf, but manufacturing of those was stopped a few years ago, so now it is very specialised
Step 1: You need a 100% sized scan of the original decal. For me, this meant buying a set of decals that were printed on transparent vinyl - including printed white ink. I didn't want to actually use the vinyl ones though as they sit slightly proud of the surface, and I also wasn't 100% confident that that ink on them would cope with a layer or two of automotive clear coat.
I opted for a set from pinballcentre like this (I ignored the coloured ones):
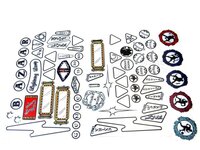
Once I received them, I scanned them at 300dpi as jpeg images.
Step 2: Once scanned you then need to open them in Adobe Illustrator, or another application that works with vector graphics. The reason for this is that jpegs are rastorised files - a compromise between quality and file size that is excellent for photos that you don't need to manipulate, but for pinball graphics, the format is far from ideal - the nice crisp edges that you see around normal playfield graphics are blurred in the process of scanning to jpeg and lost. Vector graphics, however, are composed of a mathematical formula to represent what you see on the page - edges are crisp, and there is no change in image quality if you resize them.
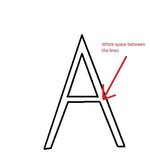
Step 3: The next step is to use Adobe Illustrator's 'Image Trace' functionality to create a vector graphic version of the scanned images. With a simple monotone image, say black text on a transparent background, this does a very good job, with minimal manual post processing needed. If, for example, you were trying to create an Image Traced vector image of the letter 'A' in bold Illustrator would likely do a good job automatically - the outcome would be two sets of lines like below, and Illustrator would either expand the size of those black lines to fill in the white space between them, or you could 'fill' the white space with black. Filling space being reliant on the fact that each of the straight lines that make up the 'A' are all perfectly joined together - something that Illustrator Tracing can struggle with.
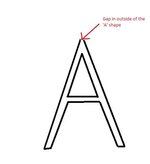
Problems arise if the 'lines' from the automated 'tracing' don't join up properly (see picture below as an example). in which case, if you tried to 'fill' the inside of the 'A' with black, you would actually 'fill' the entirety of the outside of it too. Fortunately you can resolve this by manually cleaning up the tracing - you can drag the corners of each line and set it so that they intersect, thus forming a complete 'A' shape that can then be 'filled' with black.
With a monotone image, black on a transparent background, this manual effort is quite time consuming, but not too burdensome. But with black letters and with a white shadow around them, the automated Tracing struggles, and you get the outlines of the black and white shapes all mixed together, so it's frankly a ball-ache of a manual job to manually fix the problems. At the end of that though, you'll have an image made up of two concentric shapes that look something like the below (I'm only showing the lines, not the fill yet).
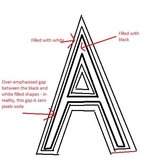
Step 4: After filling each of these shapes respectively black and white, you then need to separate them out - black filled stuff on one 'layer' and white filled stuff on a different 'layer' in Illustrator - again, a bit of a ballache, because it's easy to accidentally miss bits.
From a printing perspective, you then set Illustrator up so that it will produce a two page document, one with the black stuff on it, and the other with the white stuff on it - which is important, because the printers capable of printing white only print one colour at a time - the paper (or waterslide decal paper) goes through and the first colour is printed (e.g. white), then the same piece of paper goes through again and it prints the second page of your document containing the second colour (e.g. black).
Step 5: Bizarrely, the printer capable of printing white, does not recognise the standard Red, Green, Blue (RGB) code used to identify white on a screen. On a screen, the code for white is 255, 255, 255. The printer requires the code for white to be anything other than 255, 255, 255. So you need to make a sort of negative image of what you have created - anything you want to appear black must be RGB black, 0,0,0, and anything you want white, you set to any colour other than white, except black (I went for grey, RGB 230, 230, 230 to represent white.
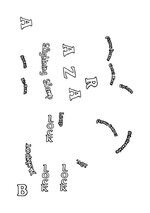
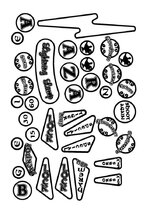
Step 6: Having created this semi-negative version of the decal, you output a a two page .pdf document from Illustrator, which can then be sent off to the printers. I used precisionlabels.com (UK based) who do a lot of stuff for people who make model trains and need white waterslide decals. I think it was about £25 for a sheet of A4. Below is what the final .pdf file looked like - the first page was what was the bits printed in white (but coloured RGB grey on the screen, RGB 230, 230, 230) and the second page was the stuff printed in black in the printers' second pass (RGB 0,0,0).
Bits printed in white in the first printing pass:
Bits printed in black in the second printing pass:
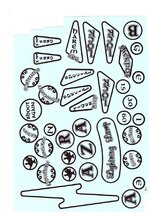
And that's it - at the end of the day you'll get a set of water slide decals that look something like the below (the background paper is blue, the decals are transparent, black and white). I'm not sure it was worth the amount of time it took, but a lot of that was getting to grips with Adobe Illustrator - if you did it often, it would become much quicker I think.
I haven't actually got around to applying the decals, I ended up buying a new playfeild whilst I played around with restoring the old one (not because they were inadequate), but that decal application process is covered elsewhere on the net and is quite straight forward.
Anyway, I thought it might be helpful to share how and where to get waterslides decals done with white ink. For anyone not aware, printing white is a very specialist application - there used to be printers capable of doing it off the shelf, but manufacturing of those was stopped a few years ago, so now it is very specialised
Step 1: You need a 100% sized scan of the original decal. For me, this meant buying a set of decals that were printed on transparent vinyl - including printed white ink. I didn't want to actually use the vinyl ones though as they sit slightly proud of the surface, and I also wasn't 100% confident that that ink on them would cope with a layer or two of automotive clear coat.
I opted for a set from pinballcentre like this (I ignored the coloured ones):

Once I received them, I scanned them at 300dpi as jpeg images.
Step 2: Once scanned you then need to open them in Adobe Illustrator, or another application that works with vector graphics. The reason for this is that jpegs are rastorised files - a compromise between quality and file size that is excellent for photos that you don't need to manipulate, but for pinball graphics, the format is far from ideal - the nice crisp edges that you see around normal playfield graphics are blurred in the process of scanning to jpeg and lost. Vector graphics, however, are composed of a mathematical formula to represent what you see on the page - edges are crisp, and there is no change in image quality if you resize them.
Step 3: The next step is to use Adobe Illustrator's 'Image Trace' functionality to create a vector graphic version of the scanned images. With a simple monotone image, say black text on a transparent background, this does a very good job, with minimal manual post processing needed. If, for example, you were trying to create an Image Traced vector image of the letter 'A' in bold Illustrator would likely do a good job automatically - the outcome would be two sets of lines like below, and Illustrator would either expand the size of those black lines to fill in the white space between them, or you could 'fill' the white space with black. Filling space being reliant on the fact that each of the straight lines that make up the 'A' are all perfectly joined together - something that Illustrator Tracing can struggle with.

Problems arise if the 'lines' from the automated 'tracing' don't join up properly (see picture below as an example). in which case, if you tried to 'fill' the inside of the 'A' with black, you would actually 'fill' the entirety of the outside of it too. Fortunately you can resolve this by manually cleaning up the tracing - you can drag the corners of each line and set it so that they intersect, thus forming a complete 'A' shape that can then be 'filled' with black.

With a monotone image, black on a transparent background, this manual effort is quite time consuming, but not too burdensome. But with black letters and with a white shadow around them, the automated Tracing struggles, and you get the outlines of the black and white shapes all mixed together, so it's frankly a ball-ache of a manual job to manually fix the problems. At the end of that though, you'll have an image made up of two concentric shapes that look something like the below (I'm only showing the lines, not the fill yet).

Step 4: After filling each of these shapes respectively black and white, you then need to separate them out - black filled stuff on one 'layer' and white filled stuff on a different 'layer' in Illustrator - again, a bit of a ballache, because it's easy to accidentally miss bits.
From a printing perspective, you then set Illustrator up so that it will produce a two page document, one with the black stuff on it, and the other with the white stuff on it - which is important, because the printers capable of printing white only print one colour at a time - the paper (or waterslide decal paper) goes through and the first colour is printed (e.g. white), then the same piece of paper goes through again and it prints the second page of your document containing the second colour (e.g. black).
Step 5: Bizarrely, the printer capable of printing white, does not recognise the standard Red, Green, Blue (RGB) code used to identify white on a screen. On a screen, the code for white is 255, 255, 255. The printer requires the code for white to be anything other than 255, 255, 255. So you need to make a sort of negative image of what you have created - anything you want to appear black must be RGB black, 0,0,0, and anything you want white, you set to any colour other than white, except black (I went for grey, RGB 230, 230, 230 to represent white.
Step 6: Having created this semi-negative version of the decal, you output a a two page .pdf document from Illustrator, which can then be sent off to the printers. I used precisionlabels.com (UK based) who do a lot of stuff for people who make model trains and need white waterslide decals. I think it was about £25 for a sheet of A4. Below is what the final .pdf file looked like - the first page was what was the bits printed in white (but coloured RGB grey on the screen, RGB 230, 230, 230) and the second page was the stuff printed in black in the printers' second pass (RGB 0,0,0).
Bits printed in white in the first printing pass:

Bits printed in black in the second printing pass:

And that's it - at the end of the day you'll get a set of water slide decals that look something like the below (the background paper is blue, the decals are transparent, black and white). I'm not sure it was worth the amount of time it took, but a lot of that was getting to grips with Adobe Illustrator - if you did it often, it would become much quicker I think.

Last edited:
