I discovered this website ....
http://www.thepolishingshop.co.uk
I contacted them for advice and spoke to a really helpful guy and outlined that I was restoring metal and plastic in pinball machines
He recommended this kit, which cost less than £20 delivered
Steel Polishing Super Finishing kit 4"x1/2" mops with Menzerna Compounds
http://www.thepolishingshop.co.uk/cgi-bin/sh000001.pl?WD=super steel polishing&PN=Steel---Stainless-Steel-Kits-for-Drills.html#SID=174
This has 4 different grades of polishing discs, and 4 different polishing compounds which will deal with rusty metal through to fine plastics. You can use with a battery drill, but they work better with the higher speed of an electric drill
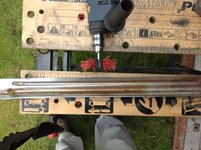
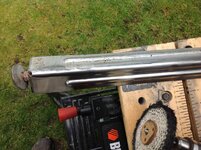
I have been using it for a couple of months now and it is superb. Pitted wpc legs (top is rust covered with horrible silver paint, the bottom is after I used a single coarse mop) ...
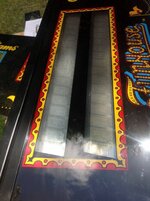
Plastics - it is perfect with speaker panels and playfield plastics using the most gentle wheel and gentle compound. This panel had usual swirl marks and also horrible scratches on both sides of the display window as some moron used sand paper on it. (Note - The red paint loss on the speaker grill was already there, I did not do this !)
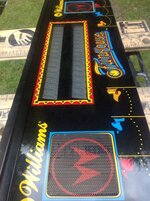
The after photo, this took less than 5 minutes, i did not even have to remove it from the mdf. This was done using the drill at full speed. I even used it on the inside of the display windows as i learnt using a surplus speaker panel that light pressure did not damage the art if i momentarily placed the wheel on it accidentally. You can push down hard on this plastic and it does not burn, i think you would need to be quite careless to damage it. Just remember to reverse the drill when need be so that you do not snag the edge of the material with the mop - it wants to spin from the body of the item you are polishing to the edge, not the other way round.
It cleaned up heavily pitted and corroded drop targets, solenoid plungers etc to leave them with a finer finish than new.
From this level of corrosion ...
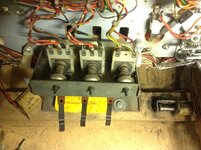
To this ...
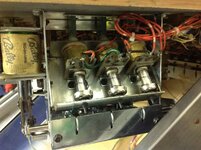
The guy was so helpful, i just bought from him. These wheels and compounds may be available elsewhere for less, I did not shop around, as i believe in rewarding customer service
I use ear muffs, safety glasses and a dust mask when using this lot
http://www.thepolishingshop.co.uk
I contacted them for advice and spoke to a really helpful guy and outlined that I was restoring metal and plastic in pinball machines
He recommended this kit, which cost less than £20 delivered
Steel Polishing Super Finishing kit 4"x1/2" mops with Menzerna Compounds
http://www.thepolishingshop.co.uk/cgi-bin/sh000001.pl?WD=super steel polishing&PN=Steel---Stainless-Steel-Kits-for-Drills.html#SID=174
This has 4 different grades of polishing discs, and 4 different polishing compounds which will deal with rusty metal through to fine plastics. You can use with a battery drill, but they work better with the higher speed of an electric drill
I have been using it for a couple of months now and it is superb. Pitted wpc legs (top is rust covered with horrible silver paint, the bottom is after I used a single coarse mop) ...

Plastics - it is perfect with speaker panels and playfield plastics using the most gentle wheel and gentle compound. This panel had usual swirl marks and also horrible scratches on both sides of the display window as some moron used sand paper on it. (Note - The red paint loss on the speaker grill was already there, I did not do this !)

The after photo, this took less than 5 minutes, i did not even have to remove it from the mdf. This was done using the drill at full speed. I even used it on the inside of the display windows as i learnt using a surplus speaker panel that light pressure did not damage the art if i momentarily placed the wheel on it accidentally. You can push down hard on this plastic and it does not burn, i think you would need to be quite careless to damage it. Just remember to reverse the drill when need be so that you do not snag the edge of the material with the mop - it wants to spin from the body of the item you are polishing to the edge, not the other way round.

It cleaned up heavily pitted and corroded drop targets, solenoid plungers etc to leave them with a finer finish than new.
From this level of corrosion ...

To this ...

The guy was so helpful, i just bought from him. These wheels and compounds may be available elsewhere for less, I did not shop around, as i believe in rewarding customer service
I use ear muffs, safety glasses and a dust mask when using this lot
Last edited:


