Pinball info
You are using an out of date browser. It may not display this or other websites correctly.
You should upgrade or use an alternative browser.
You should upgrade or use an alternative browser.
Complete BALLY SKATEBALL. Now sold, but still in the U.K.
- Thread starter new forest pinball
- Start date
That Stencil makes me think of Dogtown & Z-Boys; all about the style. Looks gnarly dude. 
So good Keith! Cracking work dude
OP
OP
“PURPLE RAILS....PURPLE RAILS.......I only want to see you dancing with your purple rails..” you got no chance!......
Back to business.....made a decision yesterday about the side rails on the playfield. Now I know you are all waiting to see what the playfield looks like, be patient it will not be long until all is revealed. Honest. Unless I get distracted by something else, which for all who know me that is about 98% likely! So back on subject. The rails were removed today. Sanded , primered and sprayed in metallic purple! Yes you heard that right folks..”purple rails...hee hee... kool.....


Think they are going to look good....may lacquer them not sure yet.......?
What else did we get done today..apart from sit about in the garden and stare at loads of gardening chores......
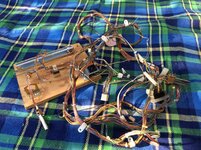
Ah ha that’s it clean the cabinet loom. Tools required a kitchen sponge scourges. Or what ever they are called. What we find cleans the cables cheaply and effectively is astonish carpet cleaner from Poundland. (I know what you are thinking, this is all we had in the workshop with a sprayer that cleans, and couldn’t be bothered to que for hours at the shops. To buy something else). If you are thinking that then you are right. But it does do a good job honest. First thing to do was to cut off that German power lead and plug, along with the faulty line filter.......
Here’s my kit...including a bucket of clean water to rinse me cables in....just cover them in a good coat of cleaner and leave for a couple of minutes......like this...
Woah...loook at that foaming action, cleaning deep and thoroughly all for a £1.00.....

After a brief soak give the cables a light scrub with your sponge thingy.....and then dunk in your bucket of water
and leave to dry in the lovely new forest sunshine......

Taa daa.....jobs a gooden..........coming next.....”A BAG OF SWAG...OOHHH I SAY....”
Back to business.....made a decision yesterday about the side rails on the playfield. Now I know you are all waiting to see what the playfield looks like, be patient it will not be long until all is revealed. Honest. Unless I get distracted by something else, which for all who know me that is about 98% likely! So back on subject. The rails were removed today. Sanded , primered and sprayed in metallic purple! Yes you heard that right folks..”purple rails...hee hee... kool.....
Think they are going to look good....may lacquer them not sure yet.......?
What else did we get done today..apart from sit about in the garden and stare at loads of gardening chores......
Ah ha that’s it clean the cabinet loom. Tools required a kitchen sponge scourges. Or what ever they are called. What we find cleans the cables cheaply and effectively is astonish carpet cleaner from Poundland. (I know what you are thinking, this is all we had in the workshop with a sprayer that cleans, and couldn’t be bothered to que for hours at the shops. To buy something else). If you are thinking that then you are right. But it does do a good job honest. First thing to do was to cut off that German power lead and plug, along with the faulty line filter.......
Here’s my kit...including a bucket of clean water to rinse me cables in....just cover them in a good coat of cleaner and leave for a couple of minutes......like this...
Woah...loook at that foaming action, cleaning deep and thoroughly all for a £1.00.....
After a brief soak give the cables a light scrub with your sponge thingy.....and then dunk in your bucket of water
and leave to dry in the lovely new forest sunshine......
Taa daa.....jobs a gooden..........coming next.....”A BAG OF SWAG...OOHHH I SAY....”
Attachments
OP
OP
“A LARGE BAG O SWAG.."........
A small amount of progress in recent days. The cabinet wiring loom has been refitted, and a new line filter and varistor were installed. If you recall the original was cut out of circuit. Here’s the bits......I will refit the decal later....

Here it is fitted..looks a lot better.....

Side rails on...these are new, but we really wanted them mirror polished, but Steve at Phoenix polishers is now shut so that will have to wait, which is a big disappointment. But the new ones look great , but compared to mirrored........
Here is the cabinet....so far........
 Oh....and the coin door is on...covered in my grubbie old fingerprints. At least the door frame is mirror polished..hoorah.....

Also installed metal cabinet protectors for the legs.......polished shooter housing with a nice new insert. Always a good idea to replace the plastic insert as it wears at the front and the spring for the shooter hits the metal surround which is not ideal..nothing like a nice smooth rod......
Next we get to the title of this thread...over the years I have been collecting parts for this machine. Looking back I really regret not getting a cpr playfield when they did them a couple of years ago....But got a new apron and shooter rod plate a while ago..
As you look at all the swag some of it is ideas swimming about in my head, some I have definitely made a decision on...for example clear posts instead of red. And teal pop bumper yokes....the Titan rubbers I have not made a decision on yet. Probably not until I fit a few and see what they look like...got a choice of orange, purple, red or clear....any suggestions welcome......also the flippers , do I just stick with new solid white or go with clear red, transparent....to many choices......anyway it’s going to have
An led lamp control pcb so full comets in g.i. And inserts but not sure on backglass. As we like the look of the iridescent lamps.
Maybe add a splash of colour....time will tell........
Here’s the swag......Bella Bella........

Next up ...we take a look at the playfield......
A small amount of progress in recent days. The cabinet wiring loom has been refitted, and a new line filter and varistor were installed. If you recall the original was cut out of circuit. Here’s the bits......I will refit the decal later....
Here it is fitted..looks a lot better.....
Side rails on...these are new, but we really wanted them mirror polished, but Steve at Phoenix polishers is now shut so that will have to wait, which is a big disappointment. But the new ones look great , but compared to mirrored........
Here is the cabinet....so far........
Oh....and the coin door is on...covered in my grubbie old fingerprints. At least the door frame is mirror polished..hoorah.....Also installed metal cabinet protectors for the legs.......polished shooter housing with a nice new insert. Always a good idea to replace the plastic insert as it wears at the front and the spring for the shooter hits the metal surround which is not ideal..nothing like a nice smooth rod......
Next we get to the title of this thread...over the years I have been collecting parts for this machine. Looking back I really regret not getting a cpr playfield when they did them a couple of years ago....But got a new apron and shooter rod plate a while ago..
As you look at all the swag some of it is ideas swimming about in my head, some I have definitely made a decision on...for example clear posts instead of red. And teal pop bumper yokes....the Titan rubbers I have not made a decision on yet. Probably not until I fit a few and see what they look like...got a choice of orange, purple, red or clear....any suggestions welcome......also the flippers , do I just stick with new solid white or go with clear red, transparent....to many choices......anyway it’s going to have
An led lamp control pcb so full comets in g.i. And inserts but not sure on backglass. As we like the look of the iridescent lamps.
Maybe add a splash of colour....time will tell........
Here’s the swag......Bella Bella........
Next up ...we take a look at the playfield......
Nothing like a collection of individually wrapped mint kit to get the blood pumping!
You have to use those neon orange rubbers Keith. They'll look great with the cab art. Then pure white flippers with either orange or red bands for me.
You have to use those neon orange rubbers Keith. They'll look great with the cab art. Then pure white flippers with either orange or red bands for me.
OP
OP
Had a day off from anything pinball today. So to set the right mood in the build up to the skateball playfield reveal.....please play at full volume for full effect.....Here is our walk out today in the new forest.....and a calming picture of Dolly and Fuzzy being rascals in the bluebells......
View attachment 249E7C53-E98A-4337-BECD-D5AB9DBDCE34.MOV

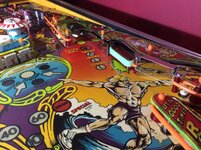
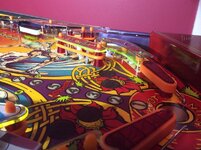
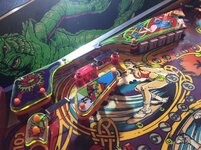
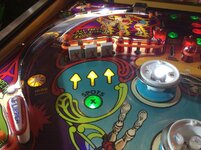
So here she is the playfield. This was one of the reasons I purchased this game originally I seem to remember, as the playfield was Mylared pretty early on I reckon. Only down side is that the pops are double mylared, which does upset me greatly. This is quite common on Bally games off this era as they were often fitted with pop bumper and or sling shot Mylar when put on site when new. Then a bit further down the line a playfield Mylar was added, this is nearly always put over the top of the existing mylar. As most operators were in fear of removing Mylar. Or just couldn’t be bothered. Here it is with nothing removed or cleaned at all. Fresh out of storage.....

So it’s in great condition really. Points to note on initial closer inspection is the following:
1). All metal gates are present and correct. (Rare for this game as often an operator would remove one gate to install it on the right inlane to stop skilled players from the well known hack of continually backflipping it up the inlane from the right flipper, maxing out the bonus and lighting the special for unlimited credits. More on this later in the thread.). This is great news, as finding these gates nowadays is getting pretty tricky.
2). All lane guides are either broken or sawn off to fit.
3). From the factory prior to coloured lamps, coloured shields , tubes that covered the lamp were used. There are three on skateball. Although they are all present on this playfield as always they have completely faded to clear.
4). A few broken plastics, and broken clears at lane guides.
5). Spinner chipped and worn. Strange thing is no decal is available for the skateball spinner. Never understood why!? Rosie reckons she can touch it in ok. If not we will attempt to make a decal.........
6). How old are those flipper rubbers.....
Here are a few more pictures of it....


We will strip it down and take a closer look at what needs touching up and repairing....in our next thrilling instalment....
“STRIPPED “.......
Oh and before I go...here is the spinner...

View attachment 249E7C53-E98A-4337-BECD-D5AB9DBDCE34.MOV
So here she is the playfield. This was one of the reasons I purchased this game originally I seem to remember, as the playfield was Mylared pretty early on I reckon. Only down side is that the pops are double mylared, which does upset me greatly. This is quite common on Bally games off this era as they were often fitted with pop bumper and or sling shot Mylar when put on site when new. Then a bit further down the line a playfield Mylar was added, this is nearly always put over the top of the existing mylar. As most operators were in fear of removing Mylar. Or just couldn’t be bothered. Here it is with nothing removed or cleaned at all. Fresh out of storage.....
So it’s in great condition really. Points to note on initial closer inspection is the following:
1). All metal gates are present and correct. (Rare for this game as often an operator would remove one gate to install it on the right inlane to stop skilled players from the well known hack of continually backflipping it up the inlane from the right flipper, maxing out the bonus and lighting the special for unlimited credits. More on this later in the thread.). This is great news, as finding these gates nowadays is getting pretty tricky.
2). All lane guides are either broken or sawn off to fit.
3). From the factory prior to coloured lamps, coloured shields , tubes that covered the lamp were used. There are three on skateball. Although they are all present on this playfield as always they have completely faded to clear.
4). A few broken plastics, and broken clears at lane guides.
5). Spinner chipped and worn. Strange thing is no decal is available for the skateball spinner. Never understood why!? Rosie reckons she can touch it in ok. If not we will attempt to make a decal.........
6). How old are those flipper rubbers.....
Here are a few more pictures of it....
We will strip it down and take a closer look at what needs touching up and repairing....in our next thrilling instalment....
“STRIPPED “.......
Oh and before I go...here is the spinner...
Last edited:
OP
OP
Apology to all who are following this....had some parts come in for customers machines, so they took priority. Here’s the thing,
It’s all good news as far as skateball goes! It has now been moved from our storage facilities into the main workshop. Big wow I hear you cry! This means that it is almost in one piece.....almost.....The backbox is on. It’s on new legs (chrome) feet and bolts.
Before we attach the backglass illumination board, best thing to do is to sort out the boards. This game when originally purchased did have a full set of pcb’s but no idea which ones work and which doesn’t. The original plan was to install a full,new , replacement board set. That still is the plan but we just used our last solenoid driver pcb on a customers machine. So I will rebuild the original and see how it goes....will include that in this thread.
So first up is the power supply board attached to the transformer assembly. These are very reasonable new these days particularly in kit form so here is our last version 10. Version 11 is super cool with larger diodes and only one bridge rectifier!
Here is our kit ready for assembly. COMPONENTS....

PCB.

Here is a picture of me organising the parts. (No idea why I do this as I always drop them all or knock them with my elbow...lol).

HERE IT IS ASSEMBLED. TASTY......

Now onto the solenoid driver board...this needs modding it is still complete with all its original components, not even a changed transistor??....we will upgrade c23.(big capacitor, top centre). To 35v 15000uf this is pretty crucial if your classic Bally has more than two flippers. Change the capacitor on the display voltage supply line and do three vital earth mods. That really help this aged board to become Uber reliable...well improved anyway......The earth mods are basically three wire links...........
Here is the mod kit........and the board....

So let’s mark up the 3 mod. Links and give a vague explanation of what’s going on....I have marked them on the board with me sharpie!.....see the picture below for the jumper locations. The one on the left I normally do in red as it’s a voltage link not an earth. But I couldn’t find it! (To much workshop clutter!). Here what we did and why....
These pcb's definitely suffer from circuitry not up to the job required, so some jumper - link mods need to be done to help out the old girls. . First i added a brown jumper wire from the solder point of the negative lead on capacitor C23 to the thick ground trace directly below it. This relieves pin 10on connector J3and stops it from burning (cable link in middle on picture ). I then added another brown jumper wire from the solder point of the negative lead on capacitor C26and soldered this to the ground trace at the edge of the pcb (Link top right in picture). this helps to stop pin 3of J3from burning.
Lastly i added a 5V+jumper wire from the solder point of TP1 (test point) to the solder point of TP3 (test point) in this pic it is black (link on left). Adding this jumper helps to prevent unreliable game play. And , for reasons that are incredibly varied, loss of 5v on tp3......

And here is the front with new capacitors fitted. Also took the opportunity to clean it up and add a new decal.....

Next job is to solder the cables from the transformer onto the back of our new power board. Install our nice mpu. (Quick note about this particular mpu it has a special skateball home use jumper setting with improved attract mode sounds and light show. Wow great stuff doodes!).........A new lamp control pcb and a new sound board...fantastico! We will of course be modding the lamp board for LED’s........here are the boards cozy and comfortable in the backbox, hungry for cables...but need to check the sockets first.....more to come soon.......K.
Ohhh....some backbox pictures......


It’s all good news as far as skateball goes! It has now been moved from our storage facilities into the main workshop. Big wow I hear you cry! This means that it is almost in one piece.....almost.....The backbox is on. It’s on new legs (chrome) feet and bolts.
Before we attach the backglass illumination board, best thing to do is to sort out the boards. This game when originally purchased did have a full set of pcb’s but no idea which ones work and which doesn’t. The original plan was to install a full,new , replacement board set. That still is the plan but we just used our last solenoid driver pcb on a customers machine. So I will rebuild the original and see how it goes....will include that in this thread.
So first up is the power supply board attached to the transformer assembly. These are very reasonable new these days particularly in kit form so here is our last version 10. Version 11 is super cool with larger diodes and only one bridge rectifier!
Here is our kit ready for assembly. COMPONENTS....
PCB.
Here is a picture of me organising the parts. (No idea why I do this as I always drop them all or knock them with my elbow...lol).
HERE IT IS ASSEMBLED. TASTY......
Now onto the solenoid driver board...this needs modding it is still complete with all its original components, not even a changed transistor??....we will upgrade c23.(big capacitor, top centre). To 35v 15000uf this is pretty crucial if your classic Bally has more than two flippers. Change the capacitor on the display voltage supply line and do three vital earth mods. That really help this aged board to become Uber reliable...well improved anyway......The earth mods are basically three wire links...........
Here is the mod kit........and the board....
So let’s mark up the 3 mod. Links and give a vague explanation of what’s going on....I have marked them on the board with me sharpie!.....see the picture below for the jumper locations. The one on the left I normally do in red as it’s a voltage link not an earth. But I couldn’t find it! (To much workshop clutter!). Here what we did and why....
These pcb's definitely suffer from circuitry not up to the job required, so some jumper - link mods need to be done to help out the old girls. . First i added a brown jumper wire from the solder point of the negative lead on capacitor C23 to the thick ground trace directly below it. This relieves pin 10on connector J3and stops it from burning (cable link in middle on picture ). I then added another brown jumper wire from the solder point of the negative lead on capacitor C26and soldered this to the ground trace at the edge of the pcb (Link top right in picture). this helps to stop pin 3of J3from burning.
Lastly i added a 5V+jumper wire from the solder point of TP1 (test point) to the solder point of TP3 (test point) in this pic it is black (link on left). Adding this jumper helps to prevent unreliable game play. And , for reasons that are incredibly varied, loss of 5v on tp3......
And here is the front with new capacitors fitted. Also took the opportunity to clean it up and add a new decal.....
Next job is to solder the cables from the transformer onto the back of our new power board. Install our nice mpu. (Quick note about this particular mpu it has a special skateball home use jumper setting with improved attract mode sounds and light show. Wow great stuff doodes!).........A new lamp control pcb and a new sound board...fantastico! We will of course be modding the lamp board for LED’s........here are the boards cozy and comfortable in the backbox, hungry for cables...but need to check the sockets first.....more to come soon.......K.
Ohhh....some backbox pictures......
Not sure how I missed this thread but incredibly inspiring work as always Keith, every shop log of your blows me away more than the last 
OP
OP
TURN ON?....RE-PIN....COP OUT!
tiny update on SKATEBALL ..need to spend more time on this really, as when I do my excitement and anticipation for a few games on this beautiful machine builds to an almost frenzy like state....
So no way I am turning this machine on currently, the sockets for the power board are an absolute disgrace. So copped out and went for simply the most tedious, (but essential) restoration job in Bally SS pinball repairs, re-pinning! Uuurrrgggghhhh! But so satisfying when it’s done. Best to set small goals for this job, as otherwise you just cop out!...so my goal today was to re-pin and socket the three power board connectors, and J3 , J4 on the solenoid driver pcb. (We consider these connectors the absolute minimum for achieving any kind of game play reliability). Here are the power board connectors...embarrassed? So you should be you are a disgrace to reliability my friends......here they are the dirty rascals!....

Ahhh...now this is a lot better. Almost tidy enough to get the stamp of approval from the missus!.....hee hee...(not that she is ever in the workshop as that would definitely fail the tidy and organised standards).

Here is J3 and J4 on the solenoid pcb....that’s neat neat. FYI We always crimp the connectors first then solder for that ultra reliable connection, before we push the pins in the connectors........

It was staring me in the face during this repinning session, J4 on the lamp driver board. A connector of two half’s, with wires falling out...So I exceeded my expectations and cracked on with that one as well....
BEFORE.......
.
AFTER..........

Phew...that’s quite enough of that for one day.....tomorrow we will turn her on and see what happens...........
Stay tuned folks......and stay safe....keep alert.......and other P.M. waffle.......K.
tiny update on SKATEBALL ..need to spend more time on this really, as when I do my excitement and anticipation for a few games on this beautiful machine builds to an almost frenzy like state....
So no way I am turning this machine on currently, the sockets for the power board are an absolute disgrace. So copped out and went for simply the most tedious, (but essential) restoration job in Bally SS pinball repairs, re-pinning! Uuurrrgggghhhh! But so satisfying when it’s done. Best to set small goals for this job, as otherwise you just cop out!...so my goal today was to re-pin and socket the three power board connectors, and J3 , J4 on the solenoid driver pcb. (We consider these connectors the absolute minimum for achieving any kind of game play reliability). Here are the power board connectors...embarrassed? So you should be you are a disgrace to reliability my friends......here they are the dirty rascals!....
Ahhh...now this is a lot better. Almost tidy enough to get the stamp of approval from the missus!.....hee hee...(not that she is ever in the workshop as that would definitely fail the tidy and organised standards).
Here is J3 and J4 on the solenoid pcb....that’s neat neat. FYI We always crimp the connectors first then solder for that ultra reliable connection, before we push the pins in the connectors........
It was staring me in the face during this repinning session, J4 on the lamp driver board. A connector of two half’s, with wires falling out...So I exceeded my expectations and cracked on with that one as well....
BEFORE.......
.
AFTER..........
Phew...that’s quite enough of that for one day.....tomorrow we will turn her on and see what happens...........
Stay tuned folks......and stay safe....keep alert.......and other P.M. waffle.......K.
you can "attempt" a 1080 in celebration when you get this finished. or maybe not
https://www.bbc.co.uk/news/av/world...skateboarder-11-lands-record-1080-degree-turn
https://www.bbc.co.uk/news/av/world...skateboarder-11-lands-record-1080-degree-turn
OP
OP
Now has come the time to turn it on and see what occurs?......
Yippee! It boots ......and we have sound. Boy that 6” x 9” is loud!!........think I will swap some old with new.....first though we have some very serious decisions to make!
1). Ribbed post colour, red(original), blue or clear?
2). Rubber colour, white, clear, yellow, red, purple or orange? (Titan).
3). Leds in G.i. Faceted, twin smd, single smd, frosted or clears? (Comet).
4). Flipper colour? White, blue, green, clear or red? (White original).
5). 5 piece custom plastic protectors set. (5 piece , bespoke design by our very own plastics legend @Colywobbles )
Luminescent green, or luminescent orange?
6). Lane guides, blue, red or clear? All translucent. (Solid red original).
7). Flipper rubbers.Titan. Red,orange,gitd,yellow,clear,black......and so on.........lol....
Oh decisions, decisions..........
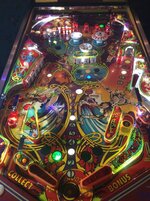
Anyway this is what we decided on in the end....I will let the pictures do the talking!.........
First here is the new shooter housing and shooter rod.....

Coin door illuminated...

Nice new buttons...White body, clear red button...

This was the upper right flipper, posts and rubbers...before...

After......

The pop bumpers and the red lane guides before....

And after...the pops are work in progress as we did not have stock of the correct lamp holders so only one is currently working, lane guides in clear red...


New drops!........luuvvlee....

 And new mini flipper, upper left with red Titan. “Flipper” decal as original. Blue. See above.
Decided on green protectors, fitted on lane guides, slings, and centre all targets down plastic. Which is prone to breaks....

Notice on the right inlane guide we replaced the dull gray spacers with orange, and polished the playfield metal posts....
Before......

After.....

And a new plastics set....here’s a few more pictures for your evenings viewing pleasure.....
Few touch ups left to do and some playfield polish top coats...then I guess We ought to see what’s actually working!......


Yippee! It boots
......and we have sound. Boy that 6” x 9” is loud!!........think I will swap some old with new.....first though we have some very serious decisions to make!1). Ribbed post colour, red(original), blue or clear?
2). Rubber colour, white, clear, yellow, red, purple or orange? (Titan).
3). Leds in G.i. Faceted, twin smd, single smd, frosted or clears? (Comet).
4). Flipper colour? White, blue, green, clear or red? (White original).
5). 5 piece custom plastic protectors set. (5 piece , bespoke design by our very own plastics legend @Colywobbles )
Luminescent green, or luminescent orange?
6). Lane guides, blue, red or clear? All translucent. (Solid red original).
7). Flipper rubbers.Titan. Red,orange,gitd,yellow,clear,black......and so on.........lol....
Oh decisions, decisions..........
Anyway this is what we decided on in the end....I will let the pictures do the talking!.........
First here is the new shooter housing and shooter rod.....
Coin door illuminated...
Nice new buttons...White body, clear red button...
This was the upper right flipper, posts and rubbers...before...
After......
The pop bumpers and the red lane guides before....
And after...the pops are work in progress as we did not have stock of the correct lamp holders so only one is currently working, lane guides in clear red...
New drops!........luuvvlee....
And new mini flipper, upper left with red Titan. “Flipper” decal as original. Blue. See above.Decided on green protectors, fitted on lane guides, slings, and centre all targets down plastic. Which is prone to breaks....
Notice on the right inlane guide we replaced the dull gray spacers with orange, and polished the playfield metal posts....
Before......
After.....
And a new plastics set....here’s a few more pictures for your evenings viewing pleasure.....
Few touch ups left to do and some playfield polish top coats...then I guess We ought to see what’s actually working!......
Attachments
-
 B1507B02-A1CA-4E39-BDDE-FC9C15A61084.jpeg201.9 KB · Views: 17
 -
 C3CCF0F2-18B8-4E58-9DB0-718A99C7584A.jpeg162.7 KB · Views: 16
 -
 B4B5EBFF-B701-42DD-98E5-99A2614F03AB.jpeg196.7 KB · Views: 16
 -
 BF7755B8-6C63-4730-97CB-9F5A531FFEF8.jpeg164.9 KB · Views: 17
 -
 E96D796C-3699-4050-800E-E077556E2876.jpeg148.4 KB · Views: 19
God damn, you’re good!!!
Looks stunning!
Outstanding work Keith, such an awesome game 
D
Deleted member 2463
Loverly!
Sent from my iPhone using Tapatalk Pro
Sent from my iPhone using Tapatalk Pro
I did too, just catching up now.Not sure how I missed this thread but incredibly inspiring work as always Keith, every shop log of your blows me away more than the last
This is a wonderful thread. Such meticulous & stunning work.
Beyond beautiful Keith. Legendary work 
OP
OP
Not a sight you See everyday........but a wonderful one......skateball update due this evening......have a nice day!....
Very nice, who makes the rectifier boards??
OP
OP
FLIPPERS AND SPINNERS.
Here’s the thing, on classic Bally/stern games the most essential two items that need to be working well are the flippers and the spinners. (Obviously helps if the rest of the game parts work , just employing a bit of hyperbole!). Nothing worse than strolling up to an old classic favourite only to find the flippers are more floppers, and the spinner more like a two way gate! What a disappointment. Let’s consider our spinners first. Two things worthy of note on a Skateball, 1st no spinner decals are available. Never quite understood that as it’s such a well respected game. Secondly the spinner is very high up the playfield on skateball, I can only think of blackout with one higher. So the spinner needs to be spot on. More on this later when we discuss flippers. Now our expectations are high at new forest pinball as far as spinners go. We want 30-35 spins for a clean hit minimum. And twenty ish for a half baked effort.
As far as the spinner goes this is what it looked like when stripped from the game....
Front...

Back

First thing to do for a cleaner spin is to remove the paint from the arms. I scanned / copied the decal onto paper but it looked terrible so I decided to attempt to touch it up. Thought it would be good to have the reverse side red, so when it spins the red wheels blend.
New rear...

Then I touched in the artwork and added Mylar.....

So onto the flippers this is a fairly costly job as skateball has 4 flippers! So four flipper rebuild kits, four coils and six, yes six e.o.s. Switches.Ouch. But essential for fast , furious game play as the designer intended.
Here are the four flippers rebuilt....
Top left.....

Upper right...

Bottom pair.....

Now here’s where it gets interesting...some of you more eagle eyed viewers may have already spotted it?....
Was only getting a max of twenty spins on the spinner. Not enough!!.....so we swapped out the coil lower left side for the infamous stern “Uber” coil. The A 24-570/34-3600! Woah awesome! The ball had enough power still to hot 30 spins! What a rush! Love it! Anyway ......got to adjust a few switches and lamps...to finish......next thread will contain a very nice mod for your viewing pleasure....watch this space........
Take it easy....Keith.
P.s.certified cab..........

Here’s the thing, on classic Bally/stern games the most essential two items that need to be working well are the flippers and the spinners. (Obviously helps if the rest of the game parts work , just employing a bit of hyperbole!). Nothing worse than strolling up to an old classic favourite only to find the flippers are more floppers, and the spinner more like a two way gate! What a disappointment. Let’s consider our spinners first. Two things worthy of note on a Skateball, 1st no spinner decals are available. Never quite understood that as it’s such a well respected game. Secondly the spinner is very high up the playfield on skateball, I can only think of blackout with one higher. So the spinner needs to be spot on. More on this later when we discuss flippers. Now our expectations are high at new forest pinball as far as spinners go. We want 30-35 spins for a clean hit minimum. And twenty ish for a half baked effort.
As far as the spinner goes this is what it looked like when stripped from the game....
Front...
Back
First thing to do for a cleaner spin is to remove the paint from the arms. I scanned / copied the decal onto paper but it looked terrible so I decided to attempt to touch it up. Thought it would be good to have the reverse side red, so when it spins the red wheels blend.
New rear...
Then I touched in the artwork and added Mylar.....
So onto the flippers this is a fairly costly job as skateball has 4 flippers! So four flipper rebuild kits, four coils and six, yes six e.o.s. Switches.Ouch. But essential for fast , furious game play as the designer intended.
Here are the four flippers rebuilt....
Top left.....
Upper right...
Bottom pair.....
Now here’s where it gets interesting...some of you more eagle eyed viewers may have already spotted it?....
Was only getting a max of twenty spins on the spinner. Not enough!!.....so we swapped out the coil lower left side for the infamous stern “Uber” coil. The A 24-570/34-3600! Woah awesome! The ball had enough power still to hot 30 spins! What a rush! Love it! Anyway ......got to adjust a few switches and lamps...to finish......next thread will contain a very nice mod for your viewing pleasure....watch this space........
Take it easy....Keith.
P.s.certified cab..........
Keith you are my hero! Those flipper mechs are beautiful! Pure flipper porn 
OP
OP
70’S DISCO BLING.
Been working on these for a while now, with the help of @Colywobbles RGB disco flipper buttons......groovy!.....
Really happy with it, looks cool..........New button has clear red case, clear button. Clear button holder.......
View attachment 40557723-07D7-4F7B-B50E-D3E744721F84.MP4
Been working on these for a while now, with the help of @Colywobbles RGB disco flipper buttons......groovy!.....
Really happy with it, looks cool..........New button has clear red case, clear button. Clear button holder.......
View attachment 40557723-07D7-4F7B-B50E-D3E744721F84.MP4


What a great thread ,
Thanks for some great ideas and bring this pinball back to life...
