What's new
Pinball info

Register a free account today to become a member! Once signed in, you'll be able to participate on this site by adding your own topics and posts, as well as connect with other members through your own private inbox!

Complete Bally Medusa

AlanJ

Site Supporter
Joined
Dec 27, 2017
Messages
7,762
Location
Leeds, West Yorkshire
Alias
Alan
This has sat in my garage untouched since I bought it nearly a year ago. so dig it out and had a good look.
1E928C7F-FA16-4734-8AE4-27FAFFB4FB74.jpeg
003460C0-EA05-407D-8FF0-9D9D9A6F6659.jpeg
944EA878-C257-4EE4-A03C-7AC2F1623DE0.jpeg
11E8FC89-C8E8-4BDA-91CB-8C25AC11FED3.jpeg
04C6E59A-5360-41F7-9E8B-8EE221E6BCBD.jpeg
ED5585EA-C965-43A6-9E62-00D68697DD25.jpeg
9ACABECC-8B32-489D-84DE-3E2AE5304B93.jpeg
E846CFA3-BF99-4789-9FEA-B1D65FAB3758.jpeg
38EDC19A-8153-4E90-AB1F-8FEA49C195A9.jpeg
F445034E-28B4-44EF-A172-DBA9BA118C28.jpeg
C3EA4ABF-4E12-4FC3-A7B0-58AC505204F0.jpeg
434C6F41-7DDA-4762-ADA7-DF973FECB8BF.jpeg
269ECC8B-4909-45DA-89E3-8A1ACA77CE44.jpeg

The art on the apron is crumbling away - water damage.

Playfield very worn, so needs a new one.

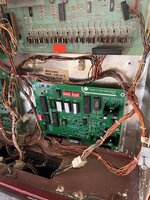
mpu battery leak damage, will replace with alltek

cab needs repair and restencil

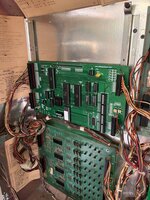
Plan is to get it going in current state, fuc and issues with mechs, wiring driver boards, sound board etc. once it’s working I’ll dismantle and redo the cab and the playfield swap too
 
Alltek mpu in, and it boots, old s&t not booting, so swapped in a mypinballs one. now we have sound and a booting game.

drop target 6 not dropping in solenoid test and 7 is dropping all the time.

4 of the 6 displays in the game are faulty.

self test button first work, but i can short the wire to get into self test.
 

Attachments

  • 32386CC0-C74F-4922-A723-701F214A549F.jpeg
    32386CC0-C74F-4922-A723-701F214A549F.jpeg
    174.4 KB · Views: 9
  • 06EA6933-5797-4454-8562-1D45611BC269.jpeg
    06EA6933-5797-4454-8562-1D45611BC269.jpeg
    171.1 KB · Views: 8
Looked at schematic and figured drop targets 6 and 7 are on the same driver circuit.

Couldn’t easily get to the drop target mech with the playfield in the machine, so popped it out on the bench and took the reset bank unit out of the drop target mech

13F52C50-3FC0-4E28-9427-EE4A43CDDB6D.jpeg
56A20A55-5E45-4D8E-9928-03433CC95CF0.jpeg

Coil 6 looks burnt out, and tests as open circuit. so replacement needed
05FF536F-0DED-411F-9560-45A46515915F.jpeg

Took out the driver board and sure enough the power transistor is shorted. so replaced
A1B1A418-96D5-461F-9B0A-DCB63C3538CA.jpeg
D68C6BBB-7FAF-4E46-96B0-F121BE4BD043.jpeg

Put it all back together and every solenoid now works as it should.

While i had the playfield out i removed and tested the 21 bulbs that are at the very rear of the playfield. all we’re ok. however in lamp test. some don’t light, so next step is to test the two lamp driver boards………
 
Looked at schematic and figured drop targets 6 and 7 are on the same driver circuit.

Couldn’t easily get to the drop target mech with the playfield in the machine, so popped it out on the bench and took the reset bank unit out of the drop target mech

View attachment 174003
View attachment 174004

Coil 6 looks burnt out, and tests as open circuit. so replacement needed
View attachment 174005

Took out the driver board and sure enough the power transistor is shorted. so replaced
View attachment 174006
View attachment 174007

Put it all back together and every solenoid now works as it should.

While i had the playfield out i removed and tested the 21 bulbs that are at the very rear of the playfield. all we’re ok. however in lamp test. some don’t light, so next step is to test the two lamp driver boards………
This looks like a lot of work Alan, good luck
 
Lamp driver boards repaired and all lamps now working correctly. (there is one bulb out, but it’s under the 7 drop target mech and impossible to get to without removing that mech, so I’ll leave that for the moment.

Cleaned off the flaking paint from the apron. will get new artwork for that.
9F1AF19A-4B90-4D5D-8E03-4E8CFB3CCB45.jpeg

Each side of the front of the cab had 4 large carriage bolts. I guess someone installed a security bar at one time over the coin door, so I removed these, more holes to eventually fill!!!
F586B4CC-0664-48EE-BED1-B063937A0753.jpeg

I’ve ordered a new set of rubbers. I’ve got a charity fund raiser pinball day in 2 weeks, so plan is to use this as an additional machine for the day, before I set to and redo the cab and playfield.
 
so does it play better with gottlieb flipper mech's rather than bally linear ones?,I guess an owner in the past had broken linear ones,and could not source the correct parts
 
so does it play better with gottlieb flipper mech's rather than bally linear ones?,I guess an owner in the past had broken linear ones,and could not source the correct parts
Not really, However I must say I do like the construction of the gotts, so may keep them on when I do the playfield swap. Someone suggested on facebook (Allan Reizman - he was Engineering Lab Supervisor with Bally for years!) that Medusa suffered from weak flippers, so perhaps someone swapped to improve the game.
 
The late Bob Thomson told me about an operator somewhere who routinely fitted Gottlieb flipper mechanisms. That was in preference to the Williams modular flipper though, as I recall.

That's an awful skew on the EoS switch for the upper left flipper, possibly due to the pawl fitted, which looks like a 'linear' flipper part.

What's that additional and unused wiring around the zipper mechanism?
 
Last edited:
I had a Bally Kiss here recently with Gottlieb flippers fitted. I removed and replaced them with the correct ones, but there was zero evidence that any other mech had ever been fitted. There were no screw holes where the correct mechs went, except those for the Gottlieb flippers.

kissflips.jpg
 
The late Bob Thomson told me about an operator somewhere who routinely fitted Gottlieb flipper mechanisms. That was in preference to the Williams modular flipper though, as I recall.

That's an awful skew on the EoS switch for the upper left flipper, possibly due to the pawl fitted, which looks like a 'linear' flipper part.

What's that additional and unused wiring around the zipper mechanism?
yes upper left looks a bit odd.

Not sure what that wiring is. almost looks like the GI lighting wires that have been joined together. I’ll bloom at it when I do the pf swap.
 
That's an awful skew on the EoS switch for the upper left flipper, possibly due to the pawl fitted, which looks like a 'linear' flipper part.

Thinking over this, a 'linear' flipper pawl would have that white plastic bobbin on it, so I'm mistaken. But looking at the few odds & ends I've still got lying about, there seem to be at least four different types over the years;
  1. Linear, with that round addition to fit into the cut-out of the plunger
  2. 'Pre-linear' with linkage, i.e. a small post to attach a linkage between plunger and pawl, with a washer and hair-clip
  3. A similar type, but pinned directly into the plunger (as seems to be fitted)
  4. Earliest, without the turned-over 'spaniels ear' for the EoS switch - instead it has a round pin attached for this, "further round", as it were, than the later types
Bearing in mind that the flipper zipper is a '60's gadget, it can probably only use the earliest Bally modular flipper.

Rather hopefully, I thought at first that the £1,800 included the machines' purchase price.
 
Getting it to a players condition playable machine. Clean and re-rubber
074850D3-D82B-430B-A57F-90AEC429193D.jpeg
56D4E911-A196-4933-820A-777C6547D30F.jpeg

Printed some new cards
3925DBDD-7FD6-44F0-B5CC-E1F4E97863F5.jpeg

then some paints arrived, i bought a few cans to try match up the existing paintwork
B01B5963-E505-40E1-9255-EFC36FB44217.jpeg

the outside cab is a brownish colour, but it really should be more purple - best to look inside the cab to match it up properly.

I end up with several cans of the wrong shade but these are useful for inside the cab or undercoats, so don’t get wasted.
 
Now I've finished Lost World, it's back on this one. Hoping the good weather will hold out in September so I can get this stripped down and the cabinet and head repaired and re-stencilled.

During Winter I'll swap over the playfield.
 
Side rails were an absoloute pig to get off, took ages.

Cab in the garage. It’s got the usual rear end issue - missing and flaking chipboard
3E98F96F-8962-44FB-AA4D-5F97F5EBCB93.jpeg
DC6215D4-F387-42A1-B98C-2CBAD626578D.jpeg

So my standard fix: First glue and nail a support piece
1F744B6C-5618-4985-AAEB-2CFCBD46E5C7.jpeg

Then start filling :
685620E9-CA46-42F6-9FCF-DF5020C69A85.jpeg

Filled a few other holes and dinks
14D4563E-932A-4408-B073-B553FA9F3670.jpeg

Let that dry then another round of filler tomorrow
 
Absolutely incredible looks a beautiful pin now never mind when she’s done 👌🏻
Wish I had your skills Al
 
Struggling to match the original paint. but after a few test cans , i think i’ve got a really good match. It’s acrylic paint, so dries very fast and so will be tricky to stencil with.

In the meantime: metal is getting the de-rust treatment - plastic bits in there too as it also removes the dirt and grime.

64309FBF-DBF8-4E89-AA24-A172F70CEFA6.jpeg
 
Alan do you keep reusing that de-rusting stuff? What brand is it also?
 
Back
Top Bottom