What's new
Pinball info

Register a free account today to become a member! Once signed in, you'll be able to participate on this site by adding your own topics and posts, as well as connect with other members through your own private inbox!

Complete BALLY DOLLY PARTON - TORMENTED BY CPR!.......

new forest pinball

Site Supporter
Joined
Oct 27, 2015
Messages
1,844
Location
brockenhurst hampshire
Alias
Keef.
Ok, so this game is an absolute basket case for sure...nearly gave up on it if I am honest! But then , after some thought and a big rummage of all our classic spares we thought let's challenge ourselves!!....after all who these days can resist the lure of a classic Bally? Not me....
So here's the current low down on this poor ole girl! On initial inspection and strip down.
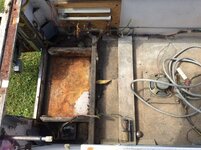
1. No pcb's ...period.
2. No transformer...inc. mounting plate, guard and power board.
3. One score display and match / ball in play display only.
4. No backglass lock bar.
5. Lots of rust.
6. Woodworm infested.....
7. No right flipper mech or mounting plate...
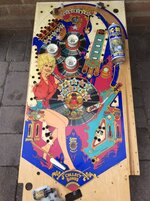
8. Absolutely fabulous condition playfield! (Phew!!!!!!).
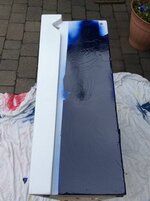
Here are some pictures...watch this space...we have a new apprentice currently so this will provide a steeep learning curve for her for sure.....
Currently matching the paints for a "pimp" stencil kit...and rummaging big time in our old workshop for stuff! How far should we go! Problem is I love this game!....they had one at rockley sands caravan park in Poole bay when I was a kid.....what a classic.......
IMG_4205.JPGIMG_4206.JPGIMG_4208.JPGIMG_4211.JPGIMG_4212.JPGIMG_4227.JPG
 

Attachments

  • IMG_4209.JPG
    IMG_4209.JPG
    182.7 KB · Views: 20
Last edited:
Paint arrived today......Jeff at pinball pimp recommends rustoleum or krylon paints only, as these cause minimum bleed with his transfers...car paint bleeds don't be tempted to use it just to save a couple of quid!....krylon is super expensive in the uk so rustoleum is your best choice and the colours match the Bally original colours!....bonus.....we will use a cheaper white as the base colour is not important. We use gloss because it resists dirt ingress better than satin..particularly if your base colour is white!......IMG_4229.JPG

Also a good plan to lay out your stencils asap...much easier to apply if flat....
IMG_4230.JPG
 
Some progress today, but hampered by the weather here in sunny Brockenhurst, so no cabinet work done...hi Chris we will use rattle cans with a spray handle @ronsplooter ..(or else my trigger finger gives up to quickly!....lol.)
So the rails , the speaker grill, the apron and shooter rod bracket sprayed.....(ignore the fathom spinner that's for another job!..).
BEFORE.....
IMG_4231.JPG IMG_4232.JPGIMG_4233.JPG

AFTER.....not finished the apron yet...pictures to follow.....
IMG_4238.JPGIMG_4239.JPG

Here is the playfield after two applications of foam cleaner..looking much better, will t-cut it then polish to finish. Also some Mylar needs trimming.....

BEFORE....
IMG_4234.JPGIMG_4235.JPGIMG_4236.JPG

AFTER.....
 

Attachments

  • IMG_3964.JPG
    IMG_3964.JPG
    150.3 KB · Views: 83
Last edited:
The apron is now done, pretty pleased with it. Only thing is the weather suddenly changed and the paint picked up some contamination!...mostly cat hair!...lol....
When doing these aprons if you just rub back the old paint lightly and give about three coats of rattle paint, it is still just about visible where the original artwork was. Making the job of new transfer placement a lot easier. As this set for dolly is a licensed set, these are much thinner than the later style apron decals.(fathom,ebd etc...).
Here is a reminder of before....

IMG_4231.JPG
Here it is sprayed and ready for new decals. Notice the cut official licensed product sticker.....
IMG_4240.JPG

Here is the finished product...custom game cards courtesy of the fabulous @johng2611 .....

IMG_4241.JPG
 
Progress has slowed a little due to customers repairs....a bit of progress....
Displays refurbished and cleaned with new dust covers....

IMG_4253.JPGIMG_4254.JPG

Backbox ready for stencils....the cabinet is still under woodworm treatment ...

IMG_4252.JPG

The missing right hand flipper plate and mech. Has been replaced and rebuilt, just making my mind up on flipper colour and rubber. My young apprentice has suggested translucent dark blue with a Titan silicon pink rubber. (She is a bit artistic..lol.)

IMG_4255.JPG
 
Dolly getting some love today. Playfield specifically as all the painted bits are hanging around the workshop and if you do that for to long then accidents occur. Undoing all your hard work!...
First new stand up targets, drop targets and pop bumper parts...we intend to keep up with our upcycle "freebie Friday " promise, by listing things we normally throw away hoping it maybe used by a forum member!.....

IMG_4270.JPG

Backbox light board back in one piece!.......

IMG_4271.JPG

Next the ball guide rails and the newly painted wooden siderails replaced......

IMG_4272.JPG
 
Getting there!.....just some artwork touches to do around the drops, so not secured that plastic yet...flipper mechs and flippers will be installed tomorrow.....Titan clear rubbers installed. New red ribbed posts. 2 Smd superbright leds (comet) in g.i.
Standard lamps in the inserts and backbox ......

IMG_4278.JPGIMG_4279.JPGIMG_4280.JPG
 
Other side of the backbox stencilled today. Inside of cabinet prepared for priming......here we have the first stencil in place. Pink.
two coats is normally enough. Leave for about an hour before you remove the stencil. Do not remove the two "x" marks. This is required to line up the next stencil....
IMG_4281.JPGLet the paint dry, then carefully lift the stencil...

IMG_4282.JPG
Note the two remaining x's line this up with the two square holes in your next stencil....
IMG_4286.JPG
Blue now on...leave to dry then peel......
IMG_4287.JPG
Phew...looks great....that's the backbox done!...
Take a look at this coin door! What a mess! Decades of neglect and careless storage, for sure...
IMG_4283.JPG
IMG_4284.JPG
Going to totally strip this. Straightening the door front as much as possible with a piece of wood and a rubber mallet. Will spray the rear of the coin door chrome once all the rust has been fully removed. Then polish the door to a nice shine.....
The coin slots/pricing plate I will remove and soak in Mel's (one stop pinball). Miracle cleaner. (Think it's persil bio but his secret is safe with me!). Anyway whatever it is it works!......then add some nice freeplay plates and blanking plates. Will keep you all posted.....next coin door and inner cabinet. Keef......
 

Attachments

  • IMG_4285.JPG
    IMG_4285.JPG
    76.5 KB · Views: 15
Whenever I refurb a cabinet, each time I promise myself "not again", but here I am doing another one! Progressed as far as filler and primer today. Needs a fine sand and gloss top coat to finish. The secret to a good stencil is a flat , smooth surface. This avoids paint bleed. Here it is first the inside of the cabinet with a new oversized 5.25" two way speaker. Just as a reminder this is a before picture.....

AB6A1C58-E912-4E39-B5E5-EBC3506BEE18.jpg

After......

IMG_4288.JPG

Here is the base. Needs a further build of filler in places. Put a big wedge of gripfill at the back as this reinforces the cabinet, economically, quickly and effectively......but don't look pretty!.......

Before....

IMG_4257.JPG

After.....

IMG_4292.JPG

Here is the cabinet in primer and filler...will require a final sand then glossed. Then a final really fine sand ready for the stencil application.

IMG_4016.JPG

Started on the coin door parts as well today. Door totally stripped. With the intention of removing all the unnecessary parts, when on freeplay. So the eject mech, reject coin mech and coin mechs will be removed. Here is the coin plate converted to freeplay.
IMG_4017.JPG

IMG_4018.JPG
Above is the backplate with the rust removed and sprayed in chrome...not perfect but a vast improvement on before.....
 
Ok so got around to refurbing the coin door today.....gave it a good clean then off to Steve at Phoenix finishing to polish all me bits! Ooeer...!
So here is a reminder of before.......back n front........a national disgrace! Whatever would ms. Parton make of it all?....

IMG_4284.JPG
IMG_4294.JPG
Here it is after...just needs a door sticker and a couple of lamps. So I doubled up on the lamp holder so the freeplay decal is clearly and brightly illuminated.. The bullet and butts you see are the credit switches. Join those together momentarily and it will add credits. The coin mechs, coin return mech etc. Have been removed...probably going to use an original Bally mpu in this as I have plenty spare to rebuild.

IMG_4295.JPG
IMG_4296.JPG
And here is the rest of the metal work ready for refitting. Considering the condition and the scratches on it all , think I am happy
With the results...

IMG_4297.JPG
 
Had some fantastic news today! Emailed Andrew out of the blue at nvram.weebly.com to see if he happened to have any of his Bally as-2518-50 sound boards left in stock. As I thought he had stopped doing them years ago!.....to my surprise he has done another run...arrived today! Fantastico! Check out this little beauty!!.....jumpers now set for Dolly Parton. (B & c in a & d out).

IMG_4301.JPG
 
Back
Top Bottom