Pinball info
You are using an out of date browser. It may not display this or other websites correctly.
You should upgrade or use an alternative browser.
You should upgrade or use an alternative browser.
and so it begins: WCS shop log
- Thread starter cooldan
- Start date


OP
OP


it looks ok, plays great (so i've delayed this shop job while having too much fun playing it) and it's only in close up pics that all the dust and dirt and crap and smeared novus and chipped plastics and flaky rubbers and stuff becomes clear, but now i've seen the ook i want to get it cleaned up. i want it so Barry Scott would be proud of it.
time spent so far: 2 hours
WCS is a great game, my first pin  Yours looks to be in good shape, any wear at the 3 saucers? Be careful when taking the coin toss mech apart as it's quite easy to force it too hard and damage it.
Your brave keeping track of the hours spent, I wouldn't want to know :faint2:
Yours looks to be in good shape, any wear at the 3 saucers? Be careful when taking the coin toss mech apart as it's quite easy to force it too hard and damage it.Your brave keeping track of the hours spent, I wouldn't want to know :faint2:
OP
OP
ok so last night i novus-ed (ok, it's not a verb) the ramps and the plastics i'd taken off, and ummed and aahed about what i'm gonna use to clean the tarnished metal bits. today i took off most of the rest of the stuff i'm gonna take off - ie all plastics plus the coin toss and lock assemblies, the trough, and the metal tray that sits under the goal. tomorrow or the next day i'll remove the 20 or so metal ball guides, and that, i think, will be enough. i'm not going to take off the pop bumpers or the slingshot kickers or the multitude of posts that will remain. i will replace all the rubbers, check all the bulbs and replace any that look dark or are dead, then i'll clean up the playfield, and start putting it all back on.


questions for you folk out there:
1) cleaning tarnished metal without a dremel or any clever spinny stuff for the drill - any recommendations? i have here some sandpaper (coarse and fine grits), some steel wool, some IPA, foam cleaner, autosol liquid chrome cleaner, and novus 2. also simple household acids like orange juice, vinegar and coca cola if anyone thinks a soak would help.
2) testing bulbs out of the machine - any suggestions for this? can i test them with a battery and croc clips? what battery should i use? the reason i ask is that my games are 50m from the house in a freezing cold garage, so i'd like to do at least half the work in my nice warm house instead. all were working in the game as far as i know, but i didn't do a lamp test when half the bits were on the floor in case i'd cause some trouble.
3) i don't have a tumbler, but i'm thinking about one. trouble is, all my plastic bags contain a few plastic and a few metal bits, and i don't want to stick all the metal bits together in a pile for tumbling, in case i later could not separate them back out into the bags they came from. do people tumble all the metal parts in one go, or do a handful at a time for 12h each? i can see that the latter would take forever, but cannot see round it. ideas? reassurance?
4) i'd not taken a trough out before, and i had to snip the wires to the solenoid that feeds the plunger, as i couldn't see where to disconnect. was there an easy alternative? i took out the trough so i can clean all the optos and give the trough itself some attention, as it has a few little dinks that may explain the occasional ball searches when they're all in the trough. again - i have no dremel to ream this out as i've seen suggested, can i do it with sandpaper? should i buy a cheap dremel for polishing etc? recommendations?
time so far: approx 6 hours - playfield half-stripped, most bits in bags and still uncleaned.
cleaning tarnished metal
How tarnished is it...chuck up a pic? I generally just clean it all with hot soapy water and a scotchbrite pad. If it's got corrosion on it then give it a go with some wet'n'dry but I wouldn't bother trying to get ball marks out etc as they come straight back within a few games....just not worth the effort.
testing bulbs out of the machine
Once I've stripped the game and before I start putting it back together I just fire it up and see which lamps are out and replace them. Loads easier when the game is stripped
i don't have a tumbler
Tbh mate I think you just chuck the lot into the tumbler in one go. I don't have one so am no expert but I guess you could take a pic of each plastic with it's relevant bits next to it and use the photos to match up the screw, nuts etc once the tumbling is finished. I think your right that doing them a bag at a time would take f*cking ages
i'd not taken a trough out
These generally don't have a connector that allows you to disconnect so I just leave them hanging by the wires from the bottom of the pf. I've done this loads of times for any coil that can't be disconnected without any issues.
- Joined
- Jul 21, 2011
- Messages
- 11,336
- Alias
- Ive
4) If really divoted you can get these to sort it, I'm sure i have seen plastic ones too somewhere.
http://mad-amusements.com/product.php?id_product=459
http://mad-amusements.com/product.php?id_product=459
OP
OP
How tarnished is it...chuck up a pic?

this is the trough. it's not too bad, and it's under the pf so it can't be seen, but it has the little divots (arrowed) where the balls sit that are perhaps only half a mm deep each, but because the trough is fairly flat, this is enough to stop them rolling to the end sometimes. i need to get rid of these divots.

this little piece supports the gold-look habitrail in the middle of the pf, is completely in view, and looks ****ing horrible as if it has been inserted in GrizZ' rectum. i'd like to get this looking at least slightly better if at all possible.

and this is somewhere between the two, in that it's partially visible (it's the floor under the goal, ideally i'd like this to be mirror-clean, but at least it shouldn't look so nasty as this) - but again the appearance has no functional value unlike the trough.
I'm sure i have seen plastic ones too somewhere
Pinbits do the plastics ones, had one in my JD to help stop magnetised balls screwing up the trough...which in turn screws up the Deadworld mod.
http://www.pinbits.com/index.php?main_page=product_info&cPath=13_8&products_id=449
I'd give all those bits a clean with a scotchbrite pad first and see how they come up...you'll be amazed. If they're still not how you want then a bit of fine grit wet'n'dry will sort them. You will take the gold coating off the one that holds the gold wireform though.
OP
OP
cleaned all the plastics with novus 2

cleaned the metal bits as good as i think i can get them


cleaned all the optos with a cotton bud/isopropanol
tried to clean the rubber football - first mistake was finding that IPA turned what i thought was black into a shower of purple from someone's previous touchup with a marker pen. ********. one step forward and two steps back as i try to clean up the mess, which doesn't want to come off the white bits of the football. no pics of the purple mess i'm afraid :confused1:

removed all the metal ball guides ready for cleaning

removed as many of the posts as i'm gonna bother with (ie all the starposts and things that were holding rubber rings on, nothing uncleanable or that i can clean around instead).


time spent so far: 11 hours :eeek:
cleaned the metal bits as good as i think i can get them
cleaned all the optos with a cotton bud/isopropanol
tried to clean the rubber football - first mistake was finding that IPA turned what i thought was black into a shower of purple from someone's previous touchup with a marker pen. ********. one step forward and two steps back as i try to clean up the mess, which doesn't want to come off the white bits of the football. no pics of the purple mess i'm afraid :confused1:
removed all the metal ball guides ready for cleaning
removed as many of the posts as i'm gonna bother with (ie all the starposts and things that were holding rubber rings on, nothing uncleanable or that i can clean around instead).
time spent so far: 11 hours :eeek:
OP
OP
cleaned all metal ball guides
removed final posts


tested lamps in situ, replaced a few of them
cleaned parts i'm not gonna remove - target plastics, flipper bats, 3 saucers
did a quick foam cleaner spray and wipe down - feels like the end of the road, from now on i'm coming back in


time spent now: 13 hours
removed final posts
tested lamps in situ, replaced a few of them
cleaned parts i'm not gonna remove - target plastics, flipper bats, 3 saucers
did a quick foam cleaner spray and wipe down - feels like the end of the road, from now on i'm coming back in
time spent now: 13 hours
OP
OP
finished cleaning the last of the bags

gave the playfield a proper clean with novus 2 - rub on, let dry, rub off.
attempted to clean the white flipper bats up with limited success.
started to replace parts in the bags - 19, 18, 17, 16 ...... all posts and rubbers now back in place. i put white rubbers on with red flippers, but stopped short of replacing all the black post sleeves. anyone have an opinion on whether this is a worthy replacement?


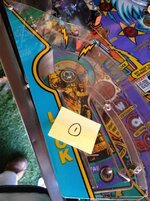
can someone also please tell me what is supposed to be there to the left of the tackle switch / assist saucer, where someone has improvised a metal strip on my game (see pic with post-it note with 18 on it, above)?
next step will be replacing all the metal ball guides. then plastics, ramps, coin toss / lock assemblies .... and then finally i'll be on the home straight: replace batteries, clean out backbox and translite, hoover cabinet, and rebuild flippers with fresh sleeves, plungers and end stops. last things to do will be sorting out that knackered leg, and bending back the bit the lockdown bar attaches to, where it's been all bent out of shape and doesn't like to go in.

time spent now: 15 hours. i'm hoping to get it completed in 20 with a bit of luck.

gave the playfield a proper clean with novus 2 - rub on, let dry, rub off.
attempted to clean the white flipper bats up with limited success.
started to replace parts in the bags - 19, 18, 17, 16 ...... all posts and rubbers now back in place. i put white rubbers on with red flippers, but stopped short of replacing all the black post sleeves. anyone have an opinion on whether this is a worthy replacement?
can someone also please tell me what is supposed to be there to the left of the tackle switch / assist saucer, where someone has improvised a metal strip on my game (see pic with post-it note with 18 on it, above)?
next step will be replacing all the metal ball guides. then plastics, ramps, coin toss / lock assemblies .... and then finally i'll be on the home straight: replace batteries, clean out backbox and translite, hoover cabinet, and rebuild flippers with fresh sleeves, plungers and end stops. last things to do will be sorting out that knackered leg, and bending back the bit the lockdown bar attaches to, where it's been all bent out of shape and doesn't like to go in.
time spent now: 15 hours. i'm hoping to get it completed in 20 with a bit of luck.
Looking good mate :thumb: I think there's supposed to be a plastic where you've got the metal strip although I traded my WCS a while ago so not 100% sure.
- Joined
- Jul 21, 2011
- Messages
- 11,336
- Alias
- Ive
'started to replace parts in the bags - 19, 18, 17, 16 ...... all posts and rubbers now back in place. i put white rubbers on with red flippers, but stopped short of replacing all the black post sleeves. anyone have an opinion on whether this is a worthy replacement?'
I think having gone to all this effort, you may as well replace the post sleeves. They do over time lose their mojo.
I think having gone to all this effort, you may as well replace the post sleeves. They do over time lose their mojo.
I agree with Ive, always replace the post sleeves if you've gone to the trouble of taking the games to bits. I recommend the coloured sleeves from Mel's store (I think PH is also doing them now) as you can match them to the game and they look a lot nicer
- Joined
- Nov 26, 2011
- Messages
- 241
That metal bit is in place of one side of the second plastic from the top in the link (one with the hole): http://pinballhead.com/cpr-world-cup-soccer-94-plastics/
It is very vulnerable to breaking.
Martin
It is very vulnerable to breaking.
Martin
OP
OP
Thanks Eddie/Martin for that. I have the rest of the pastic so may see if I can find an intact one - anyone got a used one cheap before I go buying?
I'll probably get some coloured posts, looking around now for best prices. Would love to support Jon Melleney in his new business but I've always been a Legend customer so I'm also checking with Andy first.
Bags 15, 14, 13 put back on, thats all the ball guides. Also 12, the under goal metal. Looking lovely now. Fixed some more bulbs and switches.
15 hours now
Hey...!
You were at 15 hours at bag 16.
15,14,13 and 12 must have used some time ?
:bounce:
You were at 15 hours at bag 16.
15,14,13 and 12 must have used some time ?
:bounce:
- Joined
- Jul 21, 2011
- Messages
- 11,336
- Alias
- Ive
Hey...!
You were at 15 hours at bag 16.
15,14,13 and 12 must have used some time ?
:bounce:
Good recon skills BigIan. This forum needs more men like you . Sgt_GrizZ
OP
OP
d'oh!
you got me. 17 hours then.

you got me. 17 hours then.
- Joined
- Apr 5, 2012
- Messages
- 115
Out of interest, how many bags of bits did you end up with in total? I'm stripping my WCS down at the moment as well - I ended up with 55 bags before I started cleaning the playfield. Decided to go for the more is more approach an also wrote a very wordy log of how it was all disassembled so that reassembly is relatively easy to understand. I also logged parts that were being tumbled as I went along. Taking a break from it for a few days before I begin reassembly!
OP
OP
i was up to 20 bags in all, but that's cos i put loads into each bag, probably too much really - for example, all the plastics along with their nuts and bolts and screws and washers were in just one bag. caused me a problem when i started putting back, and had three long hex posts, all of different lengths but no idea which one goes where. oh well..... i still don't know if i got them right, but will find out soon enough.
bags 11, 10, 9, 8 and 7 all done now. that's the trough, football, gold habitrail, lock mechanism, coin toss, and all the plastics. just the ramps to go back on now, and flipper rebuilds. plus when i turned the lights on, i spotted a couple that need either the bulbs replacing or the contacts adjusting - see em?


time spent so far: 19 hours
adjusted likely total job time (including ramps, flippers, leg, and removing/rebending lockdown mech) - 24 hours
bags 11, 10, 9, 8 and 7 all done now. that's the trough, football, gold habitrail, lock mechanism, coin toss, and all the plastics. just the ramps to go back on now, and flipper rebuilds. plus when i turned the lights on, i spotted a couple that need either the bulbs replacing or the contacts adjusting - see em?
time spent so far: 19 hours
adjusted likely total job time (including ramps, flippers, leg, and removing/rebending lockdown mech) - 24 hours
- Joined
- Apr 5, 2012
- Messages
- 115
I did the same thing first time round - too many parts in each bag. If you get into any "where's that supposed to go?" problems, let me know and we can compare bags/logs.
I changed the way I do things after fixing up my Taxi and having a reasonably sized part left over that to this day I haven't managed to identify!
I changed the way I do things after fixing up my Taxi and having a reasonably sized part left over that to this day I haven't managed to identify!
Cheers Sgt...
Dan, im watching... and counting.:thumb:
Dan, im watching... and counting.:thumb:
OP
OP
still waiting for my post sleeves to arrive, so i can't put the ramps back yet. but i fitted the passive ball stop thing i got from the Legend - look: in the first pic you can see how it sits, and in second you can see the arm that swings out by gravity when the pf is lifted to stop balls falling out. takes 5 mins, seems an obvious upgrade to me, so recommended.


then i took off the offending lockdown receiver mechanism that someone has bent (presumably whilst on site, trying to get at the money) - you can see the bend in this picture, now since i have no vice (ok ok, apart from booze, drugs and porn) i need to try to wedge this in a suitable place and try to bend it back to the right angle it's supposed to be.

i finally got hold of the keys, so i opened the backbox, cleaned the backglass, replaced the batteries, checked all the fuses, cleared out a spider web, and replaced about ten dud bulbs in there (mostly 555s plus two old 906 flashers) - then i swept out the main cabinet and did a final bulb check. it's amazing how many of them decide to pop when they know you're checking them, another 3 this time. i find my stock of 555s goes down to zero in no time, while my bags of 44s and 47s just stay full and looking all forlorn, like a gaggle of fat girls at a disco.
so then i decided to try to clean up the ramp flaps, as they look pretty dog awful. ten minutes with some steel wool, metal polish and novus 2 left them still looking rough round the edges, but definitely an improvement


at this point i really shoulda taken to rebuilding the flippers, but it was ****ing cold out there (when the sun went down at 4pm it was -1C) so i warmed up instead by playing a few games on SS, and considering my navel. hmmmm, i think i'll have to put a layer of foam or something just inside the crate, as a ball gets stuck just there all too often. another day......
time spent so far: 21 hours
still to do: swap post sleeves, replace ramps, rebuild flippers, bend lockdown thingy, sort out rusty leg
then i took off the offending lockdown receiver mechanism that someone has bent (presumably whilst on site, trying to get at the money) - you can see the bend in this picture, now since i have no vice (ok ok, apart from booze, drugs and porn) i need to try to wedge this in a suitable place and try to bend it back to the right angle it's supposed to be.
i finally got hold of the keys, so i opened the backbox, cleaned the backglass, replaced the batteries, checked all the fuses, cleared out a spider web, and replaced about ten dud bulbs in there (mostly 555s plus two old 906 flashers) - then i swept out the main cabinet and did a final bulb check. it's amazing how many of them decide to pop when they know you're checking them, another 3 this time. i find my stock of 555s goes down to zero in no time, while my bags of 44s and 47s just stay full and looking all forlorn, like a gaggle of fat girls at a disco.
so then i decided to try to clean up the ramp flaps, as they look pretty dog awful. ten minutes with some steel wool, metal polish and novus 2 left them still looking rough round the edges, but definitely an improvement
at this point i really shoulda taken to rebuilding the flippers, but it was ****ing cold out there (when the sun went down at 4pm it was -1C) so i warmed up instead by playing a few games on SS, and considering my navel. hmmmm, i think i'll have to put a layer of foam or something just inside the crate, as a ball gets stuck just there all too often. another day......
time spent so far: 21 hours
still to do: swap post sleeves, replace ramps, rebuild flippers, bend lockdown thingy, sort out rusty leg
OP
OP
6, 5, 4, 3, 2: still going, but nearing the end at last.
i fitted the blue post sleeves, and they look the dog's bol_ocks so i'm really pleased with them. it's a drag though when in order to fit one, you need to remove something else, and to remove that, you need to loosen or remove something else under the pf ....... so it all takes time. here's before (black post sleeves) and after (blue). i took this shot before spending an age to get blue sleeves on the goalposts, so they are still black in the 'after' shot.


i bent that lockdown mechanism by jamming it in a hated neighbour's garage door crack, and gently yanking it. then i set to it with a hammer and some pliers and a wrench. not perfect but definitely an improvement. again here's some befores and afters.


then i put the bigger of the two ramps back on, along with all the plastic and other parts except for a couple of small pieces ..... and some nuts and bolts for attaching the final ramp tomorrow.
the only problems i encountered were two connectors that i don't know where to connect them to underneath the playfield. half way through the job i'd started labelling/numbering all the connectors, but not at the start, where i'm returning to now. i need to see what i have left over after i've joined up the easy ones from that final ramp - where the wires are an obvious colour match, and there's nothing else in the vicinity it could possibly be. note to self: always label every connector before undoing it, no matter how obvious it looks.
if, after finishing this task tomorrow, i still have some connector questions, i'll be back looking for help from you lot. just in case anyone already knows, these are my two mystery connectors seeking homes;
1) above the goal is a clear flat plastic with a red dome in it, whose wire goes down under the goal via the back and behind the left goalpost to in front of the undergoal scoop - where does it connect to? i think it's just one red and one blue wire in the connector, but don't have it here with me to check - and it's flicking freezing out there so i ain't gonna go check.
2) on the right hand side, just behind the coin toss, and attached to the plastic ramp near where it says 'pass' , is a yellow dome, whose wire goes down the hole at the back of the coin toss along with all those other wire gubbins - where does this one attach to? i think it's also a simple two wire assembly, one red and one blue wire.
as i say, hopefully after the last ramp is on, there'll be more limited choices for where they could go .... but i won't be making that mistake again of not labelling a connector when undoing it.
time spent so far: 23 hours
still to do: attach final ramp, rebuild flippers.
flick the leg, it can (as Eric Cartman would say) suck my balls.
looking more like a 26 hour job now, or more.
i fitted the blue post sleeves, and they look the dog's bol_ocks so i'm really pleased with them. it's a drag though when in order to fit one, you need to remove something else, and to remove that, you need to loosen or remove something else under the pf ....... so it all takes time. here's before (black post sleeves) and after (blue). i took this shot before spending an age to get blue sleeves on the goalposts, so they are still black in the 'after' shot.
i bent that lockdown mechanism by jamming it in a hated neighbour's garage door crack, and gently yanking it. then i set to it with a hammer and some pliers and a wrench. not perfect but definitely an improvement. again here's some befores and afters.
then i put the bigger of the two ramps back on, along with all the plastic and other parts except for a couple of small pieces ..... and some nuts and bolts for attaching the final ramp tomorrow.
the only problems i encountered were two connectors that i don't know where to connect them to underneath the playfield. half way through the job i'd started labelling/numbering all the connectors, but not at the start, where i'm returning to now. i need to see what i have left over after i've joined up the easy ones from that final ramp - where the wires are an obvious colour match, and there's nothing else in the vicinity it could possibly be. note to self: always label every connector before undoing it, no matter how obvious it looks.
if, after finishing this task tomorrow, i still have some connector questions, i'll be back looking for help from you lot. just in case anyone already knows, these are my two mystery connectors seeking homes;
1) above the goal is a clear flat plastic with a red dome in it, whose wire goes down under the goal via the back and behind the left goalpost to in front of the undergoal scoop - where does it connect to? i think it's just one red and one blue wire in the connector, but don't have it here with me to check - and it's flicking freezing out there so i ain't gonna go check.
2) on the right hand side, just behind the coin toss, and attached to the plastic ramp near where it says 'pass' , is a yellow dome, whose wire goes down the hole at the back of the coin toss along with all those other wire gubbins - where does this one attach to? i think it's also a simple two wire assembly, one red and one blue wire.
as i say, hopefully after the last ramp is on, there'll be more limited choices for where they could go .... but i won't be making that mistake again of not labelling a connector when undoing it.
time spent so far: 23 hours
still to do: attach final ramp, rebuild flippers.
flick the leg, it can (as Eric Cartman would say) suck my balls.
looking more like a 26 hour job now, or more.
