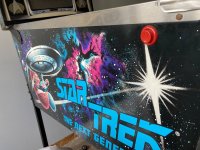
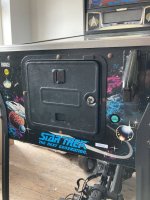
Hi all, I’ve just joined and a total noobie. Just purchased my 1st pin after wanting one for a long time. Figured they’d be out of my reach after looking on eBay. However, as luck would have it I got directed to one local to me and snapped it up. As in the title it’s a sttng that has lived in a garage for 10 years. Condition.... hmmm looks good actually but has got a grimy play field and toys but looks in good nick to the untrained eye apart from damage around the neutral zone and a missing klingon BOP. Cobwebs galore and spider corpses. The bolt heads are rusted but artwork looks really good apart from the art on the back box that has some small loss. Back glass is fine, legs and trigger handle could do with some attention. So that’s my 1st pinball and I’m over the moon.
Pinball info
You are using an out of date browser. It may not display this or other websites correctly.
You should upgrade or use an alternative browser.
You should upgrade or use an alternative browser.
1st pinball sttng
- Thread starter Bobbdobalina
- Start date
Nice one bobs, a great machine so much to explore in it and in at the deep end for maintainance! You'll be an expert soon enough ")
P.s. what's #2 gonna be...?
P.s. what's #2 gonna be...?
OP
OP
Loved this pin in my local bitd. Didn’t realise that I really have jumped in at the deep end until I did a little Googling after I bought it lol
Second pin? Need to get this one working and up to scratch 1st!
however there are loads of themes out there that catch my eye from the nineties and the newer stern pins and the jerseys jack pins look awesome but cost a fortune.
Need to get back out there and play a few!
Second pin? Need to get this one working and up to scratch 1st!
however there are loads of themes out there that catch my eye from the nineties and the newer stern pins and the jerseys jack pins look awesome but cost a fortune.
Need to get back out there and play a few!
Slippery slope, that's all im sayin...
OP
OP
... been there with arcade cabs, so know I’m in dangerous waters 
OP
OP
BSD is one that catches my eyeNice - I picked up a bargain STTNG in August 19 that had been luckily sat for 15 years! Best purchase ever. My only tip is give it a massive clean - all my initial faults were black dust on the optos.
Definitely a slippery slope as strobey said. Now got a BSD and DE SW to keep it company.

It definitely needs a big clean and service.
Think I got mine at a good price but it already needs a new cpu due to battery damage so it’s getting more expensive all the time.
Hi see see the shop done by@cmrl9 on STTNG very good and some great tipsBSD is one that catches my eye
It definitely needs a big clean and service.
Think I got mine at a good price but it already needs a new cpu due to battery damage so it’s getting more expensive all the time.
I have STTNG in my collection bought last year and you won’t be disappointed It’s a great game.
My first pin was a TZ 15 years ago at a cost of £900 in Cyprus, I didn’t have clue what I was buying had loads of faults even the power ball was missing, I could of got a perfect one over here for that price back then but that would of taken the fun out of bringing back to full health . The internet helped me massively getting it back to life, on here you will get loads of help, this forum is just amazing.
Still have the TZ sits next to STTNG both were played last night.
Here to help if needed not that I’ve done much to my STTNG replaced all capacitors to bulletproof the boards.
Good luck and enjoy the ride that I’m still on.
Alan
OP
OP
I’m excited at the prospect of bringing back to life but also nervous.
The 1st time I lifted the PF and looked in the back box I just thought omg were do I start!
ive just bought a soldering station so will be having YouTube tutorials on how to solder and probably everything else.
just a quick question, I’m assuming it’s best to remove or at least unpopulate the PF to give it a thorough clean and wax.
What’s the ballpark figure for a service/shop by an expert?
I have absolutely no idea if it’s astronomical or not
Post some pictures of the playfield, but from your description it sounds as though it's beyond the reach of a general callout service (which go for around £100 depending on where you are). There are people who do full refurbs, but this is more around the 1-2k plus mark, plus parts, depending in the level you want to go to!
I would just do it yourself, take your time, take heaps (and heaps) of photos, and learn as you go. It seems daunting at first, but starts making sense quickly and you'll get a ton of help on here, and on pinside. People are always up to help.
I would just do it yourself, take your time, take heaps (and heaps) of photos, and learn as you go. It seems daunting at first, but starts making sense quickly and you'll get a ton of help on here, and on pinside. People are always up to help.
But yeah, totally depopulate the playfield to give it the best clean possible. Clean first, then polished with canauba wax. Separate all the parts into individual bags, grouped together by their location, and write on the bags where they are, preferably with references to the manual. Remember to take lots of photos!
Depopulate the bottom as well, all boards and looms can go in the dishwasher (not the microswitches though) and all the mechs can go off to the zinc plater (around 50 quid for everything. Super cheap and amazing finish). Since you will be sending everything, take a photo of the parts next to their bag so you can reseperate when they get back.
Of course, all this depends on the level you want to go to.
Last edited:
your taking the same steps I did 15 years ago, I do have the advantage that I did repair TVs and videos back then but not since.I’m excited at the prospect of bringing back to life but also nervous.
The 1st time I lifted the PF and looked in the back box I just thought omg were do I start!
ive just bought a soldering station so will be having YouTube tutorials on how to solder and probably everything else.
just a quick question, I’m assuming it’s best to remove or at least unpopulate the PF to give it a thorough clean and wax.
What’s the ballpark figure for a service/shop by an expert?
I have absolutely no idea if it’s astronomical or not
take as much off that playfield as possible leaving the bits in small groups and of course plenty of photos to help later.
be careful removing components off them boards double sided print get damaged very easily.
I would make sure it fires up and has no faults before a full strip down just incase you add a couple of faults which is easily done, as I know !
I would make sure it fires up and has no faults before a full strip down just incase you add a couple of faults which is easily done, as I know !
 this is good advice!
OP
OP
Ok I think I’ll go down the diy route. I want to keep it as original as I can because one of the things I love about pins and arcade cabs is the arcade story and life they had.But yeah, totally depopulate the playfield to give it the best clean possible. Clean first, then polished with canauba wax. Remember to take lots of photos!
Depoluate the bottom as well, all boards and looms can go in the dishwasher (not the microswitches though) and all the mechs can go off to the zinc plater (around 50 quid for everything. Super cheap and amazing finish).
Of course, all this depends on the level you want to go to.
Don’t think I’ll go down the mod route although some do look amazing.
Maybe just leds and colour display.
so the method is basically photo and label everything and take my time?
OP
OP
Ok I’ll do that 1st. As I said the Cpu is bust due to battery damage and the right hand side flippers don’t work.
So I’ll get it 100% working 1st
It would be nice to have a few games before I dismantle it, as it could stay that way for a while by the sounds of it
thanks for the great advice
So I’ll get it 100% working 1st
It would be nice to have a few games before I dismantle it, as it could stay that way for a while by the sounds of it
thanks for the great advice
OP
OP
I want to do everything that’s necessary to keep it working. I’ve read there’s a couple of mods that are needed to avoid damage to various pcbs.In a nutshell. Will you do underneath the playfield as well?
One is the tie back mod I think.
TNT shows you it on YouTube very simple mod, must check mine lolI want to do everything that’s necessary to keep it working. I’ve read there’s a couple of mods that are needed to avoid damage to various pcbs.
One is the tie back mod I think.
OP
OP
....lol, yeah best check, read it can be costly!TNT shows you it on YouTube very simple mod, must check mine lol
OP
OP

Attachments
-
 FB819A9B-28BC-4F74-AE7A-35EF2CFB2DCE.jpeg194.4 KB · Views: 46
 -
 B241B126-E992-4BF7-9C16-7FDA6413ACA3.jpeg124.7 KB · Views: 43
 -
 50B05372-3383-41D4-9C23-01537E9E7B43.jpeg147.1 KB · Views: 34
 -
 02753B62-5CE0-4717-BB41-5A56CA37104B.jpeg76.7 KB · Views: 36
 -
 7E4D52D8-765A-4626-A677-EADD5DCE5819.jpeg83.3 KB · Views: 36
 -
 66367D04-6EAC-4F66-912A-241C0C3C447F.jpeg72.3 KB · Views: 34
 -
 8BA07AD0-BB0C-4E4C-B845-F4907A3FCCD3.jpeg78.5 KB · Views: 32
 -
 9AF4A9E3-F6A7-4A83-BDA4-B659E03B07CB.jpeg98.8 KB · Views: 33
 -
 3F0C8B3A-B284-486B-84FE-8BA1129C23BF.jpeg98.5 KB · Views: 32
 -
 D70E1174-2D66-4EC2-A45E-5617B43FE5AC.jpeg158.3 KB · Views: 30
 -
 9BB8E33C-FF52-40EC-B565-6B752F501BA1.jpeg91.8 KB · Views: 31
 -
 39DE73F2-634F-480D-B705-1B4A909233B3.jpeg116 KB · Views: 32
 -
 20306D94-292A-4E21-9179-A272908BBD2C.jpeg99.9 KB · Views: 31
 -
 6AEC9D1F-8187-4B0A-89BD-FC35125F0BD4.jpeg98 KB · Views: 35
 -
 74162477-F43A-4169-AB0C-30AA41EA68AF.jpeg99.8 KB · Views: 37
 -
 E0724EAD-5474-4161-B914-5CCCAA14D557.jpeg102.5 KB · Views: 44
 -
 B7B04328-006D-48C2-81DB-45F2B020E0CD.jpeg128.5 KB · Views: 41
 -
 0513A4E4-5E36-493D-80A2-0CAD56F828F4.jpeg134.8 KB · Views: 45
OP
OP
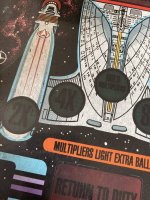
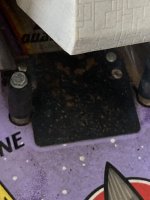
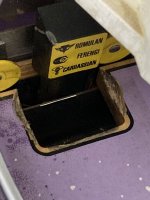
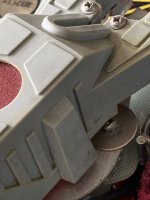
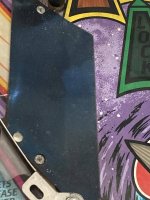
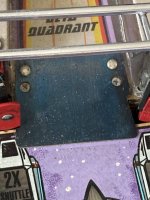
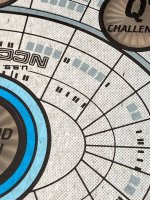
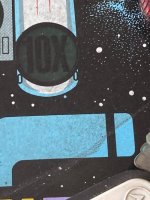
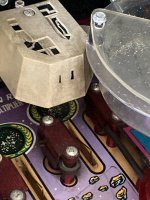
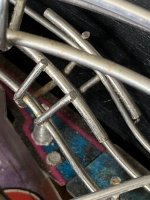
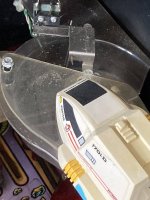
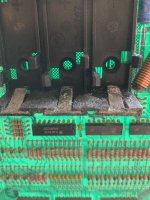
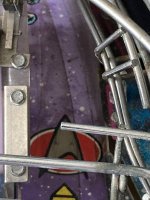
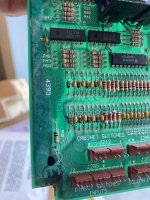
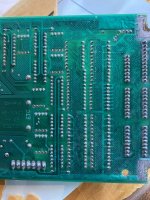
A few photos of the play field and my cpu.
Please let me know your thoughts
Please let me know your thoughts
a lot of work... Jim mypinballs might rescue that cpu board.A few photos of the play field and my cpu.
Please let me know your thoughts
cabinet looks great there’s no reason why this can’t come up looking fantasti.
OP
OP
That’s good to heara lot of work... Jim mypinballs might rescue that cpu board.
cabinet looks great there’s no reason why this can’t come up looking fantasti.
. Needs a massive clean and maybe a re chrome.The cpu is a gonna I think. When you compare the top and bottom about 80% of the traces are gone. The alkaline even went as far as the bottom two fixing screws which have corroded so badly I had to remove one with pliers!
brand new board it is for sure then.That’s good to hear
The cpu is a gonna I think. When you compare the top and bottom about 80% of the traces are gone. The alkaline even went as far as the bottom two fixing screws which have corroded so badly I had to remove one with pliers!
Yeah its in better shape than I expected. The playfield will clean up nicely. Cab and artwork all good. Cliffy to cover the VUK hole. All the metal topside can be tumbled to bring it back into shape. Isopropyl clean everything else. Ramp flaps can either be replaced or 'blued' to bring them back (m3 rivets and a rivet clincher to fix them: https://h5.aliexpress.com/item/32760263935.html).
I would just replace the MPU rather than trying to bring that one back. You can pickup decent second hand ones for 100 quid.
I would just replace the MPU rather than trying to bring that one back. You can pickup decent second hand ones for 100 quid.
OP
OP
That I can do without needing YouTubeFor those bolts, just pull em out, snd them back, respray them with satin black u-pol rattle cans a few times, clear to protect and away you go.
OP
OP
You may have to clarify some references... tumbled?Cliffy?Yeah its in better shape than I expected. The playfield will clean up nicely. Cab and artwork all good. Cliffy to cover the VUK hole. All the metal topside can be tumbled to bring it back into shape. Isopropyl clean everything else. Ramp flaps can either be replaced or 'blued' to bring them back (m3 rivets and a rivet clincher to fix them: https://h5.aliexpress.com/item/32760263935.html).
I would just replace the MPU rather than trying to bring that one back. You can pickup decent second hand ones for 100 quid.
Thinking ramp flags are the metal plates at the bottom of the ramps?
Had my eye on a new cpu from pinball displays.co.uk just waiting for them to come back in stock.
Sorry - yeah
Getting Metal Spanky Clean
So with metal parts there's basically three ways to do it. I'll keep it summarised but let me know if you want more detail on any item...
1. Hand polished - This means either sanding by hand using paper, or using a rotary wheel (either a bench one, or a 'flap disk' attached to a hand drill). I tend to use the flap disk method for the flat metal panels, like ball guides. For all the small parts I find this way too labour intensive to be worthwhile.
2. Tumbled - metal parts are adding to a 'tumbler' unit (the kind used for cleaning rifle shells), along with some tumbling medium (walnut shell, corn husk, or something else) which vibrates. After a day or two, the metal comes out nice and shiny. How shiny depends on the medium you use, however it's a tradeoff between how much gunk and rust you also need to cut. I use walnut shell, some brasso, and two days tumbling for all small metal parts, screws, posts, that sort of thing. Others have their own recipes.
This is the tumbler I use, you can pick them up cheaper second hand on ebay (like most things!)
https://www.amazon.co.uk/Lyman-1200...ocphy=1006886&hvtargid=pla-527517443409&psc=1
3. Ultrasonic cleaner - (disclaimer, I've never done this) parts are added to an ultrasonic cleaner unit, like the kind used for cleaning jewellery. From what I understand, this is good for removing muck, but not so good for removing rust.
--
I use a combination of 1 and 2, and then hand polish some things afterwards using mothers mag & brio pads. Everyone will have their own brands I'm sure.
https://www.amazon.co.uk/gp/product/B00068GEJM/ref=ppx_yo_dt_b_search_asin_title?ie=UTF8&psc=1
Cliffys
Cliff is a dude in the states who I believe was a metal fabricator in a previous life, or is currently, or never was, maybe I'm making it up. Anyway he now fabricates all kinds of flat metal parts for pinball machines - the ones he's most famous for are protectors that cover the gobble holes that always get munched by the ball over time. Cliffys are basically the defacto standard way over protecting those holes, which is why everyone calls them Cliffys, even if they were made by him or not. Like how we call plasters 'band aids' in Australia
I believe @James is now stocking a lot of Cliffys parts over at The Pinball Bazaar. Cliff also makes ramp flaps (like you guessed, the metal bit at the bottom of ramps) so hopefully you might be able to pick some of these up at the same time. I think yours are well and truly salvageable, however they are cheap as chips and look great new so if you can get em, get em.
