What's new
Pinball info

Register a free account today to become a member! Once signed in, you'll be able to participate on this site by adding your own topics and posts, as well as connect with other members through your own private inbox!

TAF - phone plastic removal to replace bulbs

Durzel

Registered
Joined
Oct 1, 2017
Messages
2,041
Location
Bath, UK
Hi,

I've heard that this is apparently difficult, which makes me think I'm confused as to what I should be removing...

I need to replace the GI and flasher bulb under here. From the looks of it I just need to unscrew these two screws circed in RED and pop off the blue plastic from the standoffs? That would give me access to the bulbs wouldn't it? Or do I have to unscrew/loosen the GREEN ones and remove the whole assembly?
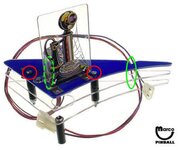
Screenshot-2019-01-08-16.54.06.jpg

Could anyone who has shopped a TAF comment? @Spandangler? :)

Also - can anyone tell me what GI bulb type is under here? #555 or #44/#47 ?

Thanks in advance!
 
Hi,

I've heard that this is apparently difficult, which makes me think I'm confused as to what I should be removing...

I need to replace the GI and flasher bulb under here. From the looks of it I just need to unscrew these two screws circed in RED and pop off the blue plastic from the standoffs? That would give me access to the bulbs wouldn't it? Or do I have to unscrew/loosen the GREEN ones and remove the whole assembly?

View attachment 77280

Could anyone who has shopped a TAF comment? @Spandangler? :)

Also - can anyone tell me what GI bulb type is under here? #555 or #44/#47 ?

Thanks in advance!

Is that not a flasher? Normally are when they have them plastic covers
 
The plastic cover on that one (and a couple of others) is riveted to the plastic. If only it were as easy as the screw type ones :)

There is a flasher and a single GI bulb under there.
 
Remove the two screws that screw into the side rail and lift the whole thing after disconnecting the flasher connector.
 
Ok I'm well and truly stuck on this piece.

I had a go at removing it earlier this evening, got as far as getting the rear screw almost out but then bottled it as I could see that it wouldn't clear the second layer cutout when I tried to extract it.

I can't see how these screws can be removed without the screw heads catching on the plastic as you lift them out and coming off the end of a magnetic screwdriver.

And because the plastic is right up against the metal ramp that takes the ball to the Thing eject hole when you plunge it, there's no way I can see to just loosen the screws enough to try and work the plastic out from underneath them.

Any tips or how-to videos that anyone can provide would be gratefully received, as I'm stuck :(
I'm certain I have had this plastic out years ago to replace bulbs.

Later on I'll have a look at mine. I *think* it really was just a case of undoing those side rail screws and lots of wiggling. Those screws you may be able to undo and lift out in situ with the plastic.... if you follow. So you aren't extracting them thru the cutout. Have certainly done that with similar setups.

Sent from my D5833 using Tapatalk
 
Yeah I think I know what you mean by that. I thought I might have to try that. I was a bit anxious about doing it that way as I didn't know how much play there was in the cables that come up through the playfield.

I've bought another longer magnetic screwdriver as neither of the ones I've got reach the back screw before fouling on the cabinet.

Thanks for replying :)

Had quick look and it's all coming back to me .... I remember now I didn't put back the upper playfield rail screw as it was such a pain and isn't really needed.

Try it again with extra wiggling and swearing - that's how I did it :thumbs: @*!*ing stupid design :D
 
Will have another crack once my extra long magnetic screwdriver that I will probably only ever need to use once turns up...

Will probably end up looking like I'm trying to defuse a bomb or something. I'm already wondering where those screws could end up if I lose them off the end of the screwdriver. Time slowing down, a bead of sweat dripping onto the side rail, etc.
 
lol I was being a bit overdramatic, but honestly if you saw how I approached some pinball DIY stuff you'd probably laugh. It definitely borders on surgical preparation etc. :oops:
 
Got this sorted. It was a massive pain. Ended up having to take the three layers apart so I could get to the flasher bulb connector. Probably took about 45 minutes to do, embarrassingly.

The guy that restored it had fitted an LED flasher in there already, maybe anticipating that it would be the worst one to try and replace if it blew, so I needn't have bothered really.. but it was warm white ?

The plastic assembly touches the side of the cabinet so not sure what I can do about that, playing about with the screws didn't achieve anything. Once I've fitted my mirror blades in there I don't want it to scratch them.
 
Back
Top Bottom