What's new
Pinball info

Register a free account today to become a member! Once signed in, you'll be able to participate on this site by adding your own topics and posts, as well as connect with other members through your own private inbox!

Complete Scared Stiff

DRD

Registered
Joined
Oct 26, 2014
Messages
5,433
Location
Newark
Took her out of the campervan this morning

Game works. My able assistant gave her the onceover ......

image.jpg

I am normally a bit sniffy about translites, but I think this is the best I have seen. Obviously neither proper glass nor screen printed, but pretty good. 3d effect, good lighting, moving spider thing.

image.jpg

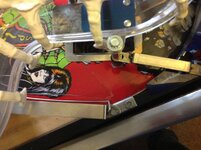
Main problem is water damage, mercifully not to the playfield, gaffer tape holding filler into the lower right corner ...image.jpg image.jpg image.jpg
Looks like some fookin idjit drilled the coin door above and below the coin slots unfortunately. Will be easy to fill, but it means i now need to repaint an otherwise tidy door. Lock down bar holes need filling..
image.jpg
Faded of course
image.jpg image.jpg

Pulling the mylar ,...

image.jpg

This was already lifting at the edges so I felt confident about removing it.

Gently tried just pulling, freeze technique, hair dryer technique.

On this game, the hairdryer worked best. Freezing causes a brutal "nothing, nothing, nothing, bam!" when you apply tension. It is much more controlled and calm with heat

image.jpg

The classic wear spot is not too bad. This has worn through the lower layer of mylar:hmm:
image.jpg

The mylar came off without issue. But in the crate area, there were two layers of mylar. The funny white triangle above was sandwiched between these two layers. I now need to remove the dreaded glue residue

Any idea wtf is going on here ? Two layers ?

I have left the lower layer alone for now as it is not lifting. I would guess that this is factory, whereas the lifting mylar over the main playfield was put down by an operator ?

Big decision is whether to save this head or get a used one. It looks like just the mdf is damaged. These heads have substantial metal internal brackets in all 4 corners, so i reckon I can strip , sand and fill this. But I will leave that decision for another day

Post the mylar pull, with foul glue residue in place ...

image.jpg

It looks like the only wear spot is in front of the crate

I could probably get away with just doing the head - and you can buy the head decals separately, but i think that this game has a good enough potential resale value to justify the full job. So will be ordering new cab and head decals soon.
 
Last edited:
awesome, a new Scared Stiff shop log, i'll be reading every word of this with interest.
looks pretty clean and tidy, how much effort are you gonna go to - surely not a full stripdown?
 
@cooldan Dan, must be honest here, your review on pinside was part of the reason why I bought a scared stiff.

Back in the day I found it a bit budget compared to tz, sttng etc

But having played it at arcade club a few times recently, I really enjoy it. Like wcs94 actually, a bit of a guilty pleasure. Just fun. There are plenty of great pinballs that do not offer this infantile joy. I was looking at the eBay one, but could not get myself to 4 grand.

Not sure how much work I will do at the moment. I was planning to be sensible, play it for a couple of weeks before deciding what to do. But I already know it warrants a full decal job and I just could not resist pulling the lifting mylar, so instead of racking up a few games, I now have a gooey mess to deal with.

I will get rid of the goo. Put it back together and see how it plays so I can build my purchase order up.

Always welcome to a game Dan.
 
Last edited:
Removed the glue using the @ronsplooter technique. Flour and sticky stuff remover. Flour first for 10 minutes. Then leave the remover on for 5 minutes.

I have an excellent vacuum cleaner that predates the EU restrictions on motor size so I could clean this up properly without a playfield strip. Vote Leave.image.jpg

It is hard graft, but all off now. Sore fingers. But the playfield is so much happier. Just pledge for now in terms of wax. I still have some mylars left, though I may well leave these as there is no bubbling or lifting. Good mylar does a job.
image.jpg

Time for a game. Could not effin believe it. Shooter lane micro switch was out , so it took 2 balls to trigger it. Easy fix.

Then a dead opto on the spin spider. Dead opto for ball 4. Gave up testing the other optos, as I had had enough. Spin spider opto worked when I bought it. The voltage change works fine on the spin spider opto, so I am thinking it is the chip. At least I went through all this with twilight zone so I have the chips in stock.

Spotted that the wafer on this popper is missing a section. Nasty little job but no big deal. Will make the game a lot livelier with a new wafer.
image.jpg

So still not had a proper game on it since getting her home and I am already into troubleshooting.

Obvious lessons are. Do not buy pinballs. Do not move pinballs. Definitely do not remove their heads to get them through narrow doors.
 

Attachments

  • image.jpg
    image.jpg
    118.7 KB · Views: 11
Last edited:
Managed to sort the opto problem relatively efficiently. The opto board on wpc games is bolted to the underside of the playfield with 4 x 1/4 inch hex screws at 90 degrees.

image.jpg

The emitter opto runs at at low voltage. The receiver has a low and a high voltage output depending on whether the beam has been broken. So you can quite easily check an opto pairing by comparing the voltages at the opto connections to those recorded on known working ones. This test told me the actual opto bulbs were working fine

Could not see any broken tracks on the board (the problem with my tz). Reflowed solder on the relevant connector to no avail.

I then traced the coloured wires from the spin spider solenoid receiver opto to the board. Traced through the board components (basic diodes and resistors) to the chips, these all seemed fine when tested in situ. This narrowed it down to two lm339 chips. Removed, socketed and replaced these and the problem was solved.

So i think if you are armed with a multimeter and you are confident soldering and desoldering chips, an opto board repair is ok for the willing amateur

Could finally get some games in. On 4 ball with no extras have managed 24 million so far

So it works. Really fun game. I think we will become friends. About to start ordering a variety parts from a variety of places now
 
Last edited:
So it works. Really fun game. I think we will become friends.

Nice choice of machine (again) Mr DRD. I'd never seen or played one of these until last Friday but fortunately Mr Moonraker has installed a nice one for the un-initiated at SWL and I enjoyed playing it a lot :thumbs:
 
I think the rules are pretty basic, but this game is FUN. The artwork is really good. The ramps/ subways/ solenoid kickers work well

Great range of shots, excellent speech and call-outs from Elvira and the male voice. Good humour - I love the "air head" dead head character.
image.jpg


I need to figure out whether you can make it harder to get the modes. Eyes of the bony beast just requires three ramp shots. The night of the leapers requires just three frog shots
 
Last edited:
SS is the most played game in our house kids wife guests and probably even myself (close between this and TZ) its the go to machine and probably the one i would be least likely to part with love it, great theme, looks excellent, and its got elvira on it whats not to like.
you are obviously a better player than me (which to be fair is far from hard) i still haven't managed to get to the top of the stiff 'o' meter been close a couple of times but no cigar !!
ill be watching this restoration closely such a great pin.
 
So much depends on how your game is set up, so I don't think you can compare scores between machines.

Mine is not properly waxed, the slings need adjustment (will do when I get new rubber), the tilt, playfield angle, flipper power, outlane settings .... When i replaced the flipper mechs on my wpt the game improved massively, but my scores fell ! Daft as it sounds even fresh rubber on the outlane posts makes them livelier

I am torn here as i should just play it. Not adjust anything. Just build my order list, wait for the parts. Then do it properly, once. But i hate playing a soggy game when it can be improved.

All three leaper mechs were loose, but good design means that this is just two bolts per mech going into captive t nuts.

image.jpg

The right hand frog mech was a bit bent, so I gently fettled this. It now propels the frogs much better

All three frogs hit the playfield glass which is both noisy and it will eventually bend the shafts they ride on and also smash the frogs.

Adjusted them by shortening the travel using the black rubber limiter below ..

image.jpg

Then partially reinstalled the playfield glass so that i could set the frogs with a reasonable amount of "leap"

image.jpg

Next job is the coffin as its metal frame also smacks the glass at the top right corner .....

This needs sorting as the glass is already scratched and replacing the coffin mech will prove pricey.
image.jpg
Someone has tried to limit how far the solenoid plunges by loosening the mech so there is play between the coil stop and coil...

image.jpg
image.jpg

This is obviously not the answer

Does anyone know whether it is normal for the coffin lid to hit the glass ?

Is there a fix ?

Thank you
 
Mine doesn't hit the glass and looking at the coffin lid I'd say it never has if you need me to have a look at anything let me know no problem :thumbs:
 
i've never seen one where the coffin lid hits the glass, but i think the leapers hitting glass is pretty much standard?

mine isn't here to photograph but i'm guessing that the reason the lid is so high is that the coil bracket isn't standard - just a guess
 
Good suggestion Dan thank you, will investigate.

The coil, sleeve, combined coffin pusher/ plunger thing are per the manual

F@@@ing pinball machines
 
Apparently there is a spacer that sits between the underside of the playfield and the metal plate of the coffin mech. This metal plate attaches the mech to the playfield and has 6 screws running through it into the underside of the pf. This serves to lower the height of the coffin mech above the playfield. Which in turn would stop it smacking the glass

Might a scared stiff owner please take this mech out, take a couple of snaps, measure the spacer so that I can see what I need to create

Thank you
 
Thanks Chris, really helpful.

Will buy you a beer at 8bit

D
 
Looking good, but I think she deserves a full playfield stripdown and rebuild to bring this beauty up to tip top condition;)

Would love one of these myself and missed out on the one the other day that Chris B had:(

Cheers Kev
 
i've never seen one where the coffin lid hits the glass, but i think the leapers hitting glass is pretty much standard?

If playing with the glass removed, the leaping frogs can hop out completely.

Shortly after being placed at their first locations, Judge Dredds would get a ball stuck against the underside of the glass, on the highest of the triple-deck wireforms. It hadn't happened while checking them out in the workshop, or after installation, but something must've altered after a couple of days use.
 
Just found this old thread. She is finally finished, as of today. Reunited the cab, head and playfiield during the week.

20180310_201318.jpg 20180310_201306.jpg 20180310_201338.jpg 20180310_201348.jpg

She was fighting me up to the very end. No game has ever fought me like this one. If I had more money I would have necklaced her, Soweto style.

The intertwined main ramps and coffin mech which cover numerous playfield items are the most hateful creation in pinball I have experienced. Even worse than the Twilight Zone clock
All manner of parts went into her ...
  • New speaker panel
  • Replacement original cab from Manny
  • @new forest pinball upgraded speakers
  • Boogie men upgrade per the original design, plus upgraded coils
  • Skull pile leds per the original design
  • Skull pile flickering candles per the original design
  • New ramp, which required remodelling with a dremel due to manufacturing error that meant the frogs got stuck
  • New rubbers
  • New plastics
  • New slingshot plastics, which needed grinding out to work with the boogie men kickers
  • Australian decals, installed by @Matt Adams
  • Metal crate body, which is a massive improvement over the flimsy black plastic original
  • New crate decals
  • Correct flasher globes from @pinballmania
  • Rebuilt flippers
  • Rebuilt pops
  • Polished the metal in the tumbler
  • Resprayed external bolts with smooth hammerite
  • Kept bulbs incandescent, but cleaned these and all inserts
This was a truly horrible game to workshop. Which is why it took so long. This thing killed my pinball mojo stone dead. But she now plays beautifully and looks like she should.

Had many enjoyable games on her over the past couple of days. The best sound and callouts of any pinball I have ever played. Pure fun.

Never again though. Do not attempt to refurb a tired example of this game, do yourself a real favour and buy one that some other cùnt has renovated instead.
 
Back
Top Bottom