What's new
Pinball info

Register a free account today to become a member! Once signed in, you'll be able to participate on this site by adding your own topics and posts, as well as connect with other members through your own private inbox!

Rollergames - need help already!

Jetsetron

Registered
Joined
Jun 18, 2018
Messages
124
Location
Lincolnshire
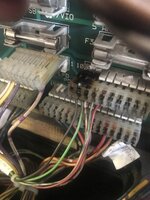
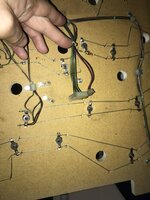
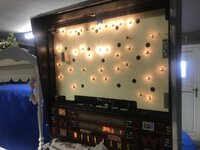
Collected my Rollergames today (Ebay win). Got it home and plugged it in and the backlighting in the translite has stopped working (think it was working when it was demonstrated).

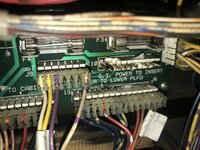
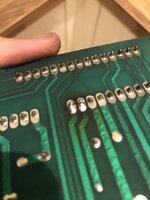
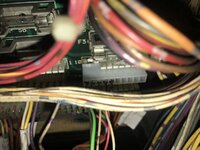
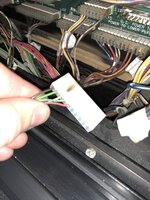
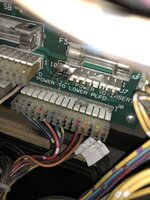
Followed the wiring back and there is damage to the plug (burning).

The seller is sending me a replacement plug.

My question - I can’t pull the damaged plug off by hand. Any suggestions?

What’s the plug type called (I might stick up).

TIA!
 

Attachments

  • BF973189-5138-4256-BD95-F987C846ADAB.jpeg
    BF973189-5138-4256-BD95-F987C846ADAB.jpeg
    86.3 KB · Views: 64
You will have to re pin it. Snip the wires off and put them in the new connector. There is a thread on here somewhere.
 
Thanks. Any ideas how to get the old connector off the board? When I pull at it the whole board is flexing.
 
Hold the board with one hand and grip the connector, try to wiggle it side to side while pulling towards you. Hopefully you'll feel some movement and it'll come off. It does look pretty burnt.
 
Used a mini hook set and it came off. Some of the white shroud broke away (was very brittle). Should it affect it? Should it work with a new connector?
 

Attachments

  • 2E8E206E-2244-46B1-980D-CA49782966EB.jpeg
    2E8E206E-2244-46B1-980D-CA49782966EB.jpeg
    130.4 KB · Views: 45
Those pins are filthy. But should be fine.

The purist would replace them. This is last resort in my opinion.

Burnt out gi connectors in old games are extremely common. Those lasted for 30 years, so they do not fail that often.

1. Replace your knackered connector with a crimp style one. Get necesssty kit (connector, crimps, crimping tool) from Andy at pinball mania. Those origibal push connectors are hard to re build successfully, crimped ones are better.

2. Lightly clean those filthy pins with very fine wet and dry paper, say 400 grit.

3. Then further clean them with isopropyl alcohol

This is usually enough to fix the issue with a lasting repair.

If this fails,

4. Remove the board, taking loads of photos and labelling connectors with a fine Charlie
5. Reflow solder over those pins

This is almost certainly enough to fix the issue

If this fails, take extreme care.

6. Repin the connector pins attached to the board. This could go very wrong if you are inexperienced with desoldering and removing items from boards
 
Last edited:
Very frustrating evening. Put a new connector on, bought the crimp style. No joy. Noticed one of the pins on the PCB was loose, resoldered, no joy. Any other avenues worth exploring?
 

Attachments

  • 99930A4B-1C67-4F5B-AD88-69F447856DE4.jpeg
    99930A4B-1C67-4F5B-AD88-69F447856DE4.jpeg
    60.2 KB · Views: 26
All sound. There is a plug hanging at the back of the light board, but appears no where to plug it in.
 

Attachments

  • 461DD00B-3CE6-4139-A6C5-5FC64D75F81D.jpeg
    461DD00B-3CE6-4139-A6C5-5FC64D75F81D.jpeg
    105.5 KB · Views: 33
Welcome to pinball ownership !!!!! Unless you buy a really new game, or buy one from a geek who really cares, problems like yours on 30 year old games are quite normal in pinball.

Next time buy a game from a geek with ocd on this forum as he will have fixed everything.

You do not normally get connectors hanging around in pinball machines for no reason, other than inside the coin door.

Time for inspector clouseau. Trace the wires from the connector you have just rebuilt to see where they go. How do they route through to the backbox light panel ?

Those connectors should probably do something. If there is nothing obvious for them to connect to, you want to find someone with a rollergames to send you pictures of the relevant parts of their own game so you can see what you are missing. You may get lucky and find suitable pictures on the Web. Tnt in the USA does good restoration videos of games on YouTube and you can get lucky with these.
 
Soldering looks decent enough to me... Good job - those burnt connectors would have gone sooner or later anyway, so not kicking the issue down the road.

If the relay board is gone, but was working on pickup, it's fallen off somewhere.
 
Thanks James, misspent years building radio controlled models gave me a few soldering skills.

Thanks Sgt Grizz, the seller has contacted me and is posting a relay to me. He’s been very up front and honest, the lights were not previously working (he had a video) and is being helpful resolving the issue.

Thanks DRD, tbh I’m enjoying the challenge and love projects - I’m trying to learn my way in this hobby and this forum is extremely helpful!
 
Soldering looks decent enough to me... Good job - those burnt connectors would have gone sooner or later anyway, so not kicking the issue down the road.

If the relay board is gone, but was working on pickup, it's fallen off somewhere.
If that board was there and connected there is little to no chance it fell off. The standoffs look snapped.

Sent from my D5833 using Tapatalk
 
Hi, Ron,

That missing relay is (or should be) a 'breaker'* for the General Illumination circuits on the insert board. I've been known to borrow one of these for other purposes (the moving car on Police Force), but I pushed linking wires into the related pins of the wiring connector so that the illumination still worked, without being switched off for effect

* Most later System 11 games have at least two of these, one (or sometimes two) for the playfield gen. illumination, and another for the insert. The earlier games made do with one for all general illumination, built into the power supply board
 
Last edited:
Interestingly there were 3 different lightboards on Rollergames.

A small number of prototypes had 15 flashers on the board as well as the regular bulbs.

Later games either had a lightboard thst still had holes for the flashers but no flasher sockets installed. Or a lightboard without any holes at all for the flashers.

Sent from my D5833 using Tapatalk
 
I'd not realised that, Sarge, having only dealt with one example, probably an early production game (it reported a non-existent switch)
 
End result - relay received from the seller, fitted, and we have lights!

Thanks everyone for your help and input ?
 

Attachments

  • 0DFD7089-0573-4A66-ABDF-4556FDE71462.jpeg
    0DFD7089-0573-4A66-ABDF-4556FDE71462.jpeg
    91.8 KB · Views: 24
Thanks James, I’ve got rubbers ordered, new drop targets, and a decal set. Started prepping the cabinet. Hunting a few plastics. Doing a light restoration (or at least that’s the plan!). I know it’s not a valuable machine so trying to keep cost down.
 
I have spent £200 at least on a NF that I bought on the money it was worth done, you need to keep costs down sure, but it is a hobby too. I would say the decals would be the bridge too far as they don't affect playability, but everything else has to be done in my opinion.
 
I just love a project. The decals were not financially sensible, but the pin is going next to a MAME Arcade and a Virtual Pin which are in great condition, so it can’t let the side down ?
 
At least you bought it from a seller who is known and had it played on location . So many people have multiple accounts and shill bid on eBay and knowingly sell fooked machines. Such a hard place eBay nowadays.

I wouldn't worry to much about spending a bit of cash. You don't go to the pub and don't spend money because you won't get a return on your investment! Just have fun and if you make some of your money back then it's a win win. How many hobbies is there that you get any cash back from enjoying them?
I know folk who spend 100 odd quid on a round of golf every 2weeks at St Andrews.
 
Too good to be true. Half the back board lights have gone out, the new connector I fitted has evidence of burning. What could be causing this, any suggestions?
 

Attachments

  • image.jpg
    image.jpg
    108.3 KB · Views: 29
  • image.jpg
    image.jpg
    92 KB · Views: 29
Going by the wire colours, the two Gen. illumination circuits used on the insert are 1) Green paired with White-green & 2) Brown paired with White-brown, with the latter (for the lower half of the insert) affected. It looks clearly dimmer than the upper half. As Arv suggests, replacement of the pcb header is a good starting point. Check the bulbs are the correct No.44 (or their low-power replacement No.47), and look for other possible poor connections in the circuit
 
Last edited:
Going by the wire colours, the two Gen. illumination circuits used on the insert are 1) Green paired with White-green and 2) Brown paired with White-brown, with the latter (for the lower half of the insert) affected. It looks clearly dimmer than the upper half. As Arv suggests, replacement of the pcb header is a good starting point. Check the bulbs are the correct No.44 (or their low-power replacement No.47), and look for other possible poor connections in the circuit

Apologies for an inadvertent duplicate reply
 
Last edited:
Back
Top Bottom