Any more pics Dave its gone a bit quiet ?
Pinball info
You are using an out of date browser. It may not display this or other websites correctly.
You should upgrade or use an alternative browser.
You should upgrade or use an alternative browser.
Pinshed Build
- Thread starter DRD
- Start date
Enthusiasm is really flagging here. I have been spending my time trying drinking gin and trying to invent a time machine so I can go back, abort the build, buy a steel shipping container, dump it at the bottom of the garden put all my workshop stuff in there - just sticking my games in my underused workshop. Which is something I was considering doing before embarking on this madness.

Sadly though, I just end up with empty gin bottles, headaches and an unfinished money pit outside.
We ran out of hardie. Next lot is due on Tuesday. We can't get the rubber on the roof until the hardie is done ...

We thought that the rubber roof needs to finish over the fascia, hence the delay on the roof ....

The upper bit of plastic with the screws in is quite clever. The rubber roof is pulled over and a second piece of plastic is snapped into it that acts as a rain strip (throwing the water into the gutter) and it also tensions the rubber, and hides the cut end.
The french doors put up a fight. They have rather natty hinges that are designed to conceal the adjusters, so I had to phone up to learn how to get inside the hinges to adjust the damned things.

I still had to get the dremel out on the shoot bolts and also relocate these dead bolt receptor things ...
To adjust the hinges you shove a screwdriver to the left of the middle round part below. This opens up the clam shell on the outside

The double glazng guys start getting nervous when a pair of french doors are 1.8m wide, so they put four hinges on each side rather than the usual three.
The inside got a layer of 25mm celotex over the top of the wood framing to reduce potential cold-spotting caused by the frame. Then a layer of polythene to keep the celotex dry, then the plasterboard.

I have put acoustic rockwool in the parttion wall....

We put a roof hatch up. The most unpleasant experience awaits those unfortunate enough to enter, claustrophobia, celotex dust and a 170mm rockwool chaser.

We clad the underside of the overhang and I inserted these led downlighters. This plastic stuff actually cuts quite well.
The problem with led bulbs is the surge when you turn them on. So I am not sure I can fit a motion detector on them. I need to do some more digging.

I thought that the tongue and groove pattern should run the other way. The guy that sells this for a living disagreed, as did someone behind me in the queue who fits it for a living, as did my builder. Their rationale being that you avoid a join this way.
We are trying to figure out how to get the pocket door in place ..... I bought a solid core unit with a veneered oak finish. This thing will hang from just 6 screws so fingers crossed.
I know from experence that when you have new builds that moisture from the floor and walls drying can be an issue. Cheap eggbox doors will warp - I hope this door behaves

I have also been experimenting with led strip lights. I think the answer is to place this stuff about 10cm below the height of my lowest backboxes (bally ss games)

It is 72w per 5m and casts a good light without glare or reflections ...

Sadly though, I just end up with empty gin bottles, headaches and an unfinished money pit outside.
We ran out of hardie. Next lot is due on Tuesday. We can't get the rubber on the roof until the hardie is done ...
We thought that the rubber roof needs to finish over the fascia, hence the delay on the roof ....
The upper bit of plastic with the screws in is quite clever. The rubber roof is pulled over and a second piece of plastic is snapped into it that acts as a rain strip (throwing the water into the gutter) and it also tensions the rubber, and hides the cut end.
The french doors put up a fight. They have rather natty hinges that are designed to conceal the adjusters, so I had to phone up to learn how to get inside the hinges to adjust the damned things.
I still had to get the dremel out on the shoot bolts and also relocate these dead bolt receptor things ...
To adjust the hinges you shove a screwdriver to the left of the middle round part below. This opens up the clam shell on the outside
The double glazng guys start getting nervous when a pair of french doors are 1.8m wide, so they put four hinges on each side rather than the usual three.
The inside got a layer of 25mm celotex over the top of the wood framing to reduce potential cold-spotting caused by the frame. Then a layer of polythene to keep the celotex dry, then the plasterboard.
I have put acoustic rockwool in the parttion wall....
We put a roof hatch up. The most unpleasant experience awaits those unfortunate enough to enter, claustrophobia, celotex dust and a 170mm rockwool chaser.
We clad the underside of the overhang and I inserted these led downlighters. This plastic stuff actually cuts quite well.
The problem with led bulbs is the surge when you turn them on. So I am not sure I can fit a motion detector on them. I need to do some more digging.
I thought that the tongue and groove pattern should run the other way. The guy that sells this for a living disagreed, as did someone behind me in the queue who fits it for a living, as did my builder. Their rationale being that you avoid a join this way.
We are trying to figure out how to get the pocket door in place ..... I bought a solid core unit with a veneered oak finish. This thing will hang from just 6 screws so fingers crossed.
I know from experence that when you have new builds that moisture from the floor and walls drying can be an issue. Cheap eggbox doors will warp - I hope this door behaves
I have also been experimenting with led strip lights. I think the answer is to place this stuff about 10cm below the height of my lowest backboxes (bally ss games)
It is 72w per 5m and casts a good light without glare or reflections ...
Last edited:
We are trying to figure out how to get the pocket door in place ..... I bought a solid core unit with a veneered oak finish. This thing will hang from just 6 screws so fingers crossed.
That door looks the same as the ones we've got in at home. They are heavy! I'm not at home at the minute but I think the chippy used 3 hinges per door because of the weight. Don't buy cheap hinges either. you want the heavy duty ones that are designed to take the weight.
looking good dave - I have a motion sensor on my soffit LED lights works fab - no issue at all. Have you used IP65 rated lights there as they look open faced ? I also used diecast aluminium ones as well so they won't rust as I am less than 1/2 a mile from the sea.
Where did you get your rubber roof from (I used rubber4roofs) as I used their trims for the edges which were also fantastic and neat. yours looks a little different to mine?
I am looking at some LED strips as well, but arduino controlled (as is the rest of the lighting in the shed) so I can work it all from my phone.
I ran my soffitt long ways - less cuts and only one join which you dont even notice - but horses for courses I guess! (i have yet to ventilate it which I must get around to doing)
If its any consolation I had the same issues with a 4ft set of french doors!!!
Keep taking the Gin!!! are you at play expo next week ?
Cheers
kev
Does not look like an egg box door possibly a chip board or a block wood one door with veneer on ")
Looking good David
Looking good David
@newdos
Thanks for your help. I am due to be at nlp.
What motion sensor did you use pls? I will get the same thing if yours does the job ok.
I am going to ventilate my overhang by putting in circular black plastic vents. Perhaps 2 inches across. Run a string along the underside. Do pilot holes first to get them nicely lined up, then use a holesaw.
The door weighs 50kg. It is held up by 6x 3" screws. We got it up on Friday. I was led to believe (lied to) that it was made of a plywood inner. When we routed the bottom to put the hidden guide track in (you can just see this at the bottom right of the photo), I could see that it was actually made of chipboard.
The screws did really bite in though. My makita battery drill got them so far in before the clutch kicked in on the maximum setting, then I finished them off with a manual screwdriver. So I am optimistic that it is not simply going to fall off.

The lights are ip65

Because I had roof trusses, it made my soffits much deeper than I would have liked. I tried rubber 4 roofs, but got mine from Permaroof. I went for the thicker of the two rubbers it sold. The firestone stuff.
Thanks for your help. I am due to be at nlp.
What motion sensor did you use pls? I will get the same thing if yours does the job ok.
I am going to ventilate my overhang by putting in circular black plastic vents. Perhaps 2 inches across. Run a string along the underside. Do pilot holes first to get them nicely lined up, then use a holesaw.
The door weighs 50kg. It is held up by 6x 3" screws. We got it up on Friday. I was led to believe (lied to) that it was made of a plywood inner. When we routed the bottom to put the hidden guide track in (you can just see this at the bottom right of the photo), I could see that it was actually made of chipboard.
The screws did really bite in though. My makita battery drill got them so far in before the clutch kicked in on the maximum setting, then I finished them off with a manual screwdriver. So I am optimistic that it is not simply going to fall off.
The lights are ip65
Because I had roof trusses, it made my soffits much deeper than I would have liked. I tried rubber 4 roofs, but got mine from Permaroof. I went for the thicker of the two rubbers it sold. The firestone stuff.
cool man all sounds very good - will have to catch up at NLP - are you stopping over ?
Cheers
kev
Cheers
kev
Hi Dave for your PIR - I used a cheap(£3) chinese one off ebay to prove the theory first - and it worked but lasted a month and now appears to have packed in. Reason I want to prove it was two fold one I am using 6 x 5w leds GU10 (which can be fussy when loads are small ie 30w total) and secondly, as it was replacing a standard light switch no neutral is present. Anyway as I said it worked fine, but now need to get a decent one to replace it and this is the one I am looking at buying
http://www.prefectcontrols.com/wp-content/uploads/PRE3204.pdf
Cheers
kev
http://www.prefectcontrols.com/wp-content/uploads/PRE3204.pdf
Cheers
kev
Well this thing has moved along. My builders are long off the job and doing other stuff for me.
We got the rubber roof on. This was a remarkably stressful endeavour. The rubber was maybe 50 sqm. We lifted it onto the roof with the infamous teleporter. It then blew off. It transpires that you do not need much wind when you have a "sail" of this size. The trees in the background give you an idea of the idiocy of our actions.

I reached for the jerry can to burn the whole place down. With the rubber roof going up in flames, it would probably have levelled this place quite effectively and also filled the sky with a suitably forboding black plume of smoke. But my builder had a better idea. Why not risk the lives of his henchman and my wife by getting them to sit on it to stop it blowing off ? Genius. What is the worst that could have happened ? He could have kept the unpaid labourer's money and I could have got a new wife. Game on...
With the henchman and my wife sat on the half rolled rubber at the top of the roof and me frantically putting paving stones on the unfurled rubber to stop it blowing the chaos ensued.
What we learnt was that rubber roofs are great. For flat roofs. My roof is not flat. What happens is that the rubber stretches under the weight of the roofer (whereas on a flat roof he would just compress it). SO when you remove your weight, the rubber gathers up like Norah Batty's stockings. But we were now fully pregnant with this one so had to keep on going.
As the glue went off it was possible for us to add to the madness by climbing up with paint stripping guns to heat the rubber, reactivate the glue and then roll it flat with metal rollers.

The finished result is not perfect, but is more than good enough. This technique really saved the day.
The guttering and flashings went up smoothly ...

The final product does look good. But only time will tell as in the summer this will all expand - so it really is a case of wait and see

I then got the inside plastered, this is the pocket door which seems to be working out OK ...

I now have a dehumidifier in there drying everything out. I am in no rush to get the floor screeded as the concrete raft foundation will actually be entombed in plastic. So I see no downside in being patient here and giving everything longer to dry out fully.
I really like ecotile floors. I first saw this product in gyms way back when ....
https://www.ecotileflooring.com/product/
The standard tile is 7mm thick and is aimed at industrial premises.

I have this stuff in my workshop and gym. It is ferociously expensive at around £30 per sqm + VAT. BUT if you keep going back to the website the company periodically has a batch that it is selling for £10 per sqm + VAT. So I have bought on this basis in the past.
These rubber tiles offer loads of benefits ...

So I ordered a load immediately as these things do not hang about.
That evening the company contacted me. It apologised saying that it had received two simultaneous web orders. So it offered to make up my blue order with another colour. OR pick any tile from the website in 6mm or 7mm ranges but at the discounted cost.
Now that is what I call customer service and is in stark contrast to the experience I had from the hardie plank suppliers and others during this build who operate on the "all customers are cheating, lying b@stards that do not pay their bills" methodology
The tiles arrived this morning and look superb. Like slate but so much easier to handle and more forgiving if you drop stuff on them. So I got the colour I wanted and 'er indoors had no grounds for complaint.

Crazy eyed Bella has added that these tiles will also help keep her bum warm ...

We got the rubber roof on. This was a remarkably stressful endeavour. The rubber was maybe 50 sqm. We lifted it onto the roof with the infamous teleporter. It then blew off. It transpires that you do not need much wind when you have a "sail" of this size. The trees in the background give you an idea of the idiocy of our actions.
I reached for the jerry can to burn the whole place down. With the rubber roof going up in flames, it would probably have levelled this place quite effectively and also filled the sky with a suitably forboding black plume of smoke. But my builder had a better idea. Why not risk the lives of his henchman and my wife by getting them to sit on it to stop it blowing off ? Genius. What is the worst that could have happened ? He could have kept the unpaid labourer's money and I could have got a new wife. Game on...
With the henchman and my wife sat on the half rolled rubber at the top of the roof and me frantically putting paving stones on the unfurled rubber to stop it blowing the chaos ensued.
What we learnt was that rubber roofs are great. For flat roofs. My roof is not flat. What happens is that the rubber stretches under the weight of the roofer (whereas on a flat roof he would just compress it). SO when you remove your weight, the rubber gathers up like Norah Batty's stockings. But we were now fully pregnant with this one so had to keep on going.
As the glue went off it was possible for us to add to the madness by climbing up with paint stripping guns to heat the rubber, reactivate the glue and then roll it flat with metal rollers.
The finished result is not perfect, but is more than good enough. This technique really saved the day.
The guttering and flashings went up smoothly ...
The final product does look good. But only time will tell as in the summer this will all expand - so it really is a case of wait and see
I then got the inside plastered, this is the pocket door which seems to be working out OK ...
I now have a dehumidifier in there drying everything out. I am in no rush to get the floor screeded as the concrete raft foundation will actually be entombed in plastic. So I see no downside in being patient here and giving everything longer to dry out fully.
I really like ecotile floors. I first saw this product in gyms way back when ....
https://www.ecotileflooring.com/product/
The standard tile is 7mm thick and is aimed at industrial premises.
I have this stuff in my workshop and gym. It is ferociously expensive at around £30 per sqm + VAT. BUT if you keep going back to the website the company periodically has a batch that it is selling for £10 per sqm + VAT. So I have bought on this basis in the past.
These rubber tiles offer loads of benefits ...
- Soft underfoot. Family members have had joint replacements so were sensitive to such things. These guys never liked the quarry tiles at my house for example. So I try to avoid hard floors like ceramics now.
- Easy to clean
- Thermal insulation
- Noise insulation
- Robust
- Dead easy to fit
- If you ruin one you can easily replace it
- IMHO, look great
So I ordered a load immediately as these things do not hang about.
That evening the company contacted me. It apologised saying that it had received two simultaneous web orders. So it offered to make up my blue order with another colour. OR pick any tile from the website in 6mm or 7mm ranges but at the discounted cost.
Now that is what I call customer service and is in stark contrast to the experience I had from the hardie plank suppliers and others during this build who operate on the "all customers are cheating, lying b@stards that do not pay their bills" methodology
The tiles arrived this morning and look superb. Like slate but so much easier to handle and more forgiving if you drop stuff on them. So I got the colour I wanted and 'er indoors had no grounds for complaint.
Crazy eyed Bella has added that these tiles will also help keep her bum warm ...
Looking Fab Dave and wondered how long before I would see another post. Sorry I missed you at PLAY next time I hope. Yes a very brave man putting rubber on a sloping roof and in the wind!!! At least you had a teleporter to lift it on - me and my mate hauled it up onto mine with 2 ropes - nearly killed us!!!
Still its looking sweet now !!!
I do like those floor tiles - I might use those for my sauna floor. Are they very waterproof to minor spills etc ?
How do you finished edges around doors and windows look now ?
Cheers
kev
Still its looking sweet now !!!
I do like those floor tiles - I might use those for my sauna floor. Are they very waterproof to minor spills etc ?
How do you finished edges around doors and windows look now ?
Cheers
kev
The tiles are water only resistant really. Water will find a way through to the floor. For wet bikes, wet dog they are fine but I would not want to expose to decent volumes of water
Ecotile is a premium product at a premium price. But that means you get good service. Give them a bell and ask for some free samples
The finished edges are unfinished ! I need to fill and paint the screw holes.......


Ecotile is a premium product at a premium price. But that means you get good service. Give them a bell and ask for some free samples
The finished edges are unfinished ! I need to fill and paint the screw holes.......
Doesn't look to bad though dave - the advantage of the picture frame effect I did means the french Doors when installed are well forward so they open all the way back - it looks like yours will bind on the side ??? if that's the case get some stays bud or they will see that hardieplank off in no time at all!!!
Yes I may get that flooring love the hidden interlocking ones you got FAB!
Cheers
kev
Yes I may get that flooring love the hidden interlocking ones you got FAB!
Cheers
kev
The offers on the ecotile website go really quickly so you do need to be quite vigilant to pick up a bargain.
I got these 7mm ones for our gym. They were a special run a few years ago. So ecotile was selling off the remnants. However I really like the colour and if I had more of the things I would have used them in my pinshed

The hidden join ones will be harder to fit, as with the standard ones do not need you to start in a corner. You are best starting in the middle of the room really. But there is not that much in it.
I got these 7mm ones for our gym. They were a special run a few years ago. So ecotile was selling off the remnants. However I really like the colour and if I had more of the things I would have used them in my pinshed
The hidden join ones will be harder to fit, as with the standard ones do not need you to start in a corner. You are best starting in the middle of the room really. But there is not that much in it.
Last edited:
Finally got the place screeded. What an absolute nightmare.
https://mcgraths.ie/cemfloor/
Thick plastic membrane on top of the raft foundation ...

Expansion foam placed around the edge to form a bed for the screed floor. The celotex has a layer of plastic sheet on top of it. The screeder users a laser level and these tripods to set the height of the floor in a few places ...


The consistency of the screed is checked by use of this gauge, water was added to the mixer lorry to get this right ...

The stuff is then pumped into place ...

Applied like this ...

Supposedly you can walk on this stuff within 24 hours and tile it in a couple of weeks
I am in no hurry to tile it, but will get on with the second fix electrical work and decorating in a few days
- Idiots
- Guys that do not show
- Noone offers any advice at all
- The screeders claim the reps do not call the screeders back with product info
- It does not dawn on anyone, anywhere that a three month wait might be inconvenient
- Moisture destroys celotex and renders it useless as an insulator
- Concrete reacts with the aluminium foil coating causing the thing to blow holes in your floor
https://mcgraths.ie/cemfloor/
Thick plastic membrane on top of the raft foundation ...
Expansion foam placed around the edge to form a bed for the screed floor. The celotex has a layer of plastic sheet on top of it. The screeder users a laser level and these tripods to set the height of the floor in a few places ...
The consistency of the screed is checked by use of this gauge, water was added to the mixer lorry to get this right ...
The stuff is then pumped into place ...
Applied like this ...
Supposedly you can walk on this stuff within 24 hours and tile it in a couple of weeks
I am in no hurry to tile it, but will get on with the second fix electrical work and decorating in a few days
Last edited:
D
Deleted member 2463
glad to see you got moving again on this. Kinda dreading Jan/Feb now.
Looking good David !
Just a thought when you are able to walk on it ,go in with a floor scrapper to take any high spots off ,if any , while it is still green ,just makes it a bit easier when tiling
Just a thought when you are able to walk on it ,go in with a floor scrapper to take any high spots off ,if any , while it is still green ,just makes it a bit easier when tiling
ventured onto the floor today.


I am running the lights - 3x70w led strip in the Pinball room and 2x60w led strip in the office to generate some mild heat
It is extremely humid ...

So I have my two dehumidifiers running. One will ultimately live in the Pinball room and one in my workshop


The floor is actually level. I checked the diagonals at the 4 corners of the Pinball room ...


The floor to ceiling height is remarkably consistent too within the Pinball room there is less than 10mm height difference between the 4 corners. Considering that this is room is approx 5m by 5m and made of wood, I think that is pretty good
My external pir sensor is excellent and designed for use with led bulbs. Led bulbs have a high inrush current so you need to choose your sensor carefully. Older models will get burnt out by leds.


The sensor is a luxomat lc plus 280. this has a 280 degree working angle and can take 165a inrush current.
I am running the lights - 3x70w led strip in the Pinball room and 2x60w led strip in the office to generate some mild heat
It is extremely humid ...
So I have my two dehumidifiers running. One will ultimately live in the Pinball room and one in my workshop
The floor is actually level. I checked the diagonals at the 4 corners of the Pinball room ...
The floor to ceiling height is remarkably consistent too within the Pinball room there is less than 10mm height difference between the 4 corners. Considering that this is room is approx 5m by 5m and made of wood, I think that is pretty good
My external pir sensor is excellent and designed for use with led bulbs. Led bulbs have a high inrush current so you need to choose your sensor carefully. Older models will get burnt out by leds.
The sensor is a luxomat lc plus 280. this has a 280 degree working angle and can take 165a inrush current.
Nice work David, I'm looking forward to a few pinshed grand openings next year . Maybe a new circuit could be formed, the UK pinshed tour.
. Maybe a new circuit could be formed, the UK pinshed tour. Been doing a few more jobs ...
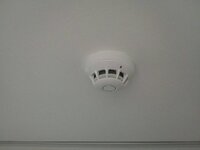
The second fix wiring is all done, burglar alarm fitted - including smoke sensors in each room. So if the sensors are triggered by 1970s wiring smouldering at night, the external alarm box will go off. I have worked with my electrician for 5 years now. He works on a day rate for me. It is really surprising how cheap burglar alarms, sensors, PIRs ... are, even ones that are made in the UK ....

Have got these LED strip lights behind the backboxes set to run off ordinary light switches. The main light switch sends the 240v to the two 12v transformers. You have to be careful with these LED strips - they may only be 70w each - but at 12v the 6A current could kill/ carbonise a regular light switch over time should you run the 12v directly through it.....

we put the relevant 2x 240v outputs from the 5 gang switch above into this arrangement on the other side of the internal wall ('er indoors' office) ....

this then goes to wall boxes as 12v ....

These de walt laser levels are absolutely superb. They self level then cast a laser beam horizontally and/ or vertically. I am most certainly not a tiler, nor kitchen fitter - but this level has enabled me to [painfully and pathetically slowly] fit kitchens and do tiling to a very good standard. Without it, I would not have stood a chance ....

It casts the beam with fantastic precision. This thing has been used for so many jobs over the last 4 years. Aligning pictures, establishing floor levels when fitting kitchens, setting cupboards for kitchens, tiling, lining up where to drill spotlights in ceilings, orientating strip lights, setting the levels for 240 sockets/ switches etc ....

The first of my three led strips for behind the backboxes is now up. The main one above uses a near full 5m run to cover 6 games. I am cutting the other one in half to cover 2x 3 games. I think these will give enough light by themselves when playing as I went for superbrights. I have also installed three really powerful LED ceiling lights for when I am doing maintenance. So this pinball room will have 350w of LEDs in it so that should be more than enough.

The walls and ceiling are painted now. I have sprayed water resistant foam into the gap at the base of the walls and screed to reduce draughts. Cut the surplus with a saw then booted it with a size 12 to remove it ...

The second fix wiring is all done, burglar alarm fitted - including smoke sensors in each room. So if the sensors are triggered by 1970s wiring smouldering at night, the external alarm box will go off. I have worked with my electrician for 5 years now. He works on a day rate for me. It is really surprising how cheap burglar alarms, sensors, PIRs ... are, even ones that are made in the UK ....
Have got these LED strip lights behind the backboxes set to run off ordinary light switches. The main light switch sends the 240v to the two 12v transformers. You have to be careful with these LED strips - they may only be 70w each - but at 12v the 6A current could kill/ carbonise a regular light switch over time should you run the 12v directly through it.....
we put the relevant 2x 240v outputs from the 5 gang switch above into this arrangement on the other side of the internal wall ('er indoors' office) ....
this then goes to wall boxes as 12v ....
These de walt laser levels are absolutely superb. They self level then cast a laser beam horizontally and/ or vertically. I am most certainly not a tiler, nor kitchen fitter - but this level has enabled me to [painfully and pathetically slowly] fit kitchens and do tiling to a very good standard. Without it, I would not have stood a chance ....
It casts the beam with fantastic precision. This thing has been used for so many jobs over the last 4 years. Aligning pictures, establishing floor levels when fitting kitchens, setting cupboards for kitchens, tiling, lining up where to drill spotlights in ceilings, orientating strip lights, setting the levels for 240 sockets/ switches etc ....
The first of my three led strips for behind the backboxes is now up. The main one above uses a near full 5m run to cover 6 games. I am cutting the other one in half to cover 2x 3 games. I think these will give enough light by themselves when playing as I went for superbrights. I have also installed three really powerful LED ceiling lights for when I am doing maintenance. So this pinball room will have 350w of LEDs in it so that should be more than enough.
The walls and ceiling are painted now. I have sprayed water resistant foam into the gap at the base of the walls and screed to reduce draughts. Cut the surplus with a saw then booted it with a size 12 to remove it ...
Attachments
Last edited:
D
Deleted member 2463
are you covering the LED strips at all? or will the machines be close enough you don't see it?
I did a trial run in my existing games room with the wall mounted led strips, just using masking tape to hold it in place. I have set them about 1.75 off the floor. Bally SS backboxes are lower than wpc ones, so I factored this in
My backboxes will be close enough together so you cannot see the leds when you are playing.
They are rather bright (72w per 5m, 5400 lumens) and they they are pretty unpleasant to stare directly at.
If need be, I will just paint the leds that fall between the backboxes. I got ip67 rated leds for a damp environment. The Leds are entombed in a clear silicone sleeve. I got these so I could easily wipe them clean and also to make painting them easy if need be
D
Deleted member 2463
Great idea. At the moment I’m thinking of having the shed builders put a lip all around the edge of the walls and then using LED strips same sort of power so there is light but no direct light. My current shed I have LED down lighters and they are terrible for glare. This will be done as a last minute item though as I have two parallel trusses to support the roof but finding it hard to get a feel for what they will be like when construction is complete.
Neil.
Neil.
The lighting is such a big decision in one of these sheds I would suggest that you do a trial and decide what works for you then factor into your final design. I have played pinball on so many places where the lighting spoils the games.
It is so much better to get the wiring planned in advance rather than having to redesign your scheme.
I have been trying to get my head around heating and power draw.
I am putting a night storage heater in the Pinball room. It is not about the money it is more about consuming power at night so that I do not draw too much power during the day.
My handwash unit can draw 10kw. This will be extremely rarely used, and I will dial it back to a half heat function. The storage heater is 3kw. The office needs a heater too. Say 1kw to 3kw. Then the kettle would be 2kw maybe ......
So electric heaters like these can trip your shed supply if used at once.
In the office I have finally landed (I think) on a wall mounted fan heater. Put it on a timer so it cannot be left on by mistake. This is just to top up the office if need be. My shed seems to need about 1 to 1.5 kW even in zero degrees ambient temperatures. So I think my storage heater will provide about enough for the whole building and will not consume any power during the day.
D
Deleted member 2463
What temp are you aiming for?
I want to have a decent base level temp in the Pinball room. The office can be cooler - but needs to have something that will get them temp up quickly when my wife uses it
I am probably going to get this ...
https://www.alertelectrical.com/dim...lTsVutk9kN3tfvrKz_8uvBmZeust-AIBoCycoQAvD_BwE
Controlled by this ..
https://www.tlc-direct.co.uk/Produc...zH4zflW14HgcCcVfhBqntdIMEIHGgDzBoCTv0QAvD_BwE
This thing will heat up her office very quickly and be out of the way about 2m up so we do not waste wall space. My electrician nearly talked me out of a fan heater as they are not the safest device. But this thing will be ok when twinned with the timer
I have found that with the internal door wide open the pin rooms current temporary fan heater keeps the office about 1 degree cooler.
Maybe 10 to 15 degrees in the pin room as a year round min with a dehumidifier going. At the moment I have been using the freezing weather outside to get a flavour for how much power the place needs.
I know that a modern electric heater with accurate thermostat would be better than the crude night storage heater - but we have so many thirsty appliances in our house ( there is no gas in my village so something like an induction hob has a massive power drain) that I do not want to use much juice heating the place with daytime electricity.
If you insulate the place well a 3kw fan heater will heat it up pretty quickly.
The problem is that a typical home electricity supply is only about 15kw. So the 3kw fan heater, 10kw water boiler (same power as an electric shower), and kettle would about trip the thing.
Hi Dave, I am using a 1.5kw oil filled wall mounted dimplex rad and it manages 15 oC with ease and thats in my 4.7m x 3.5 m room. Insulation is the key here as I'm sure you know. My app tells me exactly how long it is on each day and at the moment it is well within capacity - it was -6 here last night and it coped admirably.
cheers
kev
cheers
kev
Great read, like the (near) finished result, looks great, as does your dog
I'm needing inspiration, planning on the start of my build spring(ish) time next year, not just games room but for a couple of cars as well, you've certainly given me a few ideas.
Chris.
I'm needing inspiration, planning on the start of my build spring(ish) time next year, not just games room but for a couple of cars as well, you've certainly given me a few ideas.
Chris.
I have been waiting for the floor to dry so have not done much to the place for a while.
I have installed this electric roller blind. The cheapest ones are foam filled aluminium extrusions that provide a bit of insulation, but I find them a bit flimsy. The next level up is hollow aluminum with strengthening ribs inside, these contain about twice as much metal and are much more rigid. I got mine from a trade place so it was a right faff fitting it as there were no instructions other than for the electric switch.
Anyway, in, working, looks the part.


I have begun laying the tiles. They were stored in a cold garage. Today I found the right middles to lay them so there will be no silly cuts anywhere. I laid a few and brought in some others to warm up overnight.
I am keeping the shed around 15 degrees which is the minimum installation temperature for the tiles. You are meant to leave a 5mm expansion gap around the edge so I will lay the pre-warmed tiles then put the skirting boards on top to hide the perimeter.

The screed floor has cracked in exactly the point I feared. Right under my my pocket door. You get cracks in doorways due to the differential movement in the screed when it dries. Yet another happy chapter in the screedgate saga.

It is not too bad and I can't think it matters. The rubber tiles should hide a multitude of sins.
Now the thing is dry I can see how level it actually is. No matter how carefully they lay it, there is a risk of curling at the edges and cracking in the doorways. It looks like mine is level plus or minus 3mm in various spots.
I have installed this electric roller blind. The cheapest ones are foam filled aluminium extrusions that provide a bit of insulation, but I find them a bit flimsy. The next level up is hollow aluminum with strengthening ribs inside, these contain about twice as much metal and are much more rigid. I got mine from a trade place so it was a right faff fitting it as there were no instructions other than for the electric switch.
Anyway, in, working, looks the part.
I have begun laying the tiles. They were stored in a cold garage. Today I found the right middles to lay them so there will be no silly cuts anywhere. I laid a few and brought in some others to warm up overnight.
I am keeping the shed around 15 degrees which is the minimum installation temperature for the tiles. You are meant to leave a 5mm expansion gap around the edge so I will lay the pre-warmed tiles then put the skirting boards on top to hide the perimeter.
The screed floor has cracked in exactly the point I feared. Right under my my pocket door. You get cracks in doorways due to the differential movement in the screed when it dries. Yet another happy chapter in the screedgate saga.
It is not too bad and I can't think it matters. The rubber tiles should hide a multitude of sins.
Now the thing is dry I can see how level it actually is. No matter how carefully they lay it, there is a risk of curling at the edges and cracking in the doorways. It looks like mine is level plus or minus 3mm in various spots.
Last edited:
Looking good David , but the clock is ticking !! Only 52 days left before the grand opening
