Back in May I advertised for an EM playfield to do a bare wood restoration on. Slingshot99 offered me a Gottlieb Squarehead. It sounded ideal so a deal was done.
When it arrived I discovered that rather more work was needed than I had anticipated! The entire top veneer play surface was parting company from the rest of the plywood and there was no way it was going to be re-attached.


First job was to remove the rails and scan the playfield on my Epson A3 scanner. Three full sets of scans at 800dpi.
Then peel off the playfield, literally! I found American Maple veneer in a suitable size online. I’ve only veneered once or twice before and don’t have a large press so decided to use the dry PVA and heat method of application. This worked very well and was quite easy. I routed all the holes with a mini edge bit mounted in a Dremel. I also repaired a couple of areas on the back of the playfield. After sanding I primed with Createx UVLS clear gloss and set the playfield aside to prepare the artwork.


First step was to stitch the scans together in to a single file. Turns out that Photoshop has this ability built in and it works perfectly. Next was to replace all the missing areas of artwork on the playfield using Photoshop again. Then I added a layer with registration marks so that I could ensure that each colour layer would be in the right place.
Once I was happy with the artwork, it was time to split it into the colour layers. Squarehead has seven colour layers. White, flesh, yellow, orange, red, blue and black, applied in that order. Again, Photoshop has tools for separating colours into layers. It sounds easy, but takes hours to get it right. You need to modify each layer to make the actual painting process easier. Where a colour edge is against a colour that is painted after it, you need to expand the edge by 0.5 to 1.0mm so that you do not have gaps or white lines if the layers do not quite match up perfectly. However, where the edge is against/over a previously applied colour, you must not expand it. After what felt like months, I had seven colour files. Now, I needed to convert them to ‘vector’ files that can be used for cutting. This involves ‘tracing’ around every object in the file. After messing around with various different software packages, I settled on Inkscape for this step. Again, this step is reasonably simple, but very time consuming to find the right settings for each file.
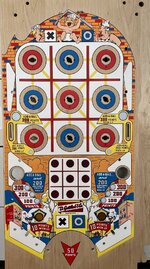
 Example of one colour file, this is the Red Layer.
Finally I was ready to cut the stencils on my Silhouette Cameo 4 Pro. I started by plotting each layer on to tracing paper to check it. Once I was happy with the files I then cut it from Oracal stencil film. This was the first major headache. The cut stencils were slightly different in size to the plotted sheets! They should have been identical. After wasting many many metres of film, I ditched the Silhouette and bought a Summa D60 vinyl cutter, rated as by far the most accurate cutter by most people in the trade.

The new cutter solved some of the issues, but not all. After tearing my hair out for weeks, I discovered that the tracing paper I was using is not dimensionally stable! I actually measured it expand by 4% overnight. No wonder the cut stencils never quite matched the tracing plots! I also then found that the programme supplied with the cutter was also not reliable, it would actually move small objects around by more than 5mm. I ditched it and invested in a third party programme recommended by the trade and that seems to be rock solid.
Finally I was able to paint. I started with Golden High Flow acrylic airbrush paints. These were great, easy to use and sprayed great. However, the layers would not adhere once fully cured. The first couple of layers would go on great and then once I got to the orange or red they would peel when I removed the stencil. I thought this was a problem with the paint, so tried several different paints. Eventually I worked out that the stencil film was leaving something on the paint that was affecting the adherence. Wiping each layer with lighter fluid after removing the stencil solved the issue!
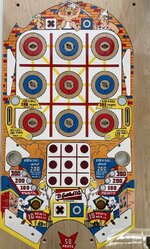
After too many false starts and sanding the paint off the playfield so many times that I have almost sanded through the new veneer, I have finally got a working system and a painted playfield. It’s not perfect. The black key lines are a bit too thick in many places, but I’m overall very happy with it. I’ve sealed the colour layers with 2k lacquer. This has caused yet another issue! The red inserts have suddenly bled through the white paint. So next job is to flat this down and re-paint the white before another couple of layers of lacquer. Once this is fully cured I will flat it back to reduce the gloss to be more in keeping with being an EM playfield.


I am now looking for the next candidate to restore. I’m not ready to take on commissions yet, maybe after the next one. So, if you have an old EM playfield that’s a little worse for wear and going spare, I’d love to take it off your hands for a few beer tokens.
When it arrived I discovered that rather more work was needed than I had anticipated! The entire top veneer play surface was parting company from the rest of the plywood and there was no way it was going to be re-attached.
First job was to remove the rails and scan the playfield on my Epson A3 scanner. Three full sets of scans at 800dpi.
Then peel off the playfield, literally! I found American Maple veneer in a suitable size online. I’ve only veneered once or twice before and don’t have a large press so decided to use the dry PVA and heat method of application. This worked very well and was quite easy. I routed all the holes with a mini edge bit mounted in a Dremel. I also repaired a couple of areas on the back of the playfield. After sanding I primed with Createx UVLS clear gloss and set the playfield aside to prepare the artwork.
First step was to stitch the scans together in to a single file. Turns out that Photoshop has this ability built in and it works perfectly. Next was to replace all the missing areas of artwork on the playfield using Photoshop again. Then I added a layer with registration marks so that I could ensure that each colour layer would be in the right place.
Once I was happy with the artwork, it was time to split it into the colour layers. Squarehead has seven colour layers. White, flesh, yellow, orange, red, blue and black, applied in that order. Again, Photoshop has tools for separating colours into layers. It sounds easy, but takes hours to get it right. You need to modify each layer to make the actual painting process easier. Where a colour edge is against a colour that is painted after it, you need to expand the edge by 0.5 to 1.0mm so that you do not have gaps or white lines if the layers do not quite match up perfectly. However, where the edge is against/over a previously applied colour, you must not expand it. After what felt like months, I had seven colour files. Now, I needed to convert them to ‘vector’ files that can be used for cutting. This involves ‘tracing’ around every object in the file. After messing around with various different software packages, I settled on Inkscape for this step. Again, this step is reasonably simple, but very time consuming to find the right settings for each file.
Example of one colour file, this is the Red Layer.Finally I was ready to cut the stencils on my Silhouette Cameo 4 Pro. I started by plotting each layer on to tracing paper to check it. Once I was happy with the files I then cut it from Oracal stencil film. This was the first major headache. The cut stencils were slightly different in size to the plotted sheets! They should have been identical. After wasting many many metres of film, I ditched the Silhouette and bought a Summa D60 vinyl cutter, rated as by far the most accurate cutter by most people in the trade.
The new cutter solved some of the issues, but not all. After tearing my hair out for weeks, I discovered that the tracing paper I was using is not dimensionally stable! I actually measured it expand by 4% overnight. No wonder the cut stencils never quite matched the tracing plots! I also then found that the programme supplied with the cutter was also not reliable, it would actually move small objects around by more than 5mm. I ditched it and invested in a third party programme recommended by the trade and that seems to be rock solid.
Finally I was able to paint. I started with Golden High Flow acrylic airbrush paints. These were great, easy to use and sprayed great. However, the layers would not adhere once fully cured. The first couple of layers would go on great and then once I got to the orange or red they would peel when I removed the stencil. I thought this was a problem with the paint, so tried several different paints. Eventually I worked out that the stencil film was leaving something on the paint that was affecting the adherence. Wiping each layer with lighter fluid after removing the stencil solved the issue!
After too many false starts and sanding the paint off the playfield so many times that I have almost sanded through the new veneer, I have finally got a working system and a painted playfield. It’s not perfect. The black key lines are a bit too thick in many places, but I’m overall very happy with it. I’ve sealed the colour layers with 2k lacquer. This has caused yet another issue! The red inserts have suddenly bled through the white paint. So next job is to flat this down and re-paint the white before another couple of layers of lacquer. Once this is fully cured I will flat it back to reduce the gloss to be more in keeping with being an EM playfield.
I am now looking for the next candidate to restore. I’m not ready to take on commissions yet, maybe after the next one. So, if you have an old EM playfield that’s a little worse for wear and going spare, I’d love to take it off your hands for a few beer tokens.