What's new
Pinball info

Register a free account today to become a member! Once signed in, you'll be able to participate on this site by adding your own topics and posts, as well as connect with other members through your own private inbox!

Glorified shed

domlouis

Registered
Joined
May 28, 2014
Messages
1,666
Location
Derby
The recent threads on cabins has got me to feel the need to start my own thread to document where I am up to with mine.
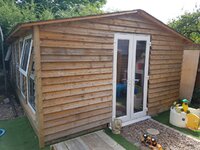
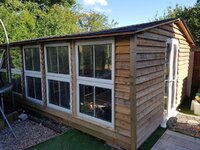
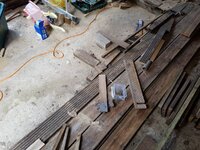
Whereas you might have been reading the tales of much better organised and experienced guys building their pad, mine is a story of making-it-up as I go along trying to build something on a small budget. The design philosophy has been recycling old materials as much as possible to reduce the cost.
I started mine in Sept 2015 but it is still nowhere near finished. Mainly due to my lack of time to work on it. I blame the children and work.
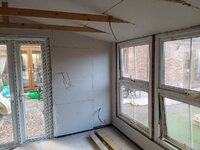
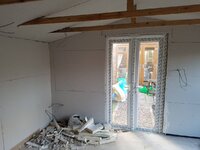
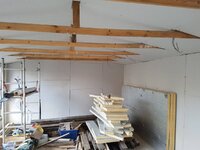
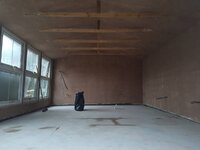
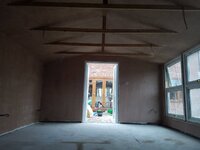
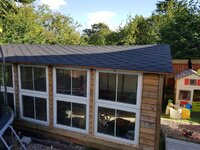
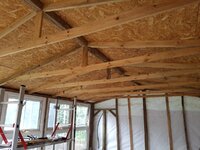
So far I have managed to make it water tight but not even all the external walls are complete.
I'll add some pictures later of what it looks like now and how I got to this stage.
To give you a feel, it is 6m x 4m. It has a pitched roof at 2.5m high. And so far it has costed me less than 500 pounds in new materials (the walls are built using old deck boards).
More to follow.
 
Oops this is what happens when you post threads on poor Wi-Fi signal.
Please remove one of the two threads.
 
A bit more about the materials used so far.

So there used to be two very old constructions in the garden (wood sheds?). Both made from railway sleepers standing vertically in the ground. Both with a solid concrete base.

They were old, roof less and derelict so we took them down. The railway sleepers have been re-used all over the garden (I love the fact that the sleepers are on their 4th life now). The concrete base was quite thick (about 5 inches deep) and by the time I had taken it up I was left with lots of flatish pieces of varying sizes up to half a metre square. There was so much of it I decided to keep it and used them as the bottom layer in my construction project (filling the gaps in between with new concrete). Assembling it was like a massive jigsaw.

So in my glorified shed the floor is a layer of this old concrete, a damp proof membrane and then another layer of concrete on top. I have only completed the bottom layer so far. I have bought the dpm and I have the sand and cement and mixer for the top layer. I should have said that I dug the ground out first to reach clay soil which I used as the surface on which to lay my concrete jigsaw.

The outer edge of the base is made of concrete blocks I obtained from various places mostly on gumtree and for free. The blocks are standing as they would in a house construction and they enable me to raise the upper wood structure off the ground. It is only one course high. Just enough and it runs all the way around the perimeter.

As the shed fits in a corner of the garden, there are two side walls without windows. Couldn't see the point of Windows looking at the fence. The third side wall (facing north so not so sunny anyway) is one of the 6m long one and it is made of 5 double windows next to each other. The upvc double windows (one window on top of the other instead of next to each other if that makes sense) came from gumtree. They were free, the lady I collected them from explained that they had been used in a conservatory for 6 months before being replaced. They were offered for free and nobody wanted them. She was about to skip them.

The fourth side is one of the short one, it has a set of double doors To get the pins in and out easily. I couldn't get the doors for free but I found on ebay a good deal on a set of spare new upvc one. I think they were 90 pounds and the guy delivered them.

The walls as I have already explained are made of wood. The frame uses the deck joists of the decking I pulled out and the cladding is the deck boards fitted as you fit feather edge boards (overlapped but horizontally) with the non-walking side of the boards facing the inside so that it isn't too obvious that they are deck boards.
I was a bit short of boards but I managed to find some cheap lot that had been pulled up like mine. That was 30 pounds and that covers one of the short sides of the shed facing the corner.

I should have added that between the frame and the cladding there is a breathable wall membrane. I had to buy that. And it only comes in 100m rolls. Anybody wants some as I have loads spare.

For the roof I didn't have any materials I could use readily so I bought wood from a local place that stocks all sort of reclaimed wood. From this I made my own trusses and they sold me osb boards too. I can't remember exactly how much it was in wood but I am sure it was less than 100 pounds.

Next I had to cover the osb boards with something and I used felt tiles I bought from ebay. I think that cost me about 250 pounds. They were new. They come in strips of about 1m length and you overlap them. It looks ok, vaguely like tiles and better than simple felt.

And that's about where I am with it. I'll show some pictures of what it looks like when I get back from my hols.

The plan is to insulate the walls and roof with reclaimed insulation boards. A guy on eBay specialises in selling lots of this stuff. Likely to be 200-300 for roof and walls.

Electrics-wise I have had to run a large core cable back to the garage to connect to the mains as a new circuit. There will be a fuse board in the shed for two local rings, one for the sockets and one for the lights. Screwfix sells one for 35 pounds I think. I'll have to hire a sparky to do the connections.

The bits i worry about are: keeping it a reasonable temperature in the winter (what shall I use?), condensation (I haven't planned for it so I might get it) and security (I haven't worried about it up to now but the fact that others are in their threads has started to worry me).

My biggest worry is not having enough time to spend on it. I have no building experience and hence everything takes me ages to do plus I have no time to spend on it anyway. That explains why it has taken me 2 yrs to get to this stage.

Pictures to follow at the weekend.
 
Yes the windows are PVC and yes there is drainage holes at the bottom which are now... behind the wood... but in front of the block work (if that makes sense).
The wood underneath the windows covers the block work (2 high at this location only). And the windows are resting on top of the block work.
The hope is that whatever water finds its way inside the window frame and wants to exit via the drainage holes runs behind the wood but in front of the blocks.
And the plan is to limit the ware ingress as much as possible by sealing the wood frame that runs all around the windows (only the first window shows it at the moment).
Is there anything else i am missing?
 
@domlouis

My shed is being massively overspecced as a pinball shed as the starting point was an office for my wife, so it needs to be warm, dry and quiet on the worst weather day of the year. If not, she will not use it

With yours, I would suggest ...

Security - I have something like this on my shed. It looks the part (which is what you need) and will put most folk off ...

image.jpeg

For windows, go for "burglar bars" - a local metal gates workshop would knock these up for very little. Fix on the inside, make sure they are visible on the outside ..

image.jpeg

On insulation, you must keep it dry, whatever you use. You need a breathable membrane (tyvek or similar) between the external wall and the insulation.

If you are patient, get foil backed celotex/ kingspan/ xtratherm From ebay. Folk order too much, then sell it on. It is very light but comes in unwieldy 8ft by 4ft sheets. Insulation giant offers good online prices. Builders merchants will rip you off. About 50mm should do it on the walls and 50 or 75mm for the roof. All these firms have technical departments who can talk you through the condensation issues.

Rocksil wool is cheaper, but you need about double the thickness so it depends how much internal space you can lose. If i could have gained a few inches here and there with my build, I would have used rocksil on my walls.

Why not do a warm roof for your shed ? This preserves space inside. You put a thick polythene membrane on top of the upper wood surface of the roof. Then the celotex. Then osb3 board (a type of cheap plywood), screw this sandwich together then put epdm rubber on the roof.
 
Looking good for someone that has no experience!!! A little to much glass for me as this could lead to lots of reflections on the pins.

In terms of condensation, I did a lot of research on this and found that the key is to stop warm from the inside meeting cold air from the outside which then becomes condensation. I was told the way to do this is ton insulate with celotex or rockwool etc and keep the insulation touching your inside walls but then leave an air gap behind the insulation and the outside wall. The same for the roof.

Hope that bit of info helps.

Cheers

kev
 
Another couple of photos showing the roof trusses and the bottom layer of concrete.
 

Attachments

  • 20170813_180411.jpg
    20170813_180411.jpg
    160.8 KB · Views: 74
  • 20170813_180437.jpg
    20170813_180437.jpg
    243.2 KB · Views: 73
Carl
The joists are connected to the rafters (had to look up on Google to understand what both these were!) With screws. The very shallow angle on the joists where they connect to the rafters made that very easy.
It is an interesting dilemma to try to build something less than 2.5m tall, with a pitched roof and that must be able to accommodate pinball machines that are nearly 2m tall...
 
I understand the comments on the amount of windows. I had all these free windows and I was trying to use as many as possible. I didn't intend initially to have so many but in the end decided that it was helping with not having to find too much extra wood.
In my defence I would say that this wall is facing north and hence despite all the windows it is still not overly bright in there.
Don't feel you have to defend anything mate, looks great and natural light is awesome, some curtains or blinds will stop the pins fading if that's a concern and if you move house the next owner will love the windows! Children and work slow everything to a snails pace so well done for getting this far and good luck finishing it off!
 
Don't feel you have to defend anything mate, looks great and natural light is awesome, some curtains or blinds will stop the pins fading if that's a concern and if you move house the next owner will love the windows! Children and work slow everything to a snails pace so well done for getting this far and good luck finishing it off!

Or just put some light window tint on the windows as most of them will block over 90% of the uv out. Cheap and good looking option :)
 
Carl
The joists are connected to the rafters (had to look up on Google to understand what both these were!) With screws. The very shallow angle on the joists where they connect to the rafters made that very easy.
It is an interesting dilemma to try to build something less than 2.5m tall, with a pitched roof and that must be able to accommodate pinball machines that are nearly 2m tall...
So is it a butt joint and screwed underneath or a half lap and screwed on the side ?
 
To me that is not strong enough :(
The angle and weight will push the walls out etc etc .
Glue some 1/2 ply to one or both sides of the truss ( the triangle thing you made ) .fix it with screw's or nails in a zig zag pattern about 6" center's ,that will stop the trusses pulling it's self apart :)
 
Great work Dom, just shows what can be done on a budget, if you shop around and do most of the work yourself.

With all these buildings of new sheds and outhouses there shouldn't be a lack of venues for next year's league meetings. :p
 
It is my goal ultimately but I am really not sure it will be read for next year!
 
Update. First fix electrics done. Insulation boards in place. Plasterboard fitted.
Progress has been made as she forced me to face the fact that it was just taking too long. So I paid people to do it which is against the grain but nevermind. I am pleased with how it is shaping up.
Next is plastering.
 

Attachments

  • 20180313_171446.jpg
    20180313_171446.jpg
    133.5 KB · Views: 67
  • 20180313_171444.jpg
    20180313_171444.jpg
    107.7 KB · Views: 63
  • 20180313_171417.jpg
    20180313_171417.jpg
    109.6 KB · Views: 61
Looks great! one thing with those windows though which for flexibility of use is superb - but I think might give you more condensation and worth keeping an eye on.


Sent from my iPhone using Tapatalk Pro
 
Yes i am really worried about condensation. I have got myself a thermometer and hygrometer (is that the right name???) anyway something to measure moisture levels inside. And I have my eyes on a dehumidifier too. Once it is completed I'll keep a close eye on moisture levels to try to limit the risk of condensation.
 
Back
Top Bottom