Fubar
Site Supporter
So this one ends up being a little bit more than I'd bargained for - the further I get into it the more stuff I want to fix/replace. But this is no mint resto just a jolly good tidy up so here we go....
First I played a couple hundred games on it because it's a really fun game! Had a couple immediate issues:
After that I got a LED kit and replaced all the inserts and backbox lights. The sockets in the backbox didn't make very good contact and I had to wiggle a few of them to get them all to light up consistently. But in the end all good, just the GI left for now. Again thought I had a photo of that but anyway not super interesting...
The sign above the supercharger ramp was broken but a new one was included in the sale - that wasn't hard to fit and later I plan on getting some @Colywobbles plastics to protect it from further destruction")

The playfield has mylar (I guess from the factory) which is overall in OK condition. It's creased in some insignificant areas like around some posts, and someone seems to have tried their hand at removing it under one of the plastics. Some of the inserts are also slightly raised, for example the hold bonus. This affects ball travel a bit, so the plan is to warm it up with a heat gun and bang them back down. Not feeling too confident about this bit so putting it off for now!

Now the main issue in my view is rust, mostly just light surface rust in particular parts which are in contact with wood. Guess this game spent some time by the seaside?


In most cases it's very light as I said, but the worst however is the lockdown receiver, I think it must have soaked up a few beers, in fact the bar's beer seal doesn't seal much anymore and will be getting replaced! Got some evaporust as others seem to be having success with it: first problem 1L isn't enough!! Will see how it does after a soak, in the meanwhile took the supercharger apart for a much-needed clean.


The sale also included some un-fitted mirror blades. One of the previous owners was clearly hoarding parts to do some kind of restoration but never got round to putting in the hours. I must say it gets a bit depressing when there's so much to be done ... ! Anyway with help from my darling wife the playfield came out of the machine and I gave the inside of the cab a much needed sweep & hoover. (This pic is before!)

As you can tell by now this is a bit of a basket case and I have to draw the line somewhere as I don't have the time to do a proper resto, but couldn't bear to sell it without fixing some of the worst things (in particular the high voltage electrics mentioned above!).
Next jobs: fit the mirror blades (waiting on some screws), put the playfield back in & LED the GI, rebuild the gyro resistor PCB which is all black, fit new back glass channel (current one is broken), fit new decal around the shifter stick (currently missing), sort out the raised inserts, and of course put everything back together
First I played a couple hundred games on it because it's a really fun game! Had a couple immediate issues:
- Game tripped the fuse maybe 1/5 times when it was powered on. The power box was totally bodged: no fuse holder, no thermistor nor varistor, and the fuse itself bypassed with a wire

So I rebuilt that... (sorry forgot to take a before pic of the box but here is the hacked fuse)


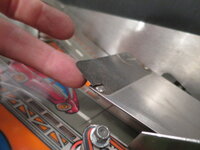
- Upper flipper sometimes stuck up. It would go back down when the game was switched off, or could be coaxed back down manually. Very weird!! Turns out the EOS switch mounting screws were making contact with the coil wire! Turned them the other way around and the fault vanished. Took the opportunity to replace the parts from the rebuild kit which was included in the sale.

- The auto-launcher also didn't usually make it around, that was solved by replacing the plunger with a new one.
After that I got a LED kit and replaced all the inserts and backbox lights. The sockets in the backbox didn't make very good contact and I had to wiggle a few of them to get them all to light up consistently. But in the end all good, just the GI left for now. Again thought I had a photo of that but anyway not super interesting...
The sign above the supercharger ramp was broken but a new one was included in the sale - that wasn't hard to fit and later I plan on getting some @Colywobbles plastics to protect it from further destruction
The playfield has mylar (I guess from the factory) which is overall in OK condition. It's creased in some insignificant areas like around some posts, and someone seems to have tried their hand at removing it under one of the plastics. Some of the inserts are also slightly raised, for example the hold bonus. This affects ball travel a bit, so the plan is to warm it up with a heat gun and bang them back down. Not feeling too confident about this bit so putting it off for now!
Now the main issue in my view is rust, mostly just light surface rust in particular parts which are in contact with wood. Guess this game spent some time by the seaside?
In most cases it's very light as I said, but the worst however is the lockdown receiver, I think it must have soaked up a few beers, in fact the bar's beer seal doesn't seal much anymore and will be getting replaced! Got some evaporust as others seem to be having success with it: first problem 1L isn't enough!! Will see how it does after a soak, in the meanwhile took the supercharger apart for a much-needed clean.
The sale also included some un-fitted mirror blades. One of the previous owners was clearly hoarding parts to do some kind of restoration but never got round to putting in the hours. I must say it gets a bit depressing when there's so much to be done ... ! Anyway with help from my darling wife the playfield came out of the machine and I gave the inside of the cab a much needed sweep & hoover. (This pic is before!)
As you can tell by now this is a bit of a basket case and I have to draw the line somewhere as I don't have the time to do a proper resto, but couldn't bear to sell it without fixing some of the worst things (in particular the high voltage electrics mentioned above!).
Next jobs: fit the mirror blades (waiting on some screws), put the playfield back in & LED the GI, rebuild the gyro resistor PCB which is all black, fit new back glass channel (current one is broken), fit new decal around the shifter stick (currently missing), sort out the raised inserts, and of course put everything back together


 Ordered a new one from pinballshop.nl, got here promptly without having to pay too much duty which I was happy with. One of the connectors is fused onto the board so I will have to cut that off and fit a new one. Will need to find my IDC insertion tool first though - but that's a job for tomorrow!


