What's new
Pinball info

Register a free account today to become a member! Once signed in, you'll be able to participate on this site by adding your own topics and posts, as well as connect with other members through your own private inbox!

Complete Demolished Man!! - A painful and very slow shop log!

First flipper mech rebuild complete stood next to the other one to do next - bit off a difference!!!

IMG_1026.JPG

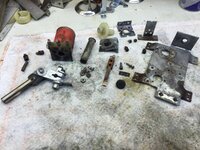
the other one now pulled to bits ready for clean up and plating

IMG_1027.JPG

Cheers Kev
 
And here it is done stood next to the upper flipper mech which is next

IMG_1028.JPG

Pulled this mech to bits and soon found out why the hold didnt work on the flipper!!! see the snapped coil wire
IMG_1030.JPG

Now fixed and this mech also complete!!!

All 3 flipper mechs done

IMG_1033[1].JPG

Onto a couple of opto mounts next and the shooter mech

IMG_1031.JPG
Very badly rusted and pitted so not sure how these will do

shooter mech before

IMG_1032.JPG

Cheers Kev
 

Attachments

  • IMG_1029.JPG
    IMG_1029.JPG
    167.2 KB · Views: 12
More progress on de rusting and plating!!

Those really badly rusted optos done - not brill but better

IMG_1043.JPG

Also did the top divertor yesterday - from this.......
PB300442.JPG

to this!!!
IMG_1038.JPG

Next fro the treatment was the ball popper - quite a big mech to do

Before - wasnt to bad

IMG_1039.JPG

and after.......

IMG_1051.JPG

Thats all for yesterday on with the ball trough today gonna be fun this one as its a large part and very awkward to clean

here are a couple of befores......

IMG_1044.JPG IMG_1046.JPG IMG_1048.JPG

Will show you the results later

Cheers Kev
 
OK here it is finished today - not bad compared to how it was above!

IMG_1056.JPG

Next job was to tackle this beast, but as you can see it is held together with sticky tape and tie wraps!!

IMG_1052.JPG IMG_1053.JPG

So all I have done for today is take it apart - well it fell apart, and then clean it up ready to go to the welders

IMG_1055.JPG

That's it for today folks!!!

Cheers Kev
 
Refitted a lot of the mechs to the playfield today (put all the coils on the flippers the right way around as well as I always fitt them back to front DOH!) - so in this pic you can now see how much of the playfield is complete - about 1/3rd !! long way to go. The red line is about where I am up to

upload_2016-2-5_16-22-41.png

And here is the closest before I could find for comparison !!!

upload_2016-2-5_16-25-14.png

Cheers Kev
 
Last edited:
Bit of soldering tomoz me thinks, then move on up the playfiel - more lampholders to replace and switch plates to de-rust and zinc plate!
 
All this metalwork that you turn from rusty to shiny, that's your acid bath followed by your home zinc plate bath? It's seriously impressive, does it have a cost, a price in renewable ingredients etc?
 
From what I've read before you get an even better finish if u blast it on a polishing wheel before plating. Like the pitting on the opto plate blast on the scotchbrite wheel then a quick Polish ud get a well good finish with your playing. Still awesome results your getting might do it myself on my next project
 
From what I've read before you get an even better finish if u blast it on a polishing wheel before plating. Like the pitting on the opto plate blast on the scotchbrite wheel then a quick Polish ud get a well good finish with your playing. Still awesome results your getting might do it myself on my next project
Hi Rudi - all the metal work has been seriously blasted on the grinder with a poly wheel on but the pitting is so deep it would have to be filled - ie copper plate it first then flow solder into it then zinc it but that is way to time consuming and costly!!!

Cheers Kev
 
All this metalwork that you turn from rusty to shiny, that's your acid bath followed by your home zinc plate bath? It's seriously impressive, does it have a cost, a price in renewable ingredients etc?
Thanks Dan - the chemicals in the kit have done everything so far and will do a hell of a lot more then there's enough chemicals with the kit to make another complete set so guess it will last for a good while. It claims it will plate 34000 sq cms !!!

Cheers Kev
 
Hi Rudi - all the metal work has been seriously blasted on the grinder with a poly wheel on but the pitting is so deep it would have to be filled - ie copper plate it first then flow solder into it then zinc it but that is way to time consuming and costly!!!

Cheers Kev

Oh right I didn't realise I thought u had just acid dipped em
 
Oh right I didn't realise I thought u had just acid dipped em
Nah mate serious buffed on the poly wheel quickest way to get rust off then acid dipped before plating. Results on good metal is fantastic!!!
 
Kev, what does the kit need in terms of ventilaition and how long do you leave things in the various stages? I don't have a garage so would have to do this in the kitchen....just wondering if that's safe if there are fumes etc :)
 
Kev, what does the kit need in terms of ventilaition and how long do you leave things in the various stages? I don't have a garage so would have to do this in the kitchen....just wondering if that's safe if there are fumes etc :)
fumes aren't bad at all just keep a window open and away from naked flames as you do get a bit of hydrogen emitted. I put it in the degreaser for 5 mins in the acid pickle until it stops bubbling then in the plating bath which varies from a couple of mins to an hour dependent on the size or numbers of bits you are doing at once. Then it goes into a weak HNO3(Nitric acid) bath for 10 secs and finally in the passivate for 30 secs (be it blue or yellow passivate).
Trick is the voltage flowing through the electrolyte - 1.2v DC seems to best, higher for big parts say 1.5, and lower for small parts 1.0, and that is measured by putting you pos probe into the electrolyte solution and the neg on your negative 12v supply terminal.

It's all in the instructions with the kit

Shout if you need any help - might try and do a video on a small part if anyone wants to see it from start to end result.

Cheers Kev
 
It's all in the instructions with the kit

Shout if you need any help - might try and do a video on a small part if anyone wants to see it from start to end result.

I'd love to see that, as well as know which kit you got, and from where. I've got a few machines here w/some rusty fixtures on them that could use a plating like that.

Your results look AWESOME. /me is totally jealous
 
deinitely want to see the video Kev - include the buffing bit as well if you can
Will do one next time I do some plating then dan and show you how it is all done. Should be sometime next week.

Cheers Kev
 
Loving what your doing on this so far Kev quality work ..
id also like to see that metal witchcraft your doing. I'm even thinking about buying the kit and i haven't even got a project pin to use it on:hmm:
But in all fairness i know for SURE i don't want to watch you buffing your thing first.. Jesus !!
hahaha!!!!! watch this space!!!

Cheers Kev
 
Hi Rudi - all the metal work has been seriously blasted on the grinder with a poly wheel on but the pitting is so deep it would have to be filled - ie copper plate it first then flow solder into it then zinc it but that is way to time consuming and costly!!!

Cheers Kev
Howdy Kev.

What would they come out like if they were shotblasted ? Do you think it would be a better finish than using the poly wheel ?
The shotblaster at work is about the only thing that survived the Christmas flood and I like the look of the stuff that you have plated.
 
Howdy Kev.

What would they come out like if they were shotblasted ? Do you think it would be a better finish than using the poly wheel ?
The shotblaster at work is about the only thing that survived the Christmas flood and I like the look of the stuff that you have plated.
Hi andrew,

I got some stuff shot blasted, it removed the rust and the general surface is very smooth and will plate fantastic - only problem is, even shot blasting will not remove the pitting, unless you use a much coarser material than sand, and then I guess you will have to take away a lot of the surface to get to that level

Cheers Kev
 
Hi, Kev,

The coil for the upper flipper is missing a diode as well, though it's not essential on the Fliptronic II system (Getaway & later).
 
Hi, Kev,

The coil for the upper flipper is missing a diode as well, though it's not essential on the Fliptronic II system (Getaway & later).
Yeah I noticed that and thought it was odd that it only had one on - so guess it it came out of factory like that ??

Cheers Kev
 
Better eyes than me man I will stick one on just to be sure

Cheers Kev
 
Next bits purchased for the DM Got these off Ebay from the croation guy - good price just hope they are ok - anyone fitted any of his yet ?

upload_2016-2-9_20-56-20.png

Cheers Kev
 
Back
Top Bottom